Login with Google in Android: Easy Step-by-Step Guide
Updated: October 15, 2025
Adding a "Login with Google" option is one of the fastest ways to improve user onboarding for your Android app. It's a secure, one-click sign-in process that saves users from having to create and remember yet another password, which is a huge win for reducing sign-up friction. Honestly, it's a strategic move that boosts adoption and builds trust right from the start.
Why Google Login Is Essential for Android Apps#
Before we jump into the code, let's talk about why adding Google Sign-In is more than just a technical checkbox. It's a fundamental upgrade to your user experience that directly impacts your app's success, especially on Android where Google accounts are almost universal. The main benefit here is frictionless onboarding. Users can create an account and sign in with a single tap, completely bypassing those tedious forms nobody likes to fill out.
This simple change can have a massive ripple effect on how you acquire and keep users.
- Boosted Sign-Up Rates: When you lower the barrier to entry, more people are willing to give your app a shot. Just removing that "create a password" step can make a huge difference in your conversion rates.
- Enhanced User Trust: People already know and trust Google's security. By using Google Sign-In, you're essentially borrowing that trust, making users feel more comfortable with your app from day one.
- Simplified Profile Creation: You can request basic profile info like their name and email straight from their Google account. This lets you pre-fill forms and personalize the experience from the very first interaction.
A Strategic Advantage in a Mobile-First World#
The dominance of Android in the mobile market makes this integration even more critical. As of September 2025, Android holds a staggering 75.18% of the global mobile OS market. That means roughly three out of every four smartphone users are on an Android device. This ubiquity means nearly every potential user already has a Google account, making it the most natural authentication method you could possibly offer.
Google Sign-In also opens the door to seamless connections with other vital Google services, like when you're integrating services with Gmail. This creates the kind of connected ecosystem that modern users have come to expect.
By simplifying the login process, you aren't just adding a feature; you are removing the biggest hurdle between a potential user and an active one. It's a strategic decision that pays dividends in user growth and engagement.
Real-World Scenarios and Benefits#
For a better sense of how Google Sign-In enhances the user experience, we've outlined some key benefits for both users and developers.
Key Benefits of Google Sign-In for Android Developers#
| Benefit | Impact on Users | Impact on Developers |
|---|---|---|
| One-Click Onboarding | Eliminates the need to create and remember new passwords, making sign-up effortless. | Dramatically increases sign-up conversion rates by reducing user friction at a critical step. |
| Enhanced Security | Users trust Google's robust security infrastructure, reducing anxiety about data privacy. | Offloads complex authentication and password management, lowering security risks and development overhead. |
| Profile Personalization | Allows the app to pre-fill profile information, creating a personalized experience from the start. | Simplifies data collection for user profiles, enabling immediate personalization and better engagement. |
| Cross-Device Sync | Provides a consistent and seamless sign-in experience across all of the user's devices. | Facilitates easier implementation of features that require a persistent user identity across platforms. |
These advantages show that integrating Google Sign-In is a clear win-win, improving the app for users while making the developer's job easier.
Imagine an e-commerce app. With Google Sign-In, it can instantly grab the user's name and email to personalize the welcome screen and streamline the checkout process. Or think of a productivity app that could use it to sync user settings and tasks across multiple devices without any extra effort. This isn't just theory; it's a practical tool for building better, more user-friendly applications from the ground up.
You can find more details on implementing various social logins in our guide on adding social login with Google to your app.
Time to get our hands dirty. This is where we lay the groundwork to get Google Sign-In up and running in your project. It might look a little complicated at first—jumping between the Google Cloud Console and Android Studio—but I'll walk you through it, step by step.
Think of this part like giving your app a passport. Before your app can talk to Google's servers, Google needs to know who it is and what it's allowed to ask for. This whole setup process is about creating that official identity. Before we get into the specifics, it's good to have a handle on the basic software integration principles that make all of this possible.
Setting Up in the Google Cloud Console#
First stop: the Google Cloud Console. This is your command center for everything related to Google services, and it’s where we'll tell Google about your Android app.
- Create a New Project: If your app doesn't already have a project in the console, you’ll need to create one. Name it something obvious, like your app's name, to keep things organized.
- Enable the Right API: In the API library, search for the "Google Sign-In API" and flip the switch to enable it. This is a small step that’s incredibly easy to forget, but without it, every single sign-in request will fail.
- Configure the OAuth Consent Screen: This screen is what your users will see when they're asked for permission. You'll need to add your app's name, a support email, and maybe a logo. Make it look professional and trustworthy.
This initial setup is what gives you the unique credentials your app needs. For a more detailed walkthrough, check out our guide on how to get a Google OAuth Client ID.
This infographic gives you a quick visual of the whole workflow, from the cloud setup down to your local Android project.
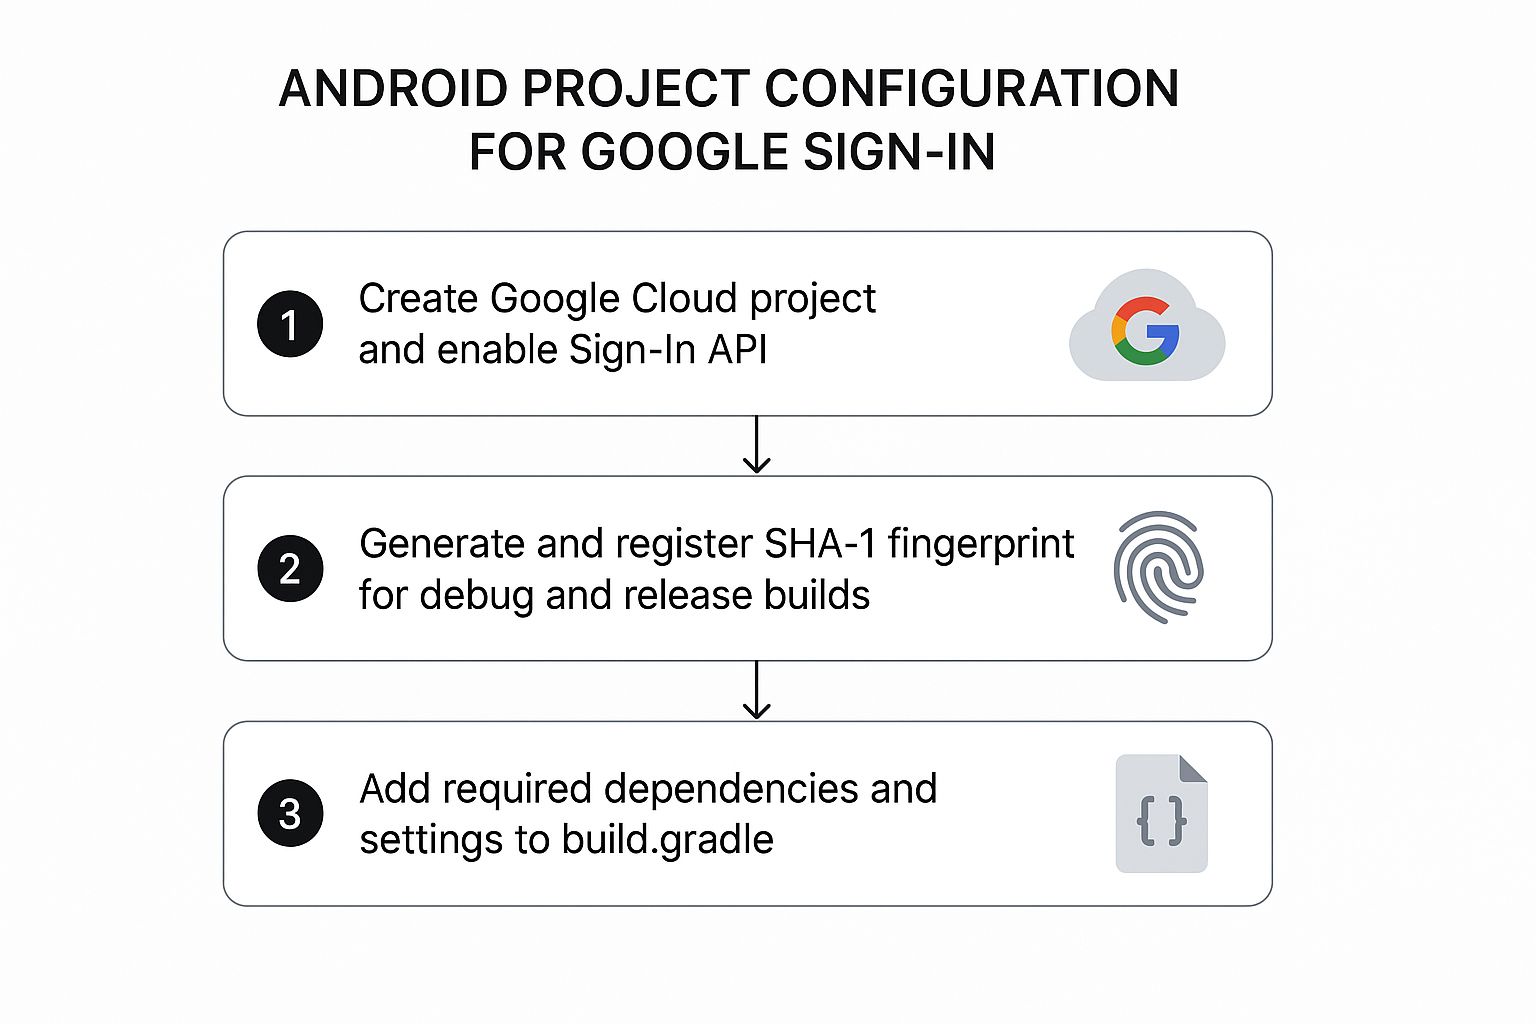
As you can see, it's a logical flow. We set things up in the cloud, then connect them to our local project to make sure everything can talk to each other securely.
Generating Your SHA-1 Fingerprint#
Now for the part that trips up just about everyone at some point: the SHA-1 fingerprint. This is basically a unique digital signature that Google uses to confirm your app's authenticity. You'll need one for your debug build (while you're testing) and a different one for your release build (for the Play Store).
Pro Tip: Never, ever use your debug SHA-1 key for a release build. It's a classic security blunder that can leave your app vulnerable. Always generate a separate, secure key for the version you publish.
Getting the debug key is easy enough in Android Studio; you can just run a Gradle task. For the release key, you'll need to use the keytool command on your production keystore file. Once you have these SHA-1 values, you have to add them to your project's credentials back in the Google Cloud Console. This is the final piece of the puzzle that links your app's binary directly to your cloud project.
Finalizing Your Android Studio Setup#
With the cloud configuration done and your SHA-1 keys in place, the last step is to tell your Android project how to use them. This means adding a few key dependencies to your app's build.gradle file.
You’ll need to pull in the Google Play services auth library. This library has all the code required to actually trigger the sign-in flow.
implementation 'com.google.android.gms:play-services-auth:21.0.0'
You'll also need to apply the Google services plugin at the top of your build.gradle file. This little plugin is what reads the google-services.json file (which you download from your cloud project) and securely makes your API keys available to your app. Once you sync these dependencies, your project is officially wired up and ready for you to build the user-facing sign-in button.
All right, with the setup out of the way, it’s time to get into the fun part: building the actual login experience. This is where we’ll write the code that shows the Google Sign-In screen to the user and then gracefully handles whatever they do—whether they log in successfully, hit the back button, or run into an error.
We're going to use modern Android practices here, specifically the ActivityResultLauncher. This is a much cleaner and safer way to get results back from another activity compared to the old onActivityResult method. Trust me, it makes your code more readable and easier to maintain down the line.
Configuring the Sign-In Request#
First things first, we need to tell Google exactly what information we want from the user's account. We do this with a GoogleSignInOptions object. Think of it like a request form where you specify the permissions, or scopes, you need for your app to function.
For a basic "login with google in android" feature, you really only need a couple of things:
- Email: The user's primary email address, which is perfect for a unique identifier.
- Profile: Basic public info like their name and profile picture.
Here’s how you set that up in Kotlin. You'll want this code to run when you're initializing your activity or fragment, usually right inside the onCreate method.
// Configure sign-in to request the user's ID, email address, and basic profile.
// ID and basic profile are included in DEFAULT_SIGN_IN.
val gso = GoogleSignInOptions.Builder(GoogleSignInOptions.DEFAULT_SIGN_IN)
.requestEmail()
.build()
By using DEFAULT_SIGN_IN, we're already getting the user's basic profile. Tacking on .requestEmail() just adds that one extra, crucial piece of information. This little object is the foundation of our entire sign-in flow.
Creating the Client and Handling the Result#
With our options defined, the next step is to create a GoogleSignInClient. This is the main object we'll use to actually launch the sign-in screen and, later on, to handle signing out.
Now, we need to set up our ActivityResultLauncher. This launcher essentially waits for the Google Sign-In activity to finish. When the user picks an account (or cancels), the activity closes, and our launcher gets the result.
Inside the launcher’s callback, we’ll get the user’s account data from an Intent. If everything went well, we can grab the details and move on to authenticating them in our own system.
Remember, the sign-in flow can fail for a dozen reasons—the user might lose their internet connection, they could tap the back button, or there could be a rare Google service issue. A solid app needs to handle these moments gracefully without crashing.
Getting this login flow right is more important than ever. Globally, it's predicted that more than 64% of all internet traffic in 2025 will come from mobile devices. And on the mobile web, Android devices account for a massive 73.49% of traffic. A seamless login isn't a luxury anymore; it's what billions of users expect.
Launching the Sign-In Intent#
With everything configured, the final piece of the puzzle is to actually trigger the sign-in flow. This usually happens when a user taps a "Sign in with Google" button. We’ll create an Intent from our GoogleSignInClient and then use our ActivityResultLauncher to kick off the whole process.
Here’s a complete, battle-tested example you can drop into your Activity:
// Declare the launcher at the class level
private val googleSignInLauncher = registerForActivityResult(
ActivityResultContracts.StartActivityForResult()
) { result ->
val task = GoogleSignIn.getSignedInAccountFromIntent(result.data)
try {
// Google Sign In was successful, authenticate with Firebase
val account = task.getResult(ApiException::class.java)!!
Log.d("GoogleSignIn", "firebaseAuthWithGoogle:" + account.id)
// Now, you can use account.idToken to authenticate with your backend or Firebase
} catch (e: ApiException) {
// Google Sign In failed, update UI appropriately
Log.w("GoogleSignIn", "Google sign in failed", e)
}
}
// In your button's OnClickListener
signInButton.setOnClickListener {
val signInIntent = googleSignInClient.signInIntent
googleSignInLauncher.launch(signInIntent)
}
This code is solid. The try-catch block is crucial for handling any ApiException that might pop up, letting you log the error and update your UI to let the user know what happened. This complete loop—configuring, launching, and handling the result—is the heart of your Google login feature. If you want to dive deeper into authentication, you can explore our post on the OAuth Google API.
Securing Your Backend with Firebase Authentication#
Getting the user signed in on their device is a huge win, but it's only half the battle. Now, we need to make that login meaningful for your backend. This is where Firebase Authentication comes in, acting as the bridge between the client-side Google login and your own secure user database.
Without this step, your app knows who the user is, but your server is completely in the dark. This leaves your backend data, like user profiles or saved content in Firestore, wide open. By passing the Google ID token to Firebase, you create a secure, verifiable user session that you can actually trust.
Why This Backend Step Is So Important#
Let's be blunt: client-side authentication is not enough. You absolutely need a secure way to verify the user’s identity on your server before you start handing out access to protected resources. Firebase handles all the complex token verification for you, making this process both straightforward and incredibly secure.
Once you have this piece in place, a whole world of possibilities opens up:
- Secure Database Access: You can write security rules for Firestore or Realtime Database that only allow authenticated users to read or write their own data. No more free-for-alls.
- Centralized User Management: All your users, whether they sign in with Google, email, or another provider, are managed in one clean interface in the Firebase console.
- Scalable Infrastructure: Firebase is built to scale from day one, so you don't have to worry about managing servers or user databases as your app takes off.
The real goal of a login with google in android flow isn't just to get an email address on the device; it's to establish a trusted identity that your entire application stack can rely on. Skipping this backend verification is like leaving the front door unlocked.
Exchanging the Google Token for a Firebase Credential#
So how does this actually work? Once you have the GoogleSignInAccount object from a successful login, you can grab the ID token from it. This token is a JSON Web Token (JWT) that Google has cryptographically signed, proving the user's identity.
We then hand this token over to Firebase. Firebase takes it, validates its signature against Google's public keys, and, if everything checks out, creates a corresponding user in its own system. Finally, it returns Firebase credentials to your app, completing the secure authentication loop.
It's a relief that this process is so consistent. Despite Android's global reach, its device ecosystem is famously fragmented. Samsung holds a whopping 53.25% of the market, followed by Google at 15.26% and Redmi at 11.43%. Thankfully, Google's authentication system and Firebase work seamlessly across all these devices, ensuring a reliable experience for everyone. You can dig into more stats on the Android device brand distribution on telemetrydeck.com.
This whole exchange ensures your backend isn’t just blindly trusting information sent from a device. For a deeper look at building on this platform, you can explore our guide on creating an Ionic app with Firebase, which covers similar backend principles.
Managing User Sessions and Sign-Outs#
A great login flow doesn't end the moment a user signs in for the first time. The real art is in how you handle their session from one app launch to the next. Your goal is to make the experience feel both effortless and secure—keeping users logged in when they expect to be and giving them clear control over their account.
This all starts by checking the user's authentication state right when the app opens. If someone has already completed the login with google in android process, they shouldn't have to do it again every single time. A quick call to Firebase's FirebaseAuth.getInstance().currentUser tells you instantly if there's an active session. This lets you bypass the login screen and take them straight into the good stuff.
Responding to Session Changes in Real Time#
A much more proactive way to manage sessions is by using Firebase's AuthStateListener. This listener is a game-changer because it notifies your app in real-time whenever the user's sign-in state changes.
For example, if a user's session expires or you disable their account from the Firebase console, the listener fires immediately. You can then instantly redirect them to the login screen. This creates a far more robust system than just checking their status at launch, ensuring your app's UI always reflects the user's true authentication state.
Handling Sign-Outs Correctly#
Giving users a clear and reliable sign-out option is absolutely essential for building trust. There are two main ways to handle this, and each one serves a very different purpose.
- Standard Sign-Out: This is what you'll use 99% of the time. It clears the local session data on the device, effectively logging the user out of your app. Simple. However, it's important to know that their Google account remains connected on the device itself.
- Token Revocation (Disconnect): This is a much more forceful action. It doesn't just sign the user out—it completely revokes your app's access to their Google account. The next time they try to sign in, they'll have to go through the full authorization flow again.
For most scenarios, a standard sign-out is all you need. Only use the token revocation option for situations where a user wants to completely sever the connection between your app and their Google account, like when they're deleting their profile.
Both of these methods are crucial for giving users complete control over their data and access. If you really want to get into the weeds, understanding the nuances of Google OAuth 2.0 and token management will give you a deeper appreciation for how these interactions work behind the scenes. Implementing these session management features thoughtfully is what completes the authentication loop, ensuring a secure and user-friendly experience from start to finish.
Common Questions About Android Google Login#
Even when you follow a guide to the letter, a few tricky situations always seem to pop up with Google Sign-In. I've run into my fair share of them, so let's walk through some of the most common questions. Getting these details right can save you hours of head-scratching later.
Handling Multiple Google Accounts and Permission Changes#
One of the first things developers ask is how to handle a user with multiple Google accounts on their device. The good news? You don't have to do much. The default sign-in flow automatically shows the user an account picker, so you get that professional UI for free. The GoogleSignInClient handles this interaction beautifully, letting the user decide which account to use with your app.
Another classic "what if" scenario is when a user revokes your app's permissions directly from their Google account settings. Your app won't get a real-time notification about this. Instead, you'll find out the hard way: the next time you try to refresh their access token or make an API call, it will fail with an authorization error.
This is the perfect spot for some solid error handling. When that call fails, your code should catch the error, log the user out cleanly, and then prompt them to sign in again.
The key is to anticipate these edge cases. A great user experience isn't just about a successful login; it's about how gracefully your app handles the moments when things don't go as planned.
Finally, what about customizing the sign-in button? While Google provides a standard button with very specific branding rules, you're not stuck with it. You can absolutely create your own custom button or UI element.
The crucial part is making sure you trigger the signInIntent from its OnClickListener. Just be sure to review and follow Google's branding guidelines. Sticking to their recommendations helps maintain user trust and keeps the experience consistent across the Android ecosystem. It's a small detail that makes your app feel polished and secure.
Ready to build a production-ready Android app without the native complexity? NextNative provides a complete toolkit with pre-built authentication, UI components, and everything you need to launch faster. Check out our templates and get started today at https://nextnative.dev.