Your Guide to the Google OAuth Client ID
Updated: September 17, 2025
A Google OAuth Client ID is the unique name tag your application shows Google's APIs when it needs to access user data. Think of it as your app's public username. It works together with a private client secret to create a secure key for the whole OAuth 2.0 process.
What Exactly Is a Google OAuth Client ID#

Before we jump into the Google Cloud Console, let's get clear on what this credential actually does. It’s not just some random string of characters; it’s the bedrock of a secure link between your app and a user's Google account. It’s your app’s way of saying, "Hey Google, this is me, and I'd like to ask for permission to see some specific user info."
This whole dance is choreographed by the OAuth 2.0 framework. It’s the industry-standard protocol that lets users give your app limited access to their stuff without ever handing over their password. When someone taps that "Sign in with Google" button in your NextNative app, it’s your client ID that kicks off this trusted handshake.
The ID and Secret: A Crucial Pair#
Your OAuth credentials always come in a pair, and you absolutely need to know the difference. Getting this wrong is a huge security risk.
- Client ID: This is the public part of the credential. It's safe to have this in your app's frontend code because its job is to build the login URLs and identify your app to Google.
- Client Secret: This is the private "password" for your application. You must never, ever expose the Client Secret in your client-side code. It lives securely on your server and is used behind the scenes to prove your app’s identity when it trades an authorization code for a real access token.
By keeping that Client Secret locked down, you stop anyone from pretending to be your application and getting their hands on user data. This separation of public and private keys is one of the most fundamental security principles in the OAuth 2.0 flow.
Before we dive into the different types of clients you can create, it's helpful to have a quick reference. Depending on where your app runs (a web browser, a mobile device, a TV), you'll need a different kind of credential.
OAuth Client Credential Types Explained#
| Client Type | Typical Use Case | Key Characteristic |
|---|---|---|
| Web application | Standard websites that run on a server. | Can securely store a client secret. Uses redirect URIs to receive auth codes. |
| Android | Native Android apps. | Doesn't use a client secret. Relies on package name and SHA-1 certificate fingerprint for security. |
| iOS | Native iOS apps. | No client secret. Uses the app's Bundle ID to verify its identity. |
| TVs and Limited Input Devices | Smart TVs, game consoles, or any device without a browser. | Uses a device-flow where the user authorizes on a separate device (like a phone). |
| Desktop app | A native application running on a user's computer (macOS, Windows, Linux). | Uses a loopback redirect URI to capture the auth code locally. |
Understanding these types is key because picking the right one is the first step in making sure your authentication flow is both secure and works smoothly for your users. For a mobile app built with NextNative, you'll typically be creating Android and iOS client types.
Why It Matters for Your NextNative App#
Getting your Google OAuth client ID set up correctly isn't just a "nice-to-have"—it's a non-negotiable step for building a trustworthy app. This is the engine that powers the features your users have come to expect, like one-tap sign-in and easy profile integration.
The scale here is massive. A recent analysis of over 500,000 users found 60,875 unique OAuth client applications in use, which just goes to show how deeply this technology is baked into the tools we use every day.
For a NextNative developer, this means you get a reliable, battle-tested way to handle authentication without having to build it all from scratch. You can find more details in our guide on NextNative authorization features at https://docs.nextnative.dev/features/authorization. This setup ensures your app plays by Google's rules, giving your users a secure and familiar experience from the moment they open your app.
Setting Up Your Project in Google Cloud#
Before you can get a Google OAuth client ID, your application needs a home inside the Google Cloud ecosystem. That home is called a Project. Think of it as the main folder for your app—it holds all your cloud resources like APIs, credentials, and billing info, keeping everything organized in one place.
Your first stop is the Google Cloud Console. If you're new here, it can look a bit intimidating, but we're only going to touch the parts we absolutely need. The first order of business is either creating a new project or picking one you already have. From experience, I always recommend creating a separate project for each application. It keeps your configurations clean and prevents a testing credential from accidentally making its way into production.
Creating Your Project Container#
To get started, look for the project selector dropdown at the top of the console page and click "New Project." Give it a name that makes sense, something you'll recognize instantly, like "NextNative-App-Authentication." A clear name now will save you from guessing games later on when you have a dozen projects in your account.
Once your project is created, the console automatically switches you into its context. This is now your app's command center. Anything you do from this point on—enabling APIs, creating credentials—is tied directly to this specific project.
Activating the Necessary APIs#
With your project ready, the next move is to tell Google which of its services your app needs to talk to. This is a crucial security measure. You're not giving your app a master key to every service Google offers; you're giving it specific keys to only the doors it needs to open. This is known as the principle of least privilege, and it's a practice every good developer follows.
You'll handle all of this from the "APIs & Services" dashboard.
- Head to the Library: In the left-hand navigation menu, find and click on "Library." This is Google's massive catalog of every API you can possibly integrate with.
- Search and Enable: Use the search bar to find the exact APIs your app will use. For a NextNative app that needs to access a user's calendar, you'd search for the "Google Calendar API" and click "Enable." If you need profile information, you might add the "People API."
- Be Selective: Only enable what is absolutely essential. Turning on unnecessary APIs just expands your app's potential attack surface and can force you to ask users for permissions they're not comfortable giving, which is a great way to lose their trust.
Remember, every API you enable corresponds to a set of permissions (scopes) you'll later request from the user. Keeping this list lean from the start simplifies the consent screen and shows you respect user privacy.
After you've enabled the APIs, you'll see them pop up in your project's dashboard, often with handy usage metrics. This dashboard gives you a great high-level view of your app's API activity. If you're building a mobile app and want to see how this fits into the bigger picture, you can learn more about integrating the Google API for OAuth in our detailed guide.
This foundational setup—creating the project and enabling the right APIs—is the essential groundwork. With this in place, you're perfectly positioned for the main event: creating the actual Google OAuth client ID.
How to Create Your Google OAuth Client ID#
Alright, you’ve got your Google Cloud project ready and the right APIs enabled. Now for the main event: generating the actual Google OAuth client ID and its secret.
This whole process breaks down into two key parts. First, you'll configure what your users see when they grant permission. Then, you'll create the actual credentials your app will use to authenticate.
This diagram shows exactly where your new client ID fits into the mobile login flow. It's the key that kicks off the whole user authentication process.
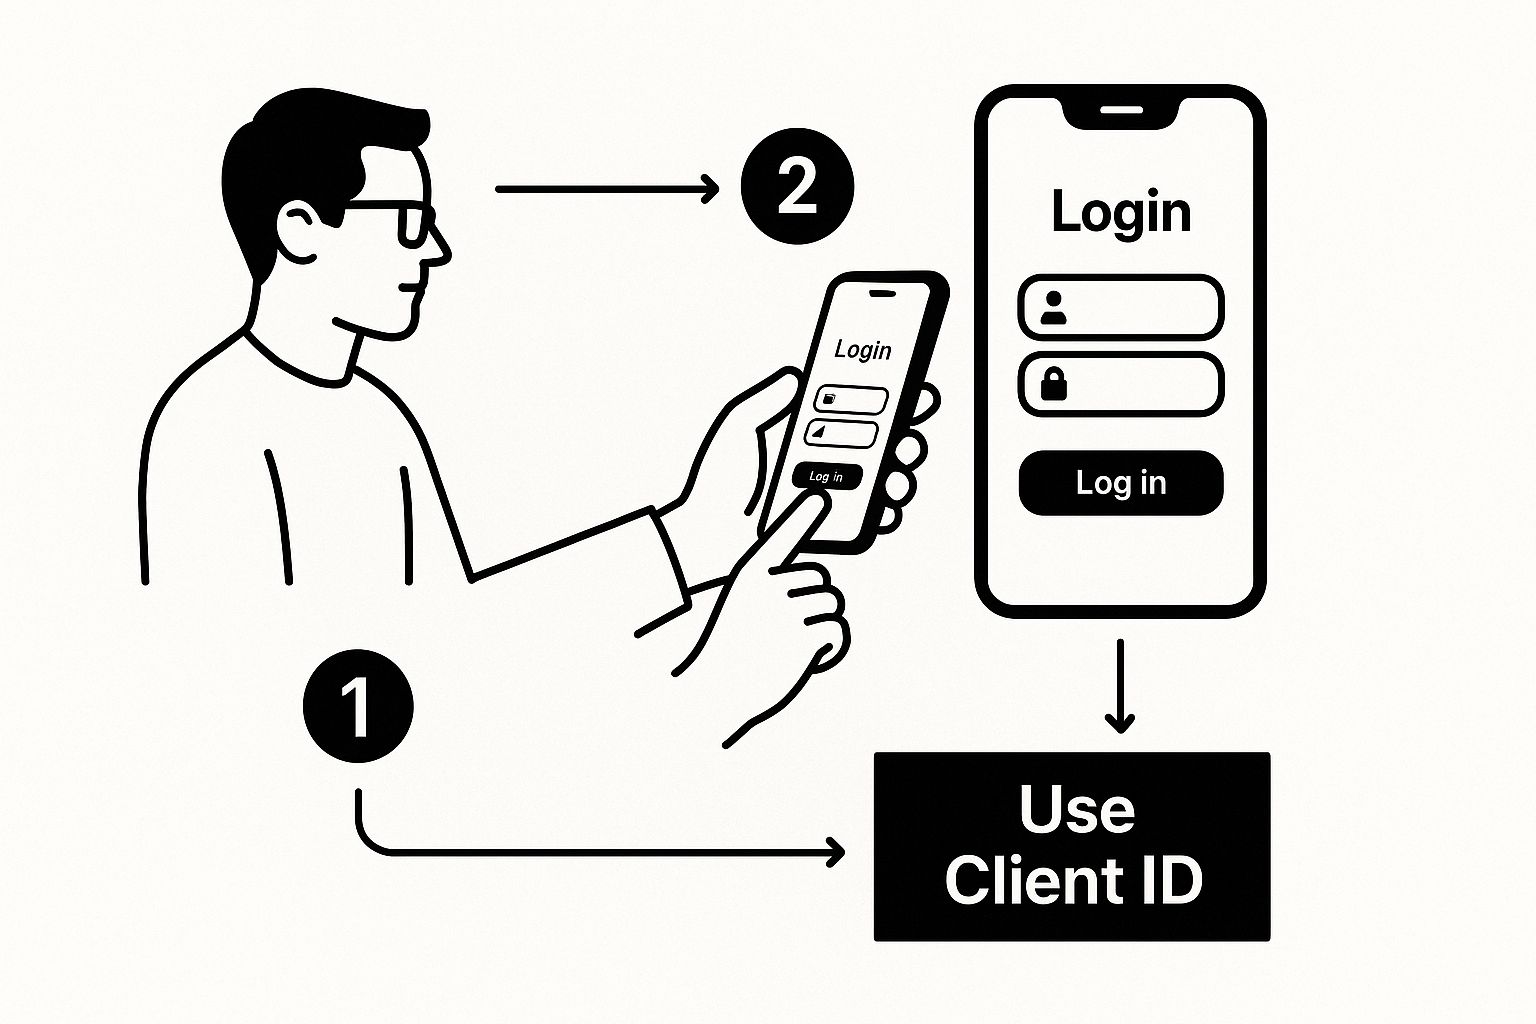
As you can see, the client ID is the very first piece of information your app hands over to Google. Getting this right is critical for a secure and functional login.
Configure the OAuth Consent Screen#
Before Google hands you the keys, it wants to know exactly what your users will experience. This is all handled on the OAuth consent screen. You know the one—it’s the pop-up that asks, "Do you want to allow this app to access your profile info?"
Head over to "APIs & Services" and find "OAuth consent screen" in the menu on the left. Right away, you have an important choice to make.
- Internal: This option only shows up if you're part of a Google Workspace organization. It locks down app usage to users inside your company, which is perfect for internal tools but a non-starter for a public app.
- External: This is the one you want for your NextNative app. It opens your app up to any user with a Google account.
Pick External and start filling in the details like your app name, support email, and a link to your privacy policy. This info is all about building trust with your users, so make it clear and professional.
Generate Your Credentials#
With the consent screen sorted, it's time to create the Google OAuth client ID. Jump over to the "Credentials" tab, click "Create Credentials," and then select "OAuth client ID."
Google will ask for an application type. For a service like NextNative that handles authentication on both the web and mobile, your best bet is usually Web application. This type is built for apps that run on a server and can keep a client secret safe and sound.
Even though you're building a mobile app, NextNative's architecture often uses server-side authentication flows to keep things secure. If your setup is purely client-side, it might be worth exploring the iOS-specific options. We actually have a whole guide on Google Sign-In for iOS that dives into those details.
After you select "Web application," you'll face two fields that need your full attention. I can't tell you how many authentication headaches I've seen come from getting these wrong.
Define Your Authorized URIs#
These settings are basically a whitelist for Google. They specify which URLs are allowed to use your new client ID. If a request comes from anywhere else, Google will shut it down to prevent someone from hijacking your credentials.
- Authorized JavaScript origins: This is simply where your frontend app is hosted. It's the URL that will kick off the OAuth flow. When you're developing locally, this will probably be
http://localhost:3000. In production, it'll be your app's real domain, likehttps://yourapp.com. - Authorized redirect URIs: This is the specific endpoint in your application where Google will send the user after they've successfully logged in. This URL is crucial because it receives the authorization code your backend needs to get an access token. A typical example looks like
https://yourapp.com/api/auth/callback/google.
Pro Tip: The
redirect_uri_mismatcherror is the bane of every developer's existence. In my experience, it almost always means the URL in your redirect URI list doesn't perfectly match the one your app is sending. Triple-check for tiny differences like HTTP vs. HTTPS, a trailing slash, or a missing port number. They have to be identical.
Once you’ve filled these in, hit "Create." Google will pop up a window with your brand-new Client ID and Client Secret. Copy these immediately and store them somewhere secure. You're going to need them in the next step to bring your NextNative app's authentication to life.
Putting Your Credentials to Work in a NextNative App#
Alright, you’ve wrestled with the Google Cloud Console and emerged victorious with your Google OAuth client ID and secret. Those keys are what connect your app to Google's entire authentication system. But having them is one thing; using them correctly and safely is what really matters.
This is where we hook everything up inside your NextNative application.
The absolute first rule of handling these credentials is to never hardcode them directly into your source code. I've seen it happen, and it's a massive security hole just waiting to be exploited. Your Client ID, and especially your Client Secret, should be treated like passwords.
Securely Storing Your Credentials#
The right way to do this is with environment variables. This technique keeps your sensitive keys completely separate from your codebase, making it easy to manage them for different environments like development, staging, and production.
In a NextNative project, you'll want to create a .env.local file in the root directory. This file is specifically ignored by Git by default, which is perfect—it means your secrets will never accidentally get committed to your repository.
Inside your .env.local file, add your credentials like this:
GOOGLE_CLIENT_ID="your-client-id-goes-here"
GOOGLE_CLIENT_SECRET="your-client-secret-goes-here"
Now, your app can safely access these values using process.env.GOOGLE_CLIENT_ID and process.env.GOOGLE_CLIENT_SECRET. It’s a simple step, but it’s the foundation of a secure, professionally built application.
Configuring Your Authentication Provider#
With your credentials safely tucked away, it's time to tell your authentication provider how to use them. If you’re using a library like NextAuth.js, this is incredibly straightforward.
You’ll typically configure it in an API route handler. The code might look something like this:
import NextAuth from "next-auth"
import GoogleProvider from "next-auth/providers/google"
export default NextAuth({
providers: [
GoogleProvider({
clientId: process.env.GOOGLE_CLIENT_ID,
clientSecret: process.env.GOOGLE_CLIENT_SECRET,
}),
],
})
See how clean that is? The configuration pulls the credentials straight from your environment variables, keeping your code secure and readable. This setup is all you need to start handling Google logins.
For a deeper dive into how authentication fits into the broader picture of building with Next.js for mobile, our guide on creating a Next.js mobile app offers some great real-world context.
Key Takeaway: The whole integration boils down to two things: storing your credentials securely as environment variables, then pointing your auth provider to those variables. This separation of secrets from code isn't just a suggestion; it's a non-negotiable best practice.
One final, critical check: make sure the "Authorized redirect URI" you set up back in the Google Cloud Console is an exact match for the callback URL your NextNative app uses. For local development, this is usually http://localhost:3000/api/auth/callback/google. If they don't match perfectly, you'll hit the infamous redirect_uri_mismatch error and bring your authentication flow to a screeching halt.
Managing Your OAuth Credentials Securely#
Getting your hands on a Google OAuth client ID and its corresponding secret is a huge milestone, but it's really just the starting line. The real responsibility begins now. How you manage these credentials over their lifetime is what separates a secure, professional application from a vulnerable one.
Think of your Client Secret as the master key to your app's access. Just like any important key, you can't just leave it lying around. One of the best practices that often gets overlooked is key rotation. Periodically generating a new Client Secret and retiring the old one significantly reduces the window of opportunity for an attacker if a key were ever compromised.
The Principle of Least Privilege#
Another core security principle is asking for only what you truly need. When you're setting up your OAuth consent screen, you define "scopes"—the specific permissions your app requests from a user. It’s always tempting to ask for broad access "just in case," but that’s a classic mistake.
Requesting readonly access when you don't need to write data, or asking only for calendar access when your app has nothing to do with contacts, shows users you respect their privacy. This isn't just good manners; it builds trust, which directly impacts your app's adoption rate.
The less data you ask for, the lower your risk and the more trustworthy your application appears. Always start with the absolute minimum scopes required for your app's core functionality and justify every additional permission.
Avoiding Common Security Blunders#
From experience, I can tell you the most common and devastating mistake is accidentally committing secrets to a public Git repository. It happens more often than you’d think and can lead to an immediate, full-blown account takeover.
To prevent this, always use environment variables for your Client ID and Secret, and make absolutely sure your .env file is listed in your .gitignore. This simple habit is non-negotiable for any serious project. We've put together a detailed guide on securing API keys that covers more in-depth strategies on this topic.
The history of OAuth is filled with lessons learned the hard way. For example, a major Google OAuth 'worm' back in 2017 affected over a million users by exploiting how app names were validated. The incident prompted Google to enforce much stricter app verification processes for sensitive scopes, which is why we have them today.
Ultimately, credential management is just one piece of a much larger security posture. Beyond these specific practices, a holistic approach is vital. To ensure the utmost protection for your OAuth credentials, it's crucial to consult an essential guide to keeping your website secure to cover all your bases. This combination of diligent credential hygiene and broad security awareness will keep your app and your users safe.
Common Questions About Google OAuth IDs#
Working with authentication always seems to stir up the same set of questions. Let's walk through a few of the most common hurdles I've seen developers trip over when setting up a Google OAuth client ID.
Getting these concepts straight from the get-go will save you a ton of headaches down the road.
API Keys vs OAuth Client IDs#
This one comes up all the time. It’s easy to mix up API Keys and OAuth Client IDs because they both grant access, but they solve completely different problems.
- An API Key is just a simple, public identifier for your project. Think of it as a library card for accessing public data—it says who the request is coming from (your project), but not on whose behalf. It’s perfect for server-to-server calls where there's no specific user involved.
- An OAuth Client ID, on the other hand, is for when your application needs to ask a user for permission to access their private data. It identifies your specific app (like your iOS app or your web app) and is always tied to getting user consent.
In short, API keys identify your project, while OAuth IDs identify your application to a user.
Fixing the Dreaded Redirect URI Mismatch#
Ah, the redirect_uri_mismatch error. If you haven't seen this yet, you will. It’s practically a rite of passage for anyone setting up OAuth.
This error almost always means one thing: the URL you're sending in your app's authentication request doesn't exactly match one of the "Authorized redirect URIs" you've listed in your Google Cloud Console. And when I say exactly, I mean it.
Check for tiny, easy-to-miss details:
- HTTP vs. HTTPS: A classic mistake. Make sure the protocol matches perfectly.
- A trailing slash (
/):http://localhost:3000is not the same ashttp://localhost:3000/. - A missing port number: If you're developing locally, you probably need to include
:3000or whatever port you're using.
The match has to be perfect, down to the last character. No exceptions.
What should I do if my Client Secret is exposed?#
If you even suspect your Client Secret has been leaked, you need to act immediately. Don't wait. Head straight to the 'Credentials' page in your Google Cloud project, find your OAuth 2.0 Client ID, and hit 'Reset Secret'. Google will instantly generate a new secret and invalidate the old one. After that, you just need to update your application's backend with the new value.
Ready to build production-ready mobile apps without the native learning curve? NextNative combines Next.js with Capacitor to help you ship iOS and Android apps using the web skills you already have. Get started today.