Implement Social Login Google the Right Way
Updated: October 5, 2025
Let's be honest, nobody enjoys filling out registration forms. Adding social login with Google is one of the fastest ways to improve your app's user experience, turning a tedious multi-step process into a single click.
This simple integration removes the friction of creating and remembering yet another password, which directly boosts sign-up rates. For developers, it’s a smart move that builds user trust right from the very first interaction.
Why Google Social Login Is a Must-Have#
The modern user expects a fast, seamless entry into your application. Every extra field they have to complete is another chance for them to abandon the process entirely. This is where the power of a Google social login becomes crystal clear.
By offering a familiar and trusted option like Google, you tap into an account that nearly everyone already has. It's a game-changer for conversion rates. Research consistently shows that apps offering social login see significantly higher sign-up completion.
Boost User Trust and Security#
When a user signs in with Google, they aren't just saving time; they're also gaining peace of mind. They know their credentials are protected by Google's world-class security infrastructure. This "borrowed trust" is incredibly valuable, especially for new or lesser-known apps.
You're offloading the complex and critical responsibility of password management to a system that users already trust with their most sensitive data. This instantly elevates your app's perceived security.
This approach also simplifies your backend responsibilities. Instead of managing password hashing, storage, and reset flows, you just verify an identity token from a reliable source. For more insights on securing your app, explore our detailed guide on mobile authentication best practices.
Streamline the User Journey#
Beyond the initial sign-up, a Google social login simplifies the entire user lifecycle. Returning users can sign back in with a single tap, eliminating the dreaded "forgot password" loop that causes so much user frustration and churn.
This streamlined experience contributes to higher engagement and retention because the barrier to re-entry is practically non-existent. A smoother journey offers several key advantages:
- Reduced Friction: No need for users to create and remember new login details.
- Faster Onboarding: Lets users access your app's core features in seconds.
- Verified Email: You automatically get a real, verified email address, which cuts down on bounced emails and fake accounts.
Ultimately, integrating Google social login isn't just another feature—it's a foundational piece of a modern, user-centric app strategy.
Setting Up Your Google Cloud Project#
Before you even think about touching your app’s code, the first stop is the Google Cloud Platform. This is where you’ll officially register your application with Google, establish trust, and grab the credentials that make social login work. Think of it as getting an official ID card for your app so Google knows who’s making the request.
Getting this initial setup right prevents major headaches down the road. It’s a smart move, too. The market for social login tools is projected to grow at a CAGR of about 15.3% through 2030, which shows just how critical this smooth user experience has become. You can read the full research on the social login market to see the trend in action.
The entire process boils down to a few key stages, from API configuration to the final user authentication callback. This diagram gives you a high-level look at the flow.
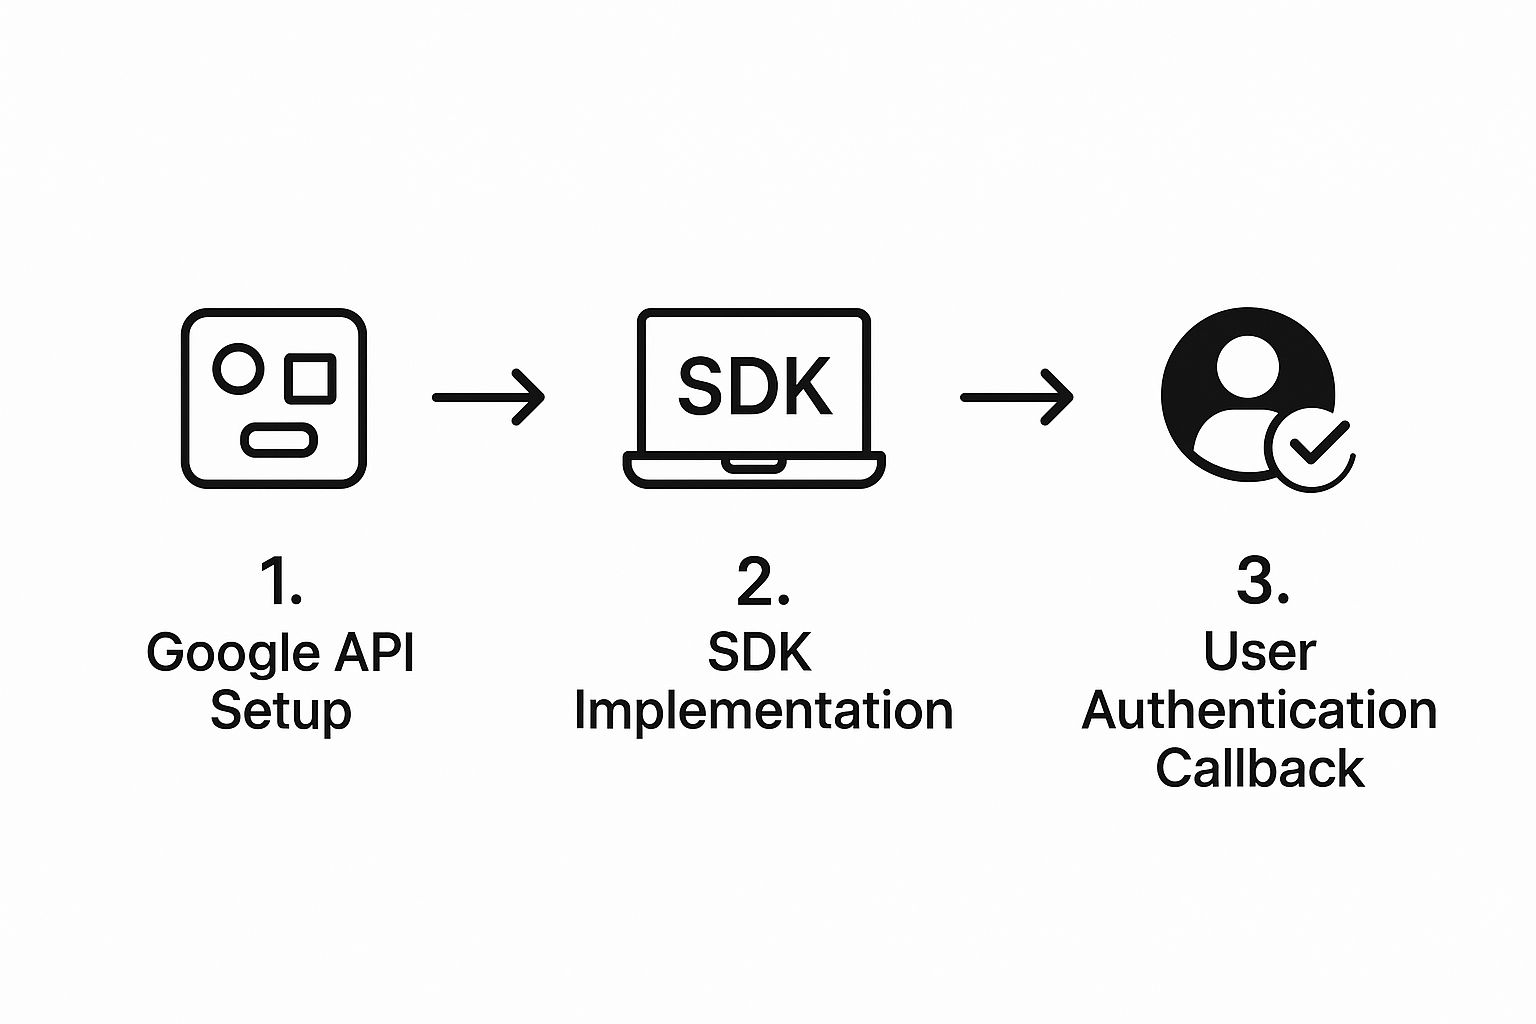
As you can see, the Google API setup is the foundation that enables everything else.
Create Your Project and Enable APIs#
First things first, head over to the Google Cloud Console and spin up a new project. Give it a clear, recognizable name that connects it to your app, something like "My Awesome App - Auth." Once the project is created, your main destination is the "APIs & Services" dashboard.
This is the control center for all Google services. To get authentication working, you need to turn on the right API.
- Navigate to the Library section from the sidebar.
- In the search bar, type in Google People API.
- Click Enable. This API is what allows your app to pull basic profile information—like a user's name and email—after they give you permission.
Configure the OAuth Consent Screen#
With the API enabled, it's time to set up the OAuth consent screen. This is the popup window your users will see asking for permission to share their data with your app. A well-configured consent screen is your first opportunity to build trust.
- User Type: You'll almost always choose External. The "Internal" option is only for apps restricted to users within your own Google Workspace organization.
- App Information: Fill in your app name, a user support email, and your developer contact info. These details are shown directly to the user, so make sure they look professional.
- Scopes: This is a big one. Scopes define exactly what data you're asking for. For a basic social login, you typically only need
.../auth/userinfo.emailand.../auth/userinfo.profile. Only request what you absolutely need. Asking for too much can easily scare potential users away.
Your consent screen is your first handshake with the user. Keep it simple, transparent, and only ask for the necessary permissions to build confidence from the start.
Generate Your Credentials#
Once the consent screen is configured, you're ready to generate the keys your application will use to talk to Google. Head over to the "Credentials" tab, click "Create Credentials," and then select "OAuth client ID."
Google will ask for the application type. For a NextNative app, you'll eventually need credentials for web, iOS, and Android, but for now, just start with Web application.
On the next screen, you'll find your newly generated keys.
The two pieces of information you're looking for are the Client ID and Client Secret. Guard these carefully, especially the Client Secret, as it should never be exposed on the client side.
For a more detailed walkthrough on managing these keys, check out our complete guide on finding your Google OAuth Client ID. These credentials are the final pieces of the puzzle you'll need to start integrating Google social login into your Next.js code.
Alright, with the Google Cloud setup out of the way, it's time to bring this to life inside your Next.js app. This is the fun part—we’re going to build the client-side code that powers that "Sign in with Google" button, handles the user interaction, and grabs the authentication token. All that configuration work is about to become a real feature users can click.
We'll start by adding the library Google provides, and then we'll create a clean, reusable React component. I always prefer this approach because it keeps the login logic contained and makes it dead simple to drop the button anywhere in your application.
Setting Up the Google Identity Library#
To get Google's authentication services working on the web, you need their official Identity Services library. You might be tempted to look for an npm package, but the most reliable way to load this is with a simple script tag in your Next.js application's main layout file or _app.tsx.
Placing it there ensures the global google object is available before any of your components try to use it. It’s a small detail, but getting this wrong can lead to frustrating race conditions and errors.
With the library ready to go, the next move is to build a dedicated React component for the button itself. This component will handle everything from rendering the button to catching the response from Google.
Creating the Login Component#
Let's whip up a functional React component called GoogleLoginButton.tsx. Inside, we'll use React's useEffect hook to initialize the Google client as soon as the component mounts, feeding it the Client ID you saved from the Google Cloud Console.
import { useEffect } from 'react';
const GoogleLoginButton = () => {
const handleCredentialResponse = (response) => {
// This is where you get the token!
console.log("Encoded JWT ID token: " + response.credential);
// TODO: Send this token to your backend for verification
};
useEffect(() => {
/* global google */
google.accounts.id.initialize({
client_id: 'YOUR_GOOGLE_CLIENT_ID.apps.googleusercontent.com',
callback: handleCredentialResponse,
});
google.accounts.id.renderButton(
  document.getElementById("signInDiv"),
  { theme: "outline", size: "large" }
);
}, []);
return
;};
export default GoogleLoginButton;
This little snippet does two critical things. First, google.accounts.id.initialize configures the service with your unique client ID and tells Google which function to call (handleCredentialResponse) when a sign-in is successful. Second, google.accounts.id.renderButton renders the official, styled Google button right into the div we provided.
The
response.credentialis the golden ticket. It's a JSON Web Token (JWT) that you absolutely must send to your backend server. Never, ever trust this token on the frontend alone; it has to be securely verified on the server to actually confirm the user's identity.
Managing Authentication State and Errors#
Once a user logs in, your frontend needs to know they're authenticated. A common and effective pattern is to use a global state management solution—something like React Context or a lightweight library like Zustand—to hold the user's session information.
After your backend verifies the token and sends back the user's data, you update this global state. This instantly makes the user's profile and login status available across all pages, which is perfect for showing or hiding content. You can explore more advanced ways to build these kinds of dynamic user experiences in our guide to developing JS mobile apps.
Of course, things don't always go according to plan. A user might close the Google popup halfway through or deny your app permission. You need to handle these cases gracefully. The Google library provides ways to catch these events, allowing you to show a friendly message like "Login canceled" or "An error occurred." It’s these small touches that make an app feel polished and trustworthy.
Securing Your Backend Authentication#
Alright, so your frontend has successfully grabbed the Google token. Now comes the most important part: the backend security check. This server-side process is where you'll verify the token is legitimate, confirm the user's identity, and create a secure session for them.
Think of it this way: the frontend gets the user's ID card, but the backend is the bouncer who actually checks to make sure it's real.
First thing's first, you'll need a dedicated API endpoint for this. Something clean like /api/auth/google is a pretty standard choice. Its only job is to catch the JWT credential sent from your app and start the real verification work.
Verifying the Google ID Token#
Here's a critical rule of thumb: never trust a token just because your frontend sent it. It has to be cryptographically verified to prove it was actually issued by Google and hasn't been messed with.
Luckily, Google provides official libraries for most backend languages that make this pretty straightforward.
For a Node.js backend, the google-auth-library is your best friend. Once you receive the token on your endpoint, you'll feed it into the library's verifyIdToken method.
This one function handles several crucial security checks for you, all behind the scenes:
- Signature Verification: Confirms the token was signed with Google's private key.
- Audience Check: Makes sure the token was issued for your specific app's Client ID and not some other application.
- Expiration Check: Verifies that the token is still valid and hasn't expired.
If any of these checks fail, the library throws an error. When that happens, your job is simple: reject the request immediately with a 401 Unauthorized status. Understanding these flows is a key part of working with REST API authentication methods like OAuth 2.0, which is the standard Google Social Login is built on.
Managing User Data and Creating Sessions#
After a successful verification, the library hands back a decoded payload. This is the good stuff—the user's profile information, like their name, email, and profile picture URL. Now you can use this trusted data to manage the user in your own database.
The logic from here is pretty simple and follows a common pattern:
- Check for an Existing User: Take the verified email address and see if a user with that email already exists in your database.
- Log In Existing User: If they do, great! You've just authenticated them. Time to generate a session.
- Create a New User: If they don't exist, it's their first time here. Create a new user record in your database using the info from the Google token.
This "upsert" (update or insert) flow is the secret to a smooth social login experience, handling new and returning users without a hitch. And since Google dominates the global search market with a 91.65% share, most of your users will already have an account, making this a reliable and user-friendly option.
The core idea here is to treat Google as your identity provider, but your own database remains the single source of truth for your application's user data.
Finally, once the user is either found or created, you need to establish a session. Best practice is to generate your own secure session token (often another JWT, but this one is yours) and send it back to the client. This new token will then be included in the headers of all future API requests from the frontend, letting your backend identify the user without having to ping Google every single time.
For a deeper dive into the OAuth flow and setting up your credentials, check out our guide on creating a Google OAuth application.
After a user authenticates, Google provides a treasure trove of user data (with their consent, of course). This information is invaluable for creating a personalized and welcoming experience right from the start.
Key User Data Available Through Google Social Login#
A summary of the most common user profile information you can request and utilize after a successful Google login, helping you personalize the user experience.
| Data Point | Description | Common Use Case |
|---|---|---|
| Email Address | The user's primary, verified email address. | The unique identifier for user accounts; used for logins and communication. |
| Full Name | The user's first and last name as set in their Google profile. | Personalizing greetings, profiles, and in-app messages (e.g., "Welcome, Alex!"). |
| Profile Picture URL | A link to the user's public Google profile image. | Displaying avatars in user profiles, comments, or navigation bars. |
| Google User ID | A unique, permanent string that identifies the user within Google. | A stable, non-email identifier for linking accounts in your database. |
| Given Name | The user's first name. | Creating more casual, personalized greetings ("Hi, Alex!"). |
| Family Name | The user's last name. | Used for more formal contexts or sorting user lists. |
By leveraging this data, you can skip tedious sign-up forms and immediately create a richer, more engaging environment for your users.
Adapting Google Login for Native Mobile#
The real magic of the NextNative approach is making your web app feel perfectly at home on iOS and Android. When it comes to something like social login with Google, this means ditching the web-based popup for a true native experience. This isn't just about looks; it's about meeting user expectations for speed and seamlessness on their phones.
To pull this off, we'll use the official Capacitor Google Auth plugin. This tool is the bridge that lets your Next.js code call the native Google Sign-In SDKs on both platforms. It's an incredibly efficient hybrid strategy, letting you stick with a single codebase while delivering the slick, platform-specific login flow that users expect. The convenience is a huge driver of adoption.
One B2C company saw social login jump from 10% to 29% of all sign-ins just two months after they rolled it out—a 190% increase. That surge shows a clear user preference for one-tap sign-ins, especially on mobile.
Configuring the Native Projects#
Before the plugin can work, you have to get your native iOS and Android projects set up. This one-time configuration ensures your app is properly registered to handle the authentication callback from Google, saving you countless hours of debugging later on.
For iOS, this means setting up a custom URL scheme in Xcode. This unique scheme tells the operating system that once Google's authentication is done, it should send the user right back into your app. This step is critical, and you can get a more detailed look in our guide on implementing Google Sign-In for iOS.
Over on the Android side, the process is a bit different. You'll generate a SHA-1 fingerprint from your keystore and add it to your Google Cloud project's Android credentials. This fingerprint acts as a digital signature, proving to Google that the login request is coming from your authentic, signed app—not a malicious counterfeit.
Don't skip these native configuration steps. A missing URL scheme on iOS or an incorrect SHA-1 on Android are the most common reasons native Google login fails. Double-checking them now will save you a ton of frustration.
Implementing the Hybrid Code Logic#
With the native projects configured, the final piece is adapting your frontend code. The goal is simple: detect which platform the app is running on and call the right login method.
You can use Capacitor's platform detection utilities to check if the app is running on 'ios', 'android', or 'web'.
- On mobile (iOS/Android): You’ll call the
GoogleAuth.signIn()method from the Capacitor plugin. - On the web: You’ll fall back to the web-based JavaScript library flow we set up earlier.
This conditional logic makes your button work everywhere without duplicating code. Once Google Login is smoothly integrated, optimizing its visibility in the store is the next logical step. For helpful strategies on that front, you might explore resources on Google Play Store Optimization. This approach ensures your app, with its fantastic login experience, reaches the widest possible audience.
Got Questions About Google Social Login?#
Even the best step-by-step guides can leave a few questions unanswered. When you're in the weeds implementing something like social login, a few common "gotchas" always seem to pop up. Let's tackle them head-on so you can build a more polished and robust authentication system.
One of the first things developers run into is token expiration. Google's ID tokens are designed to be short-lived, typically lasting about an hour. This is a security feature, not a bug. Your backend needs to be ready to verify the token's expiration on every single request that requires a user to be logged in.
So what happens when a token expires? You'll need to prompt the user to sign in again. But don't worry, this doesn't have to ruin the user experience. If the user still has an active Google session in their browser, this re-authentication can be a completely silent, frictionless process that happens in the background. They won't even notice.
Can I Make the Login Button Match My App's Design?#
Another question I hear all the time is about branding. Google provides a standard, out-of-the-box button, but what if it clashes with your app's carefully crafted design? Can you create your own?
Absolutely. The trick is to trigger the Google login flow programmatically instead of just rendering their default button.
- Build Your Own Button: First, create a button component in React that perfectly matches your app's style guide.
- Trigger the Prompt: Attach an
onClickhandler to your custom button. Inside that handler, you'll callgoogle.accounts.id.prompt(). - Handle the Callback: This simple function call will open the familiar Google pop-up. From there, the response is handled by the exact same callback function you configured during the initial setup.
This approach gives you total visual control while still providing the secure, standard Google authentication experience your users trust.
One quick word of caution: while you have free reign over your button's appearance, you still need to follow Google's branding guidelines. This helps maintain user trust because they'll recognize the secure process they're used to.
How Do I Handle Privacy and Compliance?#
Finally, let's talk about privacy, especially with regulations like GDPR in the mix. The single most important principle here is data minimization.
Don't ask for more than you need. For most social login systems, the email and profile scopes are more than enough to get the job done.
You also need to be transparent. Clearly state in your privacy policy what data you're collecting via Google login and exactly how you plan to use it. Honesty is non-negotiable for building user trust and staying compliant. By thinking through these common issues, your implementation will be both user-friendly and secure.
Ready to stop wrestling with complex mobile setups and start building? With NextNative, you can launch a production-ready iOS and Android app using the Next.js skills you already have. Get your toolkit and save weeks of development time!