Google Sign In iOS: Easy Setup & Troubleshooting Tips
Updated: October 16, 2025
Integrating Google Sign-In into your iOS app is a game-changer for user onboarding. Let’s be honest, nobody wants to create yet another password. This one feature speeds up the entire registration process and builds immediate trust by using a secure system everyone already knows and uses.
Why Google Sign-In Is a Smart Move for Your iOS App#
Before we jump into the code, it's worth taking a moment to understand why this is such a good strategic move. This isn't just about slapping another button on your login screen; it’s a decision that has a real impact on your user experience and retention from the very first tap.
The biggest win here is the massive reduction in onboarding friction. New users are tired of creating new accounts and trying to remember yet another unique password. Offering a one-tap sign-in completely removes that barrier, making it far more likely they’ll actually finish signing up and start exploring your app.
This frictionless entry creates a fantastic first impression. Users get the convenience they want and the security that comes with a trusted name like Google. They don't have to second-guess your app's security because their credentials are being handled by a system they probably use every single day.
Boosting Engagement and Trust#
When a user signs in with Google, you can request access to basic profile info like their name and email. This simple step lets you personalize their experience from the get-go, without forcing them to fill out a boring profile form.
This immediate personalization often leads to much higher engagement. Plus, by using a globally recognized authentication system, you're adding a layer of credibility to your app. It sends a clear signal that you take user security and convenience seriously.
The core idea is simple: make it as easy as possible for users to get started. A faster, more secure login means users spend less time signing up and more time engaging with what your app actually does.
A Competitive Edge in a Crowded Market#
In a marketplace with millions of apps, the small details make all the difference. The Apple App Store is home to over 1.9 million apps, and iOS is on track to claim nearly 66% of a massive $190 billion global mobile app revenue pie. You can find more insights on Apple App Store statistics to see just how competitive it is.
A smooth sign-in process can be the key differentiator that stops a user from ditching your app for a competitor's. At the end of the day, a streamlined login isn’t just a nice-to-have feature; it’s a core part of a user-centric design philosophy.
To get a broader perspective on this, you can check out our overview of Google social login strategies to see how it fits into the bigger picture of user acquisition and retention.
Getting Your App Ready for Google Sign-In#

Alright, this is where the magic really starts. Before we touch a single line of Swift, we need to get our hands dirty in the Google Cloud Console. Honestly, getting this part right from the beginning will save you a world of pain later. Most of the headaches I see with Google Sign-In come from a simple misconfiguration right here.
First things first, you’ll need a project in the console. If you already have one set up for your app, you're ahead of the game. If not, don't worry—creating one is quick. Think of it as the central hub for managing all the Google services your app will ever need.
Enabling the Right APIs and Getting Your Keys#
With your project selected, the next step is to flip the switch on the necessary APIs. This is you telling Google, "Hey, my app is going to be using your authentication services." It’s a simple but critical step to activate the features we need.
Once the API is enabled, it's time to generate your credentials. These are the keys to the kingdom, connecting your iOS app directly to Google's authentication system. What you're after is an OAuth 2.0 client ID, which acts as a unique fingerprint for your app.
Here’s a quick rundown of how to get it:
- Head over to the Credentials page under the "APIs & Services" section.
- Click "Create Credentials" and choose "OAuth client ID."
- This next part is crucial: select "iOS" as the application type. The setup for web or Android apps is completely different, so make sure you pick the right one.
Google will then ask for your app’s Bundle Identifier, which you can pull directly from your Xcode project settings. This needs to be an exact match, so I always copy and paste to avoid typos. Once you plug that in, Google will generate your Client ID.
One of the most common trip-ups I see is developers grabbing the regular Client ID and trying to use it for the URL scheme. You actually need the Reversed Client ID. This special key is what you'll use in Xcode to set up the custom URL scheme, which is how Google securely passes the authentication token back to your app after a user signs in.
Wiring Everything Up in Your Xcode Project#
After generating your credentials, you’ll see both a standard Client ID and a Reversed Client ID. The reversed one usually looks like your bundle ID flipped around, starting with com.googleusercontent.apps. followed by a unique string. For a deeper dive into this specific step, check out our post on how to get a Google OAuth client ID.
Armed with that reversed ID, jump back into Xcode. You need to register a custom URL scheme so your app knows how to listen for the callback from Google. This simple step is what closes the authentication loop securely and lets your app know the sign-in was a success.
Providing a smooth login experience is more important than ever. With iOS holding around 28% of the global smartphone market and an active user base of roughly 1.38 billion people, you can't afford to get it wrong. You can find more stats on the massive scale of the iOS market on amraandelma.com.
Alright, with the groundwork laid in Google Cloud and your Xcode project settings, it's time to pull the Google Sign-In SDK into your actual Swift code. This is where we’ll wire everything up to make the magic happen, connecting your app to Google's authentication flow.
We're going to stick with the modern, recommended approach: using Swift Package Manager (SPM).
Gone are the days of manually wrangling frameworks or dealing with dependency managers like CocoaPods for a simple integration. SPM is built right into Xcode, which keeps the whole process clean and straightforward. You just tell Xcode where to find the SDK, and it handles the rest.
Integrating The SDK With Swift Package Manager#
First, pop open your project in Xcode and head over to your project settings. Click on the "Package Dependencies" tab, then hit the small "+" icon to add a new package. A search bar will appear—paste the official Google Sign-In repository URL right in there.
Xcode will go fetch the package and then ask which parts of it you want to use. For a standard setup, all you need to check is the GoogleSignIn product. This contains all the core functionality for the authentication process.
Once you add it, Xcode automatically links the necessary libraries to your app's target. It's that simple.
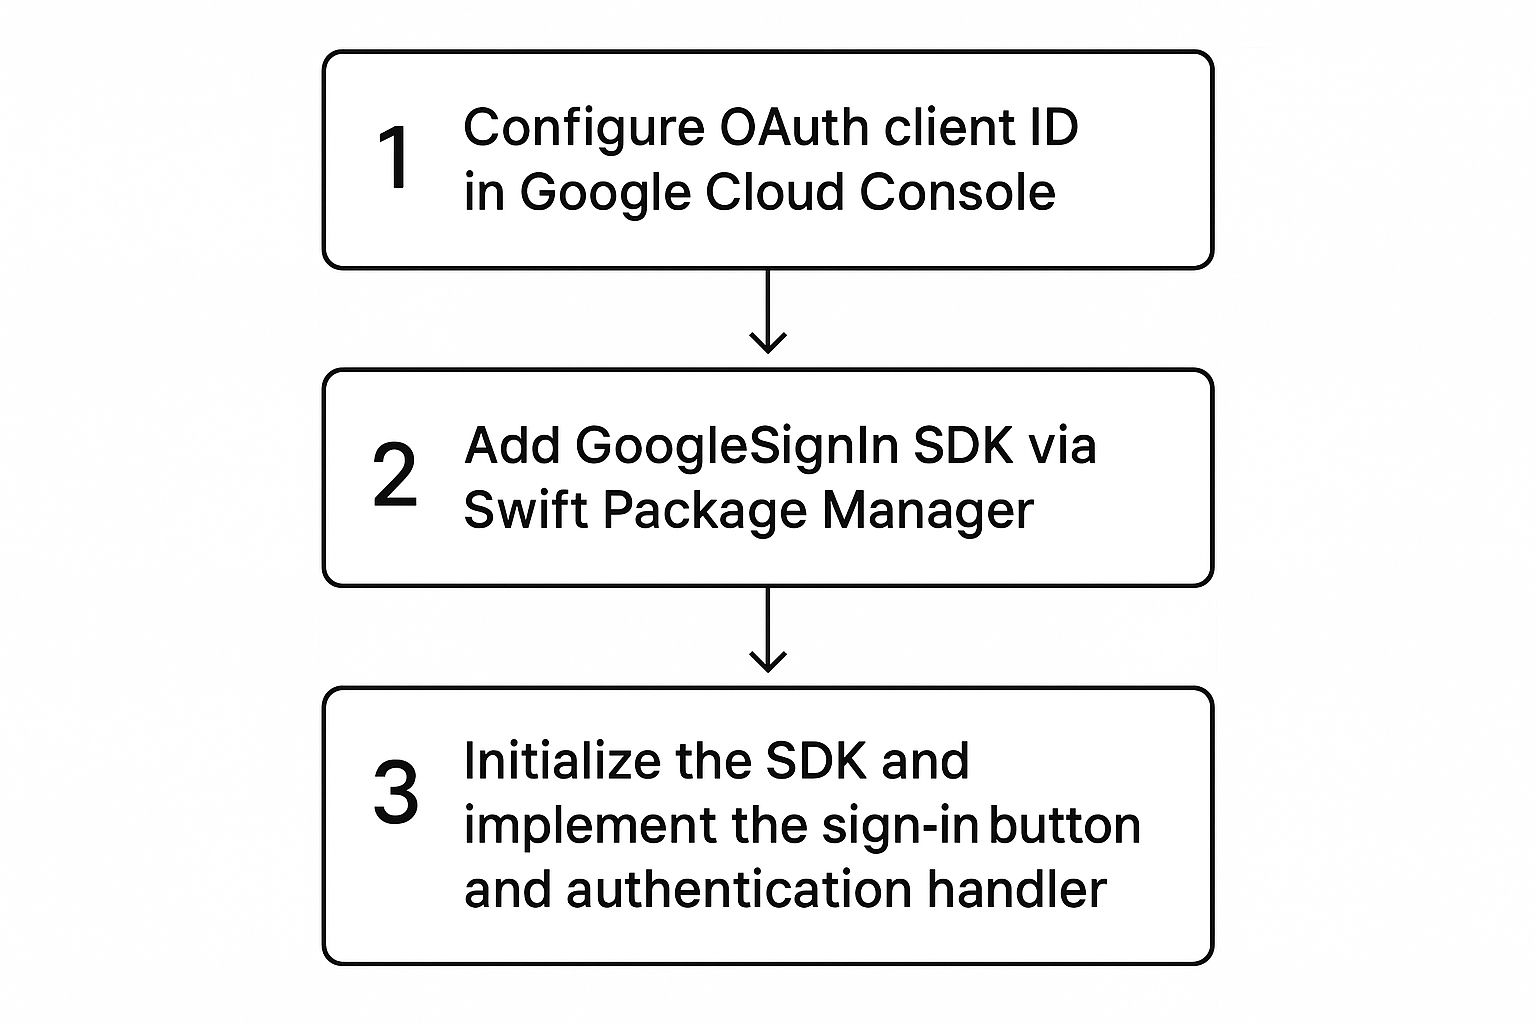
This whole process—from the initial cloud setup to the final code—is a logical sequence. The visual above shows how each stage connects to the next, a good reminder that getting each step right in order is key to a smooth integration.
Initializing The SDK At App Launch#
The Google Sign-In SDK needs to be configured the moment your app starts up. This is a critical step where you hand over the Client ID you generated earlier. This ID is what allows the SDK to talk to Google's services on behalf of your app.
The best place for this is typically in your AppDelegate or, for modern SwiftUI apps, your SceneDelegate.
You'll add a single line of code inside the application(_:didFinishLaunchingWithOptions:) method to configure the shared GIDSignIn instance. Make sure you use the standard Client ID from the Google Cloud Console here—not the reversed one.
import GoogleSignIn
// In your AppDelegate or SceneDelegate
func application(_ application: UIApplication, didFinishLaunchingWithOptions launchOptions: [UIApplication.LaunchOptionsKey: Any]?) -> Bool {
// Other setup code...
GIDSignIn.sharedInstance.configuration = GIDConfiguration(clientID: "YOUR_CLIENT_ID.apps.googleusercontent.com")

return true
}
This one line primes the SDK for action. If you forget it, any attempt to sign a user in will fail flat out.
Expert Tip: It's a small detail, but a common trip-up is mixing up the two IDs. Just remember: the standard Client ID goes in your Swift code for initialization, and the Reversed Client ID goes into your Xcode project settings for the URL Scheme.
To help keep these key properties straight, here’s a quick reference table.
Key Google Sign In SDK Configuration Properties#
This table breaks down the essential properties you'll encounter when setting up and using the Google Sign-In SDK in your Swift code.
| Property | Purpose | Example Usage |
|---|---|---|
clientID |
The standard ID from Google Cloud, used to identify your app to Google's servers. | GIDConfiguration(clientID: "YOUR_CLIENT_ID...") |
serverClientID |
An optional ID used for authenticating with your own backend server. | GIDConfiguration(clientID: "...", serverClientID: "...") |
openIDRealm |
An optional property for Cross-Account Protection, typically not needed for basic sign-in. | configuration.openIDRealm = "your-realm" |
hostedDomain |
An optional property to restrict sign-in to users from a specific Google Workspace domain. | configuration.hostedDomain = "yourcompany.com" |
Having a clear understanding of these properties helps you configure the SDK correctly for both simple and more advanced scenarios.
Adding The Sign-In Button And Handling The Result#
Now for the part your users will actually see. You have two main options here: use the official GIDSignInButton provided by the SDK, or create your own custom button and trigger the sign-in flow programmatically.
For simplicity and to ensure you're following Google's branding guidelines, the official button is usually the best choice.
You can add this button to your view controller either through Interface Builder or by writing the code yourself. Once the button is in place, you need to wire it up to an action that gets triggered when a user taps it.
Modern Swift makes handling the result incredibly clean with async/await. You can create a function that calls the signIn method, which presents the Google Sign-In flow to the user. Since this method is asynchronous, you can simply await its result inside a Task.
Here’s a practical example of a function you might call from your button’s action:
@MainActor
func handleSignInButton() {
Task {
do {
let result = try await GIDSignIn.sharedInstance.signIn(withPresenting: self)
// Handle successful sign-in
guard let user = result?.user else { return }
let email = user.profile?.email
let fullName = user.profile?.name
print("Signed in as (fullName ?? "") with email (email ?? "")")
} catch {
// Handle error
print("Error signing in: (error.localizedDescription)")
}
}
}
This modern approach keeps your UI responsive and your code easy to follow, a huge improvement over the nested callbacks we used to deal with.
For a more comprehensive look at different implementation patterns, check out our detailed guide covering all aspects of Google Sign-In for iOS.
Managing User Sessions and Data Securely#

Getting a user to sign in is a huge win, but it’s really just the beginning. The real work—and where you build lasting trust—is in how you manage their session from that point on. It’s all about creating a persistent, secure experience and handling their data with respect.
Once the sign-in flow is done, Google hands you a GIDGoogleUser object. This thing is gold. It’s packed with profile information you can use right away, like the user's full name, email, and profile picture URL. Instead of a generic "Welcome!", you can now greet them by name. It's a small touch that makes a world of difference.
Creating a Seamless Return Experience#
A great app feels like it remembers you. The absolute last thing you want is to make people log in every single time they open your app—that’s a surefire way to get them to stop using it. This is where restorePreviousSignIn comes in, and it's a non-negotiable part of a polished user experience.
By calling this method right when your app launches, the SDK checks for a valid, non-expired token from a previous session. If it finds one, it silently re-authenticates the user in the background. They go straight to the main screen without ever seeing a login prompt.
Pro Tip: I always implement
restorePreviousSignInin my initial app setup, right after configuring the SDK. This guarantees returning users are logged back in seamlessly, creating the smooth, frictionless experience they expect from modern iOS apps.
This one feature has a massive impact on user retention. It removes a repetitive annoyance, making your app feel more integrated and responsive. Remember, a core goal of adding google sign in ios is to reduce friction, and that applies to every session, not just the first one. For the backend heavy lifting and secure data management that often go with this, services like Google Cloud Platform can be a huge help.
Handling the Sign-Out Process Gracefully#
Just as important as signing in is giving users a clear and secure way to sign out. A proper sign-out isn’t just about sending the user back to the login screen; it involves a few critical actions to protect their account.
When a user decides to sign out, you must call the signOut() method on the GIDSignIn shared instance. This one call does two crucial things:
- Clears the current authentication state: It ends the local session right there in your app.
- Revokes tokens: It invalidates the tokens that were granted, so they can't be used for any future API calls.
If you mess this up, you could leave a user's session vulnerable. After calling signOut(), you should also clear any user data you’ve cached locally—their profile picture, name, whatever—and immediately update your UI to reflect their signed-out state.
This secure flow is how you build trust. It assures users that when they log out, their connection to your app is completely severed. While specific data on Google Sign-In on iOS is hard to come by, the trust in Google's ecosystem is undeniable. Consider that digital wallets are used by over 5.3 billion people globally, and Google Pay has a massive user base of 200-250 million. That shows just how much faith users place in Google to handle their data securely.
Working Through Common Google Sign In Integration Problems#
Even with the best planning, you’re bound to hit a few snags. It’s just part of the development cycle, but knowing what to look for can turn hours of frustration into a quick fix. Let's walk through some of the most common tripwires I've seen when adding google sign in ios and get them sorted out.
One of the most infamous errors you'll run into is the dreaded Error 403: disallowed_useragent. This one loves to pop up when you're testing on a real device, and it’s a real head-scratcher because your code probably looks perfect. It happens because Google has tightened its security policies to block authentication requests from web views it deems insecure, like the kind that can appear in captive network assistants.
The fix is almost always about forcing the authentication flow to open in a proper browser tab, not an embedded web view. The first place you should look is your URL scheme configuration in Xcode. A tiny typo or mismatch there is usually the culprit.
Navigating URL Scheme Conflicts#
Another classic headache is a URL scheme conflict. Your app’s custom URL scheme—which you get from your Reversed Client ID—is the special address Google uses to send the authentication token back to your app. If another app on the device happens to have registered the same scheme, things can get weird fast.
While you can't control what other apps are installed, you can make sure your scheme is as unique as possible. Google’s use of your reversed client ID is designed for this, but it's still critical that you’ve copied it into your Info.plist file exactly as it appears in the Google Cloud Console.
For stubborn URL scheme problems, the most reliable fix is to meticulously triple-check your Xcode project's
Infotab. Make sure the scheme is listed under "URL Types," the identifier matches your bundle ID, and the URL Schemes field contains only your reversed client ID. No extra spaces, no typos.
When Release Builds Go Wrong#
Here’s a frustrating one: everything works flawlessly in your debug builds, but the moment you archive a release build for TestFlight or the App Store, the sign-in process just breaks. This is almost always a sign that something is different in your build configurations.
- Check your build settings: Are necessary linker flags included for all build configurations, not just
Debug? This is a common oversight. - Review optimization levels: Sometimes, aggressive code optimization in release builds can interfere with the SDK’s inner workings.
- Confirm your API keys: Double-check that your release build is configured to use the correct—and enabled—API keys and Client IDs from your Google Cloud project. It's easy to have separate keys for dev and prod and forget to switch them.
These troubleshooting tips cover the most frequent bumps in the road. For a deeper dive into the "why" behind all this, our guide on how Google Sign-In OAuth works offers some great context. Nailing these details is what separates a frustrating login from a seamless one for your users.
Common Questions About Google Sign-In on iOS#
When you're adding a feature as important as Google Sign-In, a few questions always come up. I've heard these time and time again from developers, so let's get you some clear, practical answers.
Do I Really Need a Backend Server?#
Not always. For a simple setup, you can handle everything on the client-side. This works great if you just need to authenticate a user to personalize their in-app experience, like showing their name and profile picture. Think of apps that don't need to do anything on the user's behalf when they're offline.
However, if you're building a more robust application, sending the ID token to your own backend is the way to go. Your server can then validate that token directly with Google. This is a much more secure approach that confirms the user's identity is legitimate, allowing your backend to safely manage its own sessions or access tokens.
How Can I Customize the Google Sign-In Button?#
The SDK gives you a standard GIDSignInButton that looks and feels like a Google product, which is great for user trust. You have some control over its color scheme and corner radius to help it blend in with your app's design.
But if you need a completely custom look, you can just create your own UIButton. From there, you'll programmatically call the GIDSignIn.sharedInstance.signIn() method when the user taps it. Just make sure your custom design still follows Google's branding guidelines—it’s a small thing that makes a big difference in making users feel secure.
What’s the Difference Between an ID Token and an Access Token?#
This is a really important one to get right. It's the core of how OAuth works.
An ID token is a JSON Web Token (JWT) that basically acts as a secure identity card. It contains the user's profile information—name, email, profile picture URL, and so on. Your app uses this token to confirm who the user is.
An access token is different. It's a credential that grants your app permission to access specific Google APIs on that user's behalf for a limited time. For instance, you’d need an access token if you wanted to read files from their Google Drive or add an event to their Google Calendar.
The key difference is that an ID token proves who the user is, while an access token grants permission to do things on their behalf. They serve distinct but complementary roles in authentication and authorization.
If you want to go deeper, we break down the entire flow in our guide to the Google OAuth API and its tokens.
Ready to stop wrestling with native configurations and start shipping? With NextNative, you can build a production-ready iOS or Android app using the Next.js skills you already have. Get started with NextNative today and launch your mobile app in record time.