A Guide to Google Sign In OAuth for NextJS & Capacitor
Updated: October 12, 2025
Google Sign-In offers a secure, password-free way for users to log into your app with their existing Google account. It all runs on the OAuth 2.0 framework, a system that lets your app get limited access to a user's information without ever touching their actual password. This boosts both convenience and security in one go.
Why Modern Apps Rely on Google Sign In OAuth#
Ever notice how almost every app has a "Sign in with Google" button? That's not just a trend—it's a smart, strategic move to make life easier for users and developers. The whole idea is to get rid of friction. Instead of forcing someone to invent yet another username and password they'll forget, you give them a familiar, one-click entry point they already trust.
That simple button kicks off a complex but elegant dance behind the scenes. Your app acts as the "Client," asking for permission from the "Resource Owner" (that's your user) to get specific data from Google's "Authorization Server." If the user says yes, Google hands your app a secure token—never a password—which you then use to confirm their identity.
To really get a handle on this, it helps to see the moving parts laid out clearly. This table breaks down the core roles in any OAuth 2.0 flow.
Google Sign In OAuth Core Concepts at a Glance#
| OAuth 2.0 Role | What It Is | Example in Our Project |
|---|---|---|
| Resource Owner | The end-user who owns the data. | The person trying to sign into your NextNative app. |
| Client | The application requesting access to the user's data. | Your Next.js + Capacitor application. |
| Authorization Server | The server that authenticates the user and issues access tokens. | Google's authentication servers. |
| Resource Server | The server that hosts the user's protected data (e.g., profile info). | Google's API servers (like the People API). |
Seeing it this way makes the whole process feel less abstract. Your app is simply asking for a key (the token) from Google to unlock specific doors, with the user's explicit permission.
The Benefits for Developers and Users#
This whole setup creates a win-win situation. For your users, the upside is obvious: a faster, smoother sign-up without the headache of managing another password. It builds instant trust because the heavy lifting is handled by Google, a name they use every single day.
For developers, the advantages are just as huge. By implementing google sign in oauth, you completely sidestep the need to build, manage, and secure a password database—which is a massive responsibility. Delegating authentication this way slashes security risks and development overhead, freeing you up to focus on what makes your app special.
It also has a direct impact on user engagement. A frictionless login is one of the most effective mobile app retention strategies out there.
The data backs this up completely. A 2022 analysis showed that Google drives up to 82% of all social logins, with a staggering 68% of users globally preferring it for authentication.
This isn't just a nice-to-have feature anymore; it's practically a requirement for any modern app, especially if you want to learn https://nextnative.dev/blog/how-to-build-cross-platform-mobile-apps that can reach the widest possible audience. Before we jump into the code, understanding this foundation is crucial—it explains why every step in the setup process is so important.
Setting Up Your Google Cloud Project for OAuth#
Before you write a single line of code, your first stop is the Google Cloud Console. This is where you’ll introduce your app to Google, define its permissions, and grab the credentials it needs to work. Trust me, getting this part right from the start saves countless hours of debugging down the road.
Think of it as registering your app with the authorities. You’ll create a fresh project, which acts as a clean container for all your app's cloud services, APIs, and billing info. Starting with a new project ensures nothing from your other work interferes.
This visual guide breaks down the core workflow you'll follow inside the Google Cloud Console.
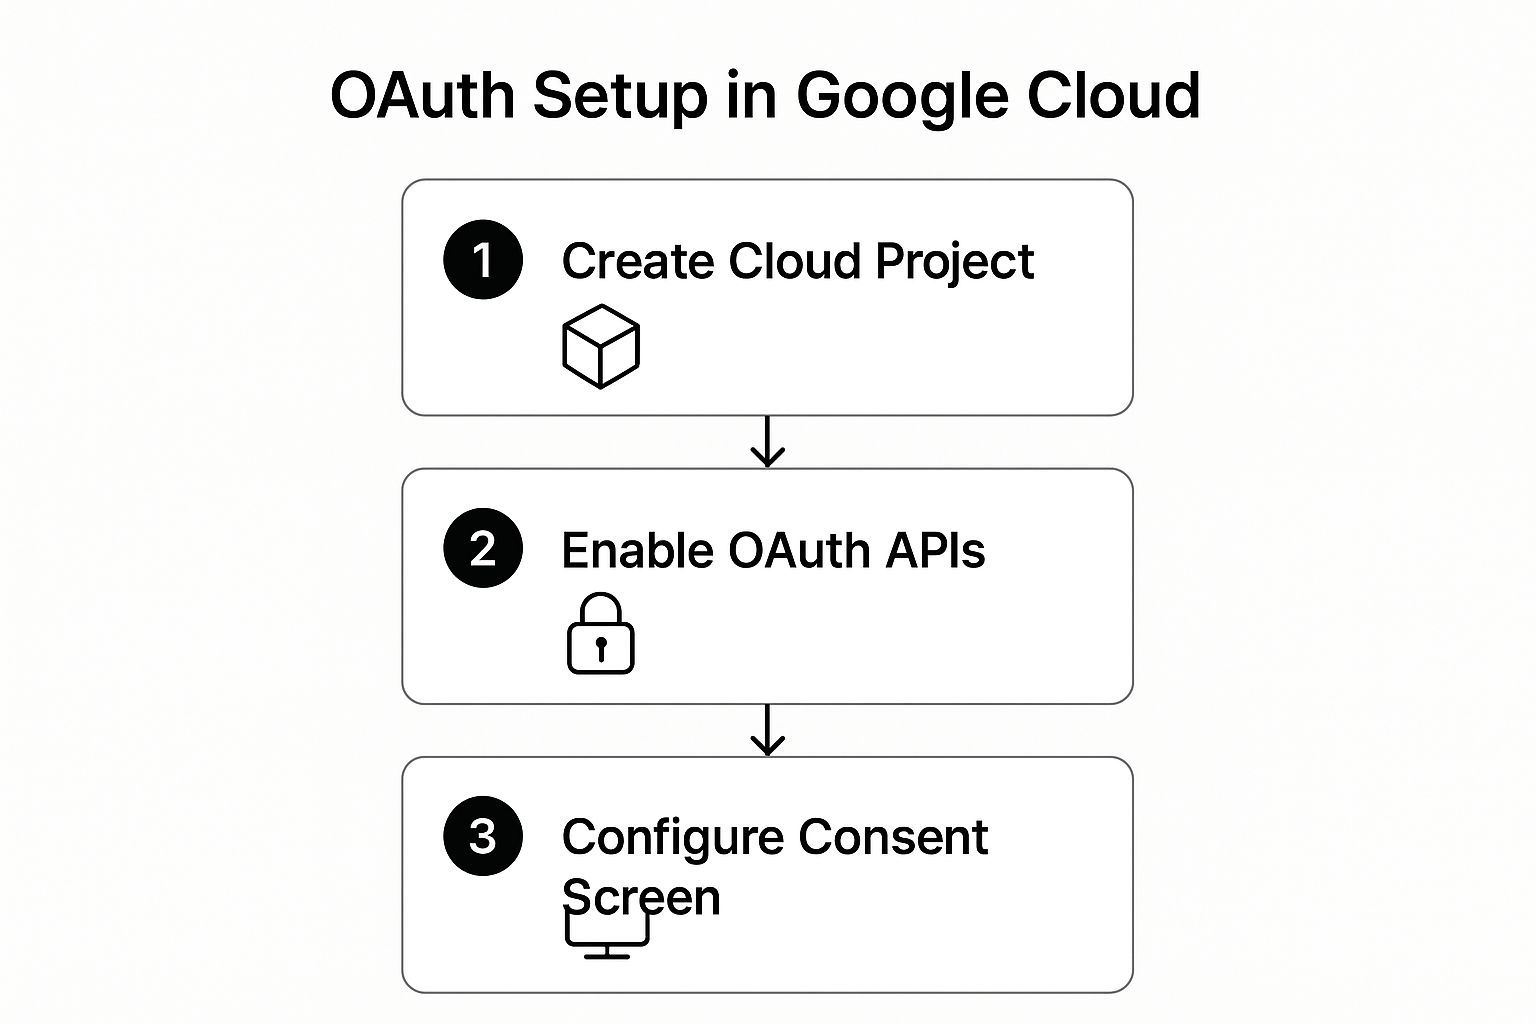
The flow is pretty direct: make the project, enable what you need, and then configure how your app presents itself to the world.
Configuring the OAuth Consent Screen#
With your project live, the very first thing you need to tackle is the "OAuth consent screen." This is the popup your users see when they try to sign in. It shows your app's name, logo, and the specific permissions it’s asking for, like "View your basic profile info."
A well-configured screen builds trust instantly. A generic one with no logo looks sketchy and can scare users away before they even get started.
- User Type: For most apps just starting out, you’ll want to select "External." This allows anyone with a Google Account to sign in.
- App Information: Fill in your app's name, a user-support email, and definitely upload your logo. It makes a huge difference.
- Scopes: For a basic sign-in, you only need the defaults:
email,profile, andopenid. A good rule of thumb is to never request more permissions than you absolutely need.
Creating Your OAuth 2.0 Client IDs#
Once the consent screen is set, it's time to generate the actual credentials your app will use. You'll find this on the "Credentials" page.
This area is the command center for all your app's keys and identifiers.
Now, for a NextNative app, you need to create two separate Client IDs. This is a common trip-up but it's essential. You’ll need one for your web front end (Next.js) and a second one for the native Android platform. If you're curious why, check out our guide on the specifics of a Google OAuth client ID for a deeper dive into why this separation is so critical.
Pro Tip: Never, ever expose your Web Client Secret in your frontend code. The web client ID is public, but the secret must stay on your server. For a pure client-side sign-in flow, you often won't even need the secret.
When you're setting up the "Web application" client ID, pay close attention to the Authorized JavaScript origins and Authorized redirect URIs. Your origin should be your development URL (like http://localhost:3000) plus your production domain. Any mismatch here is the number one cause of the dreaded redirect_uri_mismatch error.
Building the Frontend Google Sign In Flow#
Alright, with the Google Cloud project set up and your credentials ready to go, it’s time to actually build something a user can see and touch. This is where we bring the "Sign in with Google" button to life in your Next.js frontend. Our goal is to make it functional, responsive, and secure—the whole client-side authentication dance.
First things first, you need the right tools. To handle the google sign in oauth flow across both web and native platforms without a headache, you’ll need a couple of key packages.
For the web side of your Next.js app, the @react-oauth/google library is my go-to. It’s clean, uses hooks, and gives you pre-styled components that make adding the Google button dead simple. For the native part, which Capacitor handles, we'll pull in the corresponding community plugin.
Installing Core Dependencies#
Let's get the packages installed. Open up your terminal in the project's root directory and run this command:
npm install @react-oauth/google @capacitor-community/google-signin
That one command gives you everything you need for both environments. Now, you have to let Capacitor know about the new native dependency you just added. If you need a deeper dive on managing native plugins, our guide on how to build a Capacitor app from scratch is a great resource.
Run the sync command:
npx cap sync
With the libraries installed and synced, we can finally start building the UI.
Implementing the Sign In Component#
The heart of your frontend logic will live in a React component. We'll start by wrapping our entire application with the GoogleOAuthProvider, which is typically done in the _app.tsx file. This makes the Google authentication context available everywhere in your app.
// pages/_app.tsx
import { GoogleOAuthProvider } from '@react-oauth/google';
function MyApp({ Component, pageProps }) {
return (
<Component {...pageProps} />
);
}
export default MyApp;
You'll notice I’m using an environment variable for the clientId. This is non-negotiable. Never hardcode credentials directly into your components. Always use environment variables prefixed with NEXT_PUBLIC_ to safely expose them to the browser.
Now for the main event: the sign-in button component itself. This little component will render the button and handle the logic for what happens when a user successfully logs in.
// components/GoogleSignInButton.tsx
import { GoogleLogin } from '@react-oauth/google';
import { jwtDecode } from "jwt-decode";
const GoogleSignInButton = () => {
const handleSuccess = (credentialResponse) => {
// This is the ID token from Google
const idToken = credentialResponse.credential;
const decodedToken = jwtDecode(idToken);
console.log("Decoded ID Token:", decodedToken);

// TODO: Send this ID token to your backend for verification
// and session creation.
};
const handleError = () => {
console.log('Login Failed');
};
return (
);
};
export default GoogleSignInButton;
This component does a lot of heavy lifting for you. The GoogleLogin component renders the official Google-branded button and manages the pop-up flow.
The most crucial part is the
handleSuccessfunction. ThecredentialResponseobject it receives contains acredentialfield, which is the ID token. This JSON Web Token (JWT) is the proof of authentication you'll send to your backend.
This token contains user information like their name, email, and profile picture, all cryptographically signed by Google. You can decode it on the client side for quick UI updates (like showing a welcome message), but the real verification has to happen on your server, which we'll get to next.
Creating a Secure Backend for Token Verification#
Getting an ID token on the frontend is a great first step, but it's really just a claim. For your google sign in oauth flow to be truly secure, you have to verify that token on your backend.
Think of it this way: the frontend's job is to get the token, and the backend's job is to act as the gatekeeper. Relying only on what the client sends is a huge security risk. You need a server-side check to confirm the token is authentic and came directly from Google before you create a user session or grant access to anything important.
This principle is non-negotiable for a production app: never trust the client.
We'll set up a simple Next.js API route to handle this. It will catch the token from the frontend, use Google's official library to verify it, and then kick off the user session management process.
Building the Verification API Route#
One of the best things about Next.js is how easy it makes creating API endpoints. We can just create a file at pages/api/auth/google.ts, and it's ready to go. This endpoint will be set up to listen for a POST request that includes the ID token we got on the client side.
The main tool for this job is the google-auth-library. First things first, let's get it installed.
npm install google-auth-library
This package gives us a clean verifyIdToken method that handles all the heavy lifting of cryptographic verification behind the scenes.
Here’s a look at what the basic API route will look like:
// pages/api/auth/google.ts
import { OAuth2Client } from 'google-auth-library';
import type { NextApiRequest, NextApiResponse } from 'next';
const client = new OAuth2Client(process.env.GOOGLE_CLIENT_ID);
export default async function handler(
req: NextApiRequest,
res: NextApiResponse
) {
if (req.method !== 'POST') {
return res.status(405).end(); // Method Not Allowed
}
const { token } = req.body;
try {
const ticket = await client.verifyIdToken({
idToken: token,
audience: process.env.GOOGLE_CLIENT_ID,
});
const payload = ticket.getPayload();
if (!payload) {
  return res.status(401).json({ error: 'Invalid token' });
}

// TODO: Find or create user in your database
// TODO: Create a session (e.g., issue a secure HTTP-only cookie)

res.status(200).json({ user: payload });
} catch (error) {
res.status(401).json({ error: 'Token verification failed' });
}
}
This snippet is the core of your backend security. It takes the token from the request, uses the OAuth2Client to check it against your GOOGLE_CLIENT_ID, and then pulls out the user's info from the payload. If you want an even more detailed walkthrough, you can check out our complete guide on setting up a full Google OAuth application.
From Verification to Session Management#
Once you have that verified payload, you have information you can trust—the user's unique Google ID (sub), email, name, and profile picture. The next logical step is to use this data to either find an existing user in your database or create a new one.
After you've identified the user, it's time to create a session. A critical point here: never, ever use the Google ID token as your application's session token. That token is meant for one thing only: authentication.
Instead, you should generate your own secure session token (like a separate JWT) and send it back to the client inside a secure, HTTP-only cookie. This is a huge security win because it prevents client-side JavaScript from accessing the token, shielding you from common XSS attacks.
This focus on robust, modern authentication aligns with broader industry trends. Google's work on passwordless solutions like passkeys has demonstrated major security and usability wins. Recent reports show that over the past two years, Google has facilitated over 2.5 billion passkey-based sign-ins, boosting sign-in success rates by 30%. You can learn more about these advancements toward a passwordless future from industry analyses of global passkey adoption.
Avoiding Common Pitfalls and Security Risks#
Getting Google Sign-In working is one thing, but making it secure is a whole different ballgame. It's easy to follow a tutorial, get that token, and think you're done. But small, seemingly innocent mistakes here can punch massive holes in your app's security. This isn't just about getting a feature to work; it's about building a resilient system you can trust.

One of the first places people trip up is with redirect URIs. It feels easier to just set a broad domain, but that's a classic mistake that opens you up to token interception attacks. Always be brutally specific. Don't use https://yourapp.com; use the full, exact callback path like https://yourapp.com/api/auth/callback. Precision matters.
Key Takeaway: Never, ever, under any circumstances, should your client secret touch your frontend code. It belongs on your server and only on your server. Leaking it is like leaving the keys to your entire application sitting on the front doorstep.
Server-Side Validation Is Non-Negotiable#
Here’s another critical mistake I see all the time: trusting the ID token from the client without verifying it on the backend. An attacker can easily craft a fake token or use a stolen one to waltz right into a user's account if you're not checking. Your server must be the gatekeeper.
This server-side check confirms three non-negotiable facts:
- The token was actually issued by Google.
- The token was intended for your application (by checking the
audor audience claim). - The token hasn't expired.
Skipping this step is like having a bouncer at a club who just lets anyone in without checking their ID. Your authentication is basically built on a foundation of sand. For a deeper dive, it's worth brushing up on some essential mobile authentication best practices.
The Danger of Mutable Identifiers#
Now for a more advanced—but devastating—risk. How do you identify your users in your database? If your answer is "by their email address," you're making a dangerous assumption. Emails are not permanent. They can be deleted, and the domains they belong to can expire and be bought by someone else.
This isn't just a theory. A real-world exploit showed how attackers could buy expired domains from defunct startups to hijack former employee accounts across major platforms. Why? Because those platforms trusted the email address as a unique, permanent identifier. This flaw put millions of accounts at risk by exploiting that misplaced trust. You can read the fascinating and slightly terrifying research on this major Google OAuth flaw.
The fix is simple but vital. Always use the immutable sub (subject) claim from Google's ID token as the primary user ID in your database. This sub value is permanently tied to that user's Google account. It will never change. Even if they change their email ten times, the sub stays the same, ensuring your user accounts remain secure and correctly tied to the original person. It's a small change that massively hardens your security posture.
Your Google Sign In OAuth Questions Answered#
Even with a perfect guide, implementing Google Sign In OAuth can surface some weird edge cases and confusing questions. Let's walk through a few of the most common ones I see developers get stuck on.
Getting these details right is often what separates a functional app from a truly professional and secure one.
What Is the Difference Between an ID Token and an Access Token?#
This is a big one, and it trips up a lot of people. Think of it this way:
An ID token is a JSON Web Token (JWT) that proves who the user is. It contains claims like their name, email, and unique Google ID. Your app's backend uses this token to verify the user's identity. It’s like their digital driver's license.
An access token, on the other hand, is all about what the user can do. It's a credential you use to call Google APIs on their behalf. If you wanted to read their Google Drive files or add an event to their Google Calendar, you'd need an access token.
For a simple sign-in flow, you'll almost exclusively be working with the ID token.
Why Do I Keep Getting a Redirect URI Mismatch Error?#
Ah, the redirect_uri mismatch. It's practically a rite of passage for anyone working with OAuth. This error means the redirect_uri your app sent in its request doesn't perfectly match one of the URLs you’ve authorized in your Google Cloud Console.
The key here is an exact match. I mean character-for-character perfect. Check for simple mistakes like typos, mismatched protocols (http vs. https), different port numbers, or a sneaky trailing slash that’s either there when it shouldn’t be or missing when it should.
Every single character has to align with what you’ve listed in your OAuth 2.0 Client ID settings.
How Should I Handle User Sessions After a Successful Sign In?#
Once your backend has verified the Google ID token and confirmed the user is legit, that token’s job is done. You should not use the Google ID token to manage the user's session inside your own application.
Instead, your server should create its own session for your app. The standard, secure way to do this is:
- Generate your own unique session token (this is often another JWT, but one you create).
- Store this session token in a secure, HTTP-only cookie.
- Use that cookie to authenticate all future requests from the user's browser.
This approach neatly separates your app's session management from Google's authentication process, which is a critical security practice. It gives you full control and insulates your app from any changes on Google's side.
Ready to build a real mobile app with the web skills you already have? NextNative provides production-ready boilerplates for Next.js and Capacitor, saving you weeks of setup time. https://nextnative.dev