Build Production-Ready JS Mobile Apps
Updated: August 16, 2025
Building js mobile apps is faster and more cost-effective than ever, and it's all thanks to modern JavaScript frameworks. Developers can now use a single codebase to build high-performance apps for both iOS and Android, completely skipping the need to learn separate languages like Swift or Kotlin.
Why JavaScript Is Perfect for Mobile Apps#
Ever wondered why so many developers are building with JavaScript for mobile? It all comes down to its "write once, run anywhere" philosophy. This means you can take the web application you’ve already built with a framework like Next.js and, with the right tools, package it into a fully functional mobile app.
This approach absolutely slashes development time and costs. Instead of juggling two or three separate teams (web, iOS, Android), a single team can own the entire product. A unified process like this guarantees feature consistency across every platform and makes the whole update cycle a lot simpler.
The Power of a Unified Codebase#
The real magic happens when you bring in a tool like Capacitor. It acts as a bridge, letting your web code talk directly to native device features. Think of it this way: your Next.js app is the engine, and Capacitor provides the chassis and wheels to make it run on the roads of iOS and Android.
For developers, this combination unlocks some serious benefits:
- Faster Development Cycles: Pushing updates is as simple as updating your web code. There's no need to go through a full native build process for every minor tweak.
- Reduced Maintenance Overhead: One codebase means fewer platform-specific bugs and less time spent chasing down fixes.
- Access to a Huge Ecosystem: You get to use the massive world of npm packages and JavaScript libraries you already know and love.
To give you a clearer picture, here’s a quick rundown of the top JavaScript frameworks teams are using to build mobile apps today.
Key JavaScript Frameworks for Mobile Apps#
| Framework | Primary Use Case | Key Advantage |
|---|---|---|
| Next.js + Capacitor | Porting existing web apps to native mobile | Maximum code reuse; perfect for web-first teams. |
| React Native | Building native-feel apps from scratch | Renders true native UI components for top-tier performance. |
| Ionic | UI toolkit for cross-platform apps | Rich library of pre-built UI components that work everywhere. |
| NativeScript | Direct access to native APIs | Offers deep platform integration without a WebView. |
Each of these has its place, but the core idea is the same: use your web skills to build for mobile.
A Thriving Community and Proven Track Record#
JavaScript's dominance in the developer world is no secret, and that’s a massive advantage. Recent stats show that over 63% of software developers use JavaScript, with React Native (another JS framework) holding a 40% market share in cross-platform development.
With more than 16 million companies using JavaScript tools, you're tapping into an enormous and active community.
The ability to reuse skills and code is the primary driver behind the adoption of JS mobile apps. Why start from scratch when you can build on what you already have?
To get a better sense of the bigger picture, it's also worth exploring resources on the mobile app development industry as a whole.
In the end, using JavaScript for mobile isn't just a shortcut; it's a strategic move that lets teams build better products, faster. You can dive deeper into the specifics by reading our complete guide on using https://nextnative.dev/blog/javascript-for-mobile-app-development.
Getting Your Next.js Project Ready for Mobile#

This is where the rubber meets the road. Building a solid foundation for your Next.js project is the single most important part of creating high-quality js mobile apps. Getting this right from the start saves you from countless hours of refactoring and debugging down the line.
Let's start by scaffolding a new Next.js application. While the standard create-next-app command is a great starting point, we'll need to install a few extra dependencies to prepare it for its mobile journey.
Pop open your terminal and run this command to create your project and install Capacitor, the tool that will transform your web app into a native mobile binary.
npx create-next-app@latest my-mobile-app --ts --tailwind --eslint
cd my-mobile-app
npm install @capacitor/core @capacitor/cli @capacitor/ios @capacitor/android
This sequence sets up a TypeScript project with Tailwind CSS and pulls in all the Capacitor packages you'll need for both iOS and Android.
Configuring Capacitor for Next.js#
With the dependencies installed, the next move is to initialize Capacitor. This creates the configuration file that tells Capacitor how to bundle your Next.js output into a mobile package.
Just run npx cap init in your terminal. You'll be prompted for an app name and an App ID, which usually follows a reverse domain name format (like com.company.appname).
Pro Tip: Make sure your App ID is unique and final. Changing it later can cause a world of pain with app store listings and updates, so it's best to lock this in now.
This command generates a crucial file: capacitor.config.ts. Think of this as the control center for your mobile app's native properties. It’s where you’ll define settings that bridge your web code with the underlying mobile OS.
A standard configuration might look something like this:
import type { CapacitorConfig } from '@capacitor/core';
const config: CapacitorConfig = {
appId: 'com.nextnative.myapp',
appName: 'My Awesome App',
webDir: 'out',
bundledWebRuntime: false,
};
export default config;
Notice the webDir is set to 'out'. This is critical for Next.js projects that use static site generation (next build && next export), as it points Capacitor to the production-ready web assets.
Fine-Tuning Your Project Structure#
A clean folder structure is non-negotiable for a scalable app. I recommend a few adjustments to the default Next.js setup to keep your mobile-specific logic organized and separate from your core web components.
Try creating these directories at the root of your project:
- /components/mobile: For UI components designed specifically for the mobile experience, like a native-style tab bar or header.
- /lib/capacitor: A dedicated space for utility functions that interact with Capacitor plugins, such as accessing the camera or geolocation.
- /hooks/use-native-features: Custom React hooks that wrap native functionality, making it dead simple to use device features in your components.
This kind of thoughtful organization ensures that as your app grows, you know exactly where to find and tweak code related to its mobile capabilities. It also sets you up nicely if you're building a project that might benefit from a serverless backend for your mobile app to handle data and authentication. With this foundation in place, you're ready to add the native platforms themselves.
With your Next.js project configured, you’ve got a solid web foundation. Now for the fun part: turning that web code into a real mobile app. This is where we bridge the gap between your web components and the native environments of iOS and Android.

Adding Native iOS and Android Platforms#
Capacitor’s command-line interface (CLI) makes this surprisingly simple. To get the native iOS project set up, just pop open your terminal and run this command:
npx cap add ios
When you hit enter, Capacitor works its magic. It creates a new ios directory right in your project root, which contains a complete, standard Xcode project. This isn't just some lightweight wrapper; it's a genuine iOS project you can open, configure, and build just like any other.
Initializing the Android Project#
In the same way, adding support for Android is just one command away. This is crucial for making sure your js mobile apps can hit the widest possible audience by covering both major mobile ecosystems.
Run this command to generate all the necessary Android project files:
npx cap add android
This creates an android folder with everything you need to open the project in Android Studio. Having these dedicated native project folders gives you total control to add platform-specific configurations or even custom native code down the line if you need it.
This hybrid approach is a huge reason for the explosive growth in mobile development. The total number of app downloads is expected to climb to a staggering 299 billion globally in 2025, and it's tools like this that help developers build efficiently for multiple platforms.
Keeping Your Code in Sync#
Okay, so you have both native projects. A new challenge pops up: how do you keep them updated with your latest web code? Manually dragging and dropping files is a recipe for disaster. This is where the single most important Capacitor command comes into play.
npx cap sync
This command is going to be your best friend during development. Anytime you make changes to your Next.js app, you'll need to run a production build and then sync it.
Crucial Workflow: Always remember this two-step dance. First, build your web assets (
npm run build). Then, sync those assets into your native projects (npx cap sync). This simple habit ensures your native apps always have the latest version of your UI and logic.
The sync command handles a few key tasks for you automatically:
- Builds Web Assets: It kicks off your
buildscript to generate the staticoutdirectory. - Copies to Native: It then copies the contents of
outinto the web asset folders inside both theiosandandroidprojects. - Updates Plugins: It also updates any native dependencies required by the Capacitor plugins you've installed.
Mastering this sync workflow is absolutely essential for a smooth development experience. For a more detailed walkthrough of Capacitor's build process, you can check out our guide on https://nextnative.dev/blog/how-to-build-capacitor.
With your platforms added and synced, you’re ready to open them in their respective IDEs—Xcode for iOS and Android Studio for Android—and see your Next.js app running on a device for the very first time.
Crafting a Native-Feeling UI in Next.js#
A great mobile app just feels right. It’s an extension of the phone itself. Transitions are buttery smooth, gestures feel natural, and the layout fits the screen like a glove.
Nailing this polished experience is what separates a high-quality native application from a website crammed into a container. This is where we make your Next.js project truly shine on mobile.
The whole journey starts with a mobile-first mindset. Forget designing for a big desktop screen and then trying to shrink it down. We're building for the smallest screen first using Tailwind CSS.
This approach forces you to prioritize what's truly essential, guaranteeing a clean and functional experience before you even think about larger devices.
Designing Mobile-First with Tailwind CSS#
Tailwind’s responsive prefixes make this whole process incredibly intuitive. You set your base styles for mobile and then layer on overrides for larger screens using prefixes like md: or lg:. It keeps your CSS logical and your design intent crystal clear.
For example, a card component might start as a full-width block on a phone. On a tablet, it can snap into a two-column grid. By defaulting to mobile, you ensure the core experience is rock-solid from the start.
The secret to a native feel isn't just about aesthetics; it's about responsiveness and predictability. Users have expectations for how an app should behave on their phone, and our UI has to meet them flawlessly.
Handling Mobile-Specific UI Patterns#
Certain UI elements are pure mobile. Think about the persistent tab bar at the bottom of Instagram or Twitter—it’s a staple of the mobile experience.
Building these patterns in Next.js means getting comfortable with CSS properties like fixed positioning and z-index to make sure key elements stay visible without messing up your scrollable content.
Here’s a quick rundown of common patterns you'll likely need to build:
- Fixed Tab Bars: Use
position: fixed,bottom: 0, and a highz-indexto lock a navigation bar in place, making it always accessible. - Off-Canvas Menus: For secondary actions, implement a slide-in navigation drawer. CSS transforms are your best friend here for creating smooth, hardware-accelerated animations.
- Full-Screen Modals: Design modals that take over the entire screen for focused tasks, like creating a new post or editing a profile.
Tackling Device Quirks Like the Notch#
Modern phones throw their own curveballs into the mix, with the iPhone’s "notch" or "dynamic island" being the most famous example. If you’re not careful, your app's header or status bar content can get hidden behind these hardware cutouts. It looks sloppy and unprofessional.
Thankfully, Capacitor gives us a clean solution with CSS environment variables that account for these "safe areas."
By adding a little padding to the top of your layout with env(safe-area-inset-top), you can push your content down just enough to clear the notch. This simple CSS trick is a non-negotiable step for creating professional js mobile apps that look polished on any device.
By mastering these mobile-centric UI techniques, your Next.js app won't just run on a phone—it will feel like it belongs there.
5. Tapping into Native Device Features with Capacitor#
This is where your Next.js project really transforms into a mobile powerhouse. Sure, the UI looks and feels native, but it’s the ability to reach into the device's hardware that makes all the difference. With Capacitor, your JavaScript code gets direct access to the camera, file system, geolocation, and so much more.
The best part? It's all done through simple, promise-based APIs.
You don't need to touch a line of complex native code. If your app needs to snap a photo, you can do it with just a few lines of JavaScript. This direct bridge is what makes building js mobile apps so incredibly effective. You get to stay in the language you know best while creating the rich, feature-complete experiences users expect.
How to Use Core Native Functions#
Let's walk through a real-world example: accessing the device camera. The official Capacitor Camera plugin makes this almost laughably easy. Once it's installed (npm install @capacitor/camera), you can import it into any component and call its methods just like any other JavaScript module.
Imagine you're building a profile page where users can update their picture. The logic would look something like this:
import { Camera, CameraResultType } from '@capacitor/camera';
const takePicture = async () => {
try {
const image = await Camera.getPhoto({
quality: 90,
allowEditing: true,
resultType: CameraResultType.Uri
});
// The 'image.webPath' holds the path to the photo,
// which you can now use directly in an <img> tag.
const imageUrl = image.webPath;
console.log('Image URL:', imageUrl);
} catch (error) {
console.error('Error taking picture', error);
}
};
That one function handles everything: opening the native camera UI, letting the user take or choose a picture, and returning a usable image path back to your web view. It’s that simple. This same pattern applies to nearly all Capacitor plugins, whether you're showing native dialogs or checking the network status.
Here's a quick look at some of the most common native features you'll probably need and the plugins that get you there.
Common Native Features and Capacitor Plugins#
This table lists some essential device capabilities and the official Capacitor plugins you'll use to access them from your JavaScript code.
| Native Feature | Capacitor Plugin | Example Use Case |
|---|---|---|
| Camera | @capacitor/camera |
Taking user profile pictures or scanning QR codes. |
| Geolocation | @capacitor/geolocation |
Pinpointing a user's location for a map view. |
| File System | @capacitor/filesystem |
Saving user-generated content or caching data locally. |
| Push Notifications | @capacitor/push-notifications |
Sending alerts and updates even when the app is closed. |
| Local Notifications | @capacitor/local-notifications |
Scheduling reminders or alerts that fire on the device. |
| Haptics | @capacitor/haptics |
Providing physical feedback for actions like a successful payment. |
These plugins are the building blocks for creating a truly integrated mobile experience, turning your web app into something that feels right at home on iOS and Android.
Navigating the Permissions Maze#
Of course, you can't just start accessing a user's camera or location without asking. Getting permission is a critical step for both building user trust and complying with App Store rules. Capacitor helps here too, by standardizing the permissions API across both iOS and Android.
Before you try to use a feature that needs permission, you should always check the status first.
Pro Tip: Only ask for permissions right when the user tries to use a feature. Don't bombard them with a dozen requests on the first launch. It's a surefire way to have them deny everything and lose trust in your app from the get-go.
Here's a simple, robust flow for handling permissions:
- Check the current status: Use a function like
Camera.checkPermissions()to see if access has already been granted, denied, or not yet requested. - Request permission if needed: If the status is 'prompt', call
Camera.requestPermissions(). This will trigger the native OS dialog asking the user for access. - Handle the user's decision: Gracefully manage both granted and denied states. If permission is denied, it's good practice to show a message explaining why the feature needs that permission and how they can enable it later in settings.
The infographic below shows a comparison of average app startup times for different frameworks, highlighting how web-based technologies can deliver competitive performance.
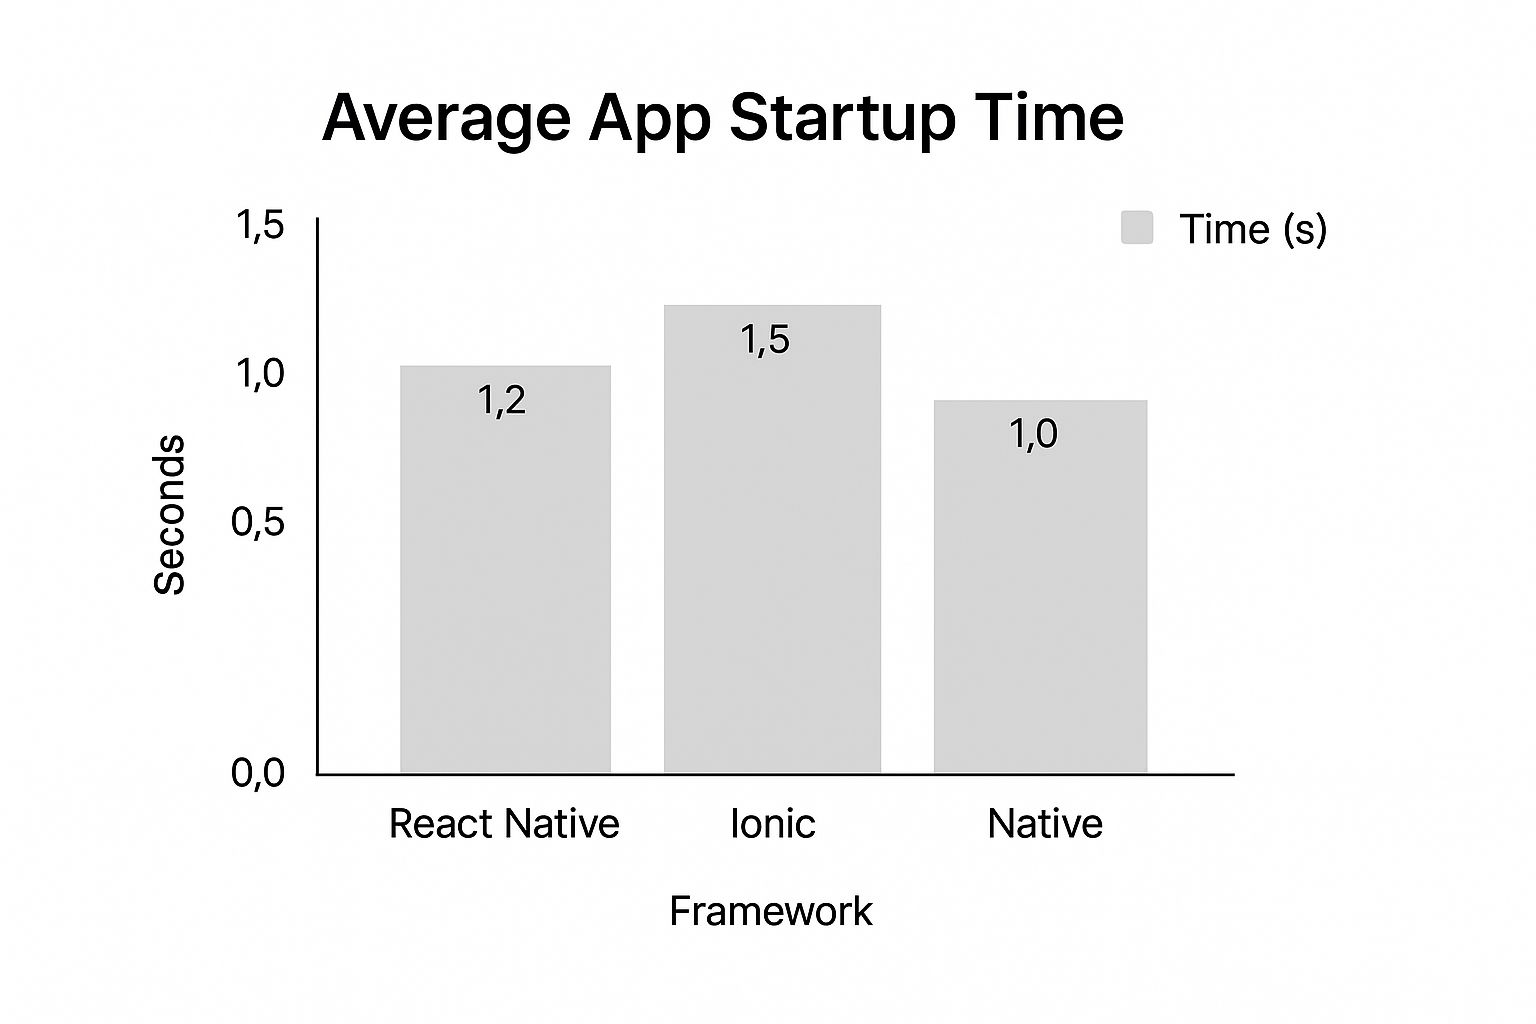
This data shows that frameworks leveraging web tech, like Ionic (which Capacitor is built on), hold their own against others while still offering the massive benefit of a unified codebase.
The cross-platform JavaScript ecosystem is incredibly dynamic. React Native currently leads with a massive 40% market share, but frameworks like Ionic have seen a 25% increase in usage, especially for teams porting existing web apps. This competitive landscape is fueling a mobile market projected to exceed $1 trillion by 2026, underscoring just how central JavaScript has become to modern app development.
For a deeper dive with more practical examples, check out our step-by-step guide on integrating native device features with NextNative.
Answering the Big Questions About JS Mobile Apps#
When you start digging into building mobile apps with your web stack, a few questions always seem to surface. It's totally normal. Let's tackle them head-on so you can move forward with confidence.
https://www.youtube.com/embed/pI5zrUhydyo
The number one concern I hear is about performance. Can an app built with Next.js and Capacitor really feel as snappy and smooth as something built natively?
For the vast majority of apps out there, the answer is a clear yes. Today's phones are ridiculously powerful, and the WebViews that run your app are incredibly efficient. Unless you’re building a graphically intense 3D game or something that needs heavy, real-time processing, your users won't be able to tell the difference.
For your typical business, social, or utility app, the performance is more than just "good enough"—it's great.
When Does This Approach Make the Most Sense?#
This brings us to the next logical question: what’s the sweet spot for this stack? The combination of Next.js and Capacitor really shines in a few key scenarios.
It’s an absolute game-changer if you already have a Next.js web app. You can reuse a huge chunk of your code—we're talking components, business logic, even API routes—and launch on mobile in a fraction of the time it would take to rebuild from the ground up.
This is perfect for content-driven apps, e-commerce stores, social platforms, and internal business tools. The ability to stick with a single codebase massively cuts down on complexity and your long-term maintenance bill.
This stack is also a lifesaver for startups and smaller teams. You can get to market on both iOS and Android without having to hire separate, specialized mobile developers. That kind of speed and efficiency is a serious competitive edge.
How Do App Updates and Maintenance Work?#
Finally, let's talk about the long game: maintenance. How do you handle updates once your app is live? This is where the hybrid model really shows its strength.
- For UI and logic changes: You can simply push new code to your web server. Since your app is essentially loading your web content, many updates don't need a full App Store review. You can ship fixes and new features on the fly.
- For native plugin updates: If you decide to add a new native feature (like biometrics) or need to update a core Capacitor plugin, you'll need to resubmit your app to the Apple App Store and Google Play Store.
This dual approach gives you incredible flexibility. You get the instant-update capability of the web for most of your changes, while still following the standard store review process for deeper, native-level modifications. It's the best of both worlds.
Of course, sticking to solid mobile development best practices is key to making sure your app stays stable and easy to manage over its lifetime.
Ready to stop wrestling with complex setups and start building? NextNative gives you a production-ready boilerplate with everything you need to build and deploy your Next.js app to iOS and Android, saving you weeks of work. Get started with NextNative today.