Build a Secure Google OAuth Application
Updated: September 24, 2025
When you add a Google OAuth application to your project, you're tapping into a secure, delegated way for your app to talk to a user's Google account without ever seeing or storing their password. It’s a standardized digital handshake. The user grants specific permissions, and your app gets a temporary access token instead of highly sensitive login credentials.
Why Google OAuth Is Your Secret Weapon for App Security#

Before we jump into the code, it’s really important to understand why Google OAuth is such a game-changer for you and your users. At its heart, OAuth 2.0—the framework Google uses—is all about trust and delegation.
Instead of building your own authentication system from the ground up, which is a notoriously complex and risky job, you offload that entire responsibility to Google's world-class security infrastructure.
This move immediately boosts user confidence. When people see that familiar "Sign in with Google" button, they're interacting with a process they already know. They aren't being asked to create yet another password or hand over their login details to an app they've just met.
The Core Benefits for Your Application#
Putting Google OAuth in place gives you several immediate wins that go way beyond just a login button. It fundamentally strengthens your app's security and makes the user's life a whole lot easier.
- Reduced Security Burden: You never handle or store user passwords. This simple fact eliminates a massive potential liability. A data breach becomes far less catastrophic if there are no passwords to steal in the first place.
- Enhanced User Trust: Using a globally recognized brand like Google for sign-in lowers the barrier to entry. It cuts down on skepticism and can directly lead to higher sign-up rates.
- Simplified Onboarding: Users can create an account with a single click. No more tedious registration forms. They get into your app faster and with less friction.
- Scoped Access: You only request the specific permissions your app actually needs, like reading a user's profile info or accessing their calendar. This is a core principle of modern privacy and a great way to respect user data. You can find more details in our complete guide on https://nextnative.dev/blog/mobile-app-security-best-practices.
The real magic of OAuth is that it separates the roles of authentication (who the user is) from authorization (what the user allows your app to do). Your app only needs to worry about the second part.
This framework is everywhere. Google OAuth, a key piece of Google's identity platform, is the backbone for securing millions of applications. It currently supports over 3 billion active monthly Google Workspace users and enables Single Sign-On (SSO) for more than 200 major cloud applications.
To help you get a clearer picture of how all the pieces fit together, let's break down the main roles you'll encounter in any OAuth 2.0 flow.
Key Google OAuth 2.0 Roles at a Glance#
This table breaks down the fundamental roles you'll encounter, helping you understand each component's purpose in the authentication flow.
| Term | Role in the OAuth Flow | Simple Analogy |
|---|---|---|
| Resource Owner | The end-user who owns the data. They grant permission for your app to access their account. | You, the owner of a house. |
| Client | Your application. It's requesting access to the user's data on their behalf. | A valet driver you hire to park your car. |
| Authorization Server | Google's server. It authenticates the user and provides an access token to your app. | The security guard at a parking garage who checks your ID and gives the valet a key card. |
| Resource Server | The server hosting the user's protected data (e.g., Google Calendar API, Gmail API). | The parking garage itself, where the car is stored. |
Understanding these roles makes the entire process much less intimidating. It's a clear, defined system designed to protect user data while still letting your application do its job.
Configuring Your Project in the Google Cloud Console#
Before you can write a single line of code, your Google OAuth application needs a home. That home is the Google Cloud Console, a powerful but sometimes intimidating dashboard. Think of it as the control room where you’ll define your app's identity and set the rules for how it interacts with Google's services.
The very first thing you need to do is create a new project. This isn't just a formality; it acts as a dedicated container for all your app's resources, APIs, and credentials. Keeping things isolated this way is a best practice that prevents your authentication settings from getting tangled up with other projects you might be working on.
Once the project is set up, you have to tell Google what your application actually wants to do. This is handled by enabling the right APIs. For grabbing basic profile information, you’ll probably just need the Google People API. If you needed to access a user's calendar, you'd enable the Calendar API. This is a critical security step that ensures your app can't accidentally access services it was never designed for.
Setting Up the OAuth Consent Screen#
Next up is the OAuth consent screen. This is the user-facing part of the setup—it's the screen people see when your app first asks for permission to access their Google account. Getting this right is absolutely crucial for building user trust.
This is where you'll display key information to the user, including:
- Your application name: Make it clear and consistent with your branding.
- Your logo: A professional logo adds a huge layer of legitimacy.
- Support email: A point of contact for users who have questions or run into trouble.
- Links to your privacy policy and terms of service: These are non-negotiable for any production app.
You’ll also define the scopes here. Scopes are just the specific permissions you're requesting, like profile, email, or openid. My advice? Only ask for what you absolutely need. Requesting a laundry list of permissions is a major red flag for users and can tank your sign-up conversion rates.
Take your time with the consent screen. A sloppy, unbranded screen with vague requests will make users hesitate. A polished screen that clearly explains why you need certain permissions builds the confidence needed for them to click "Allow."
This whole setup is fundamental to the OAuth framework, a technology used by a massive number of businesses. In fact, data shows that over 15,700 companies use OAuth 2.0 to power their secure authorization flows. Its widespread adoption really highlights its role as a trusted industry standard for managing access control.
Creating Your OAuth 2.0 Client ID#
With the consent screen configured, you can finally generate the actual credentials your app will use to identify itself. To do this, head over to the "Credentials" tab and choose to create an "OAuth 2.0 Client ID."
This step requires you to specify your Application type. Since we're building a Next.js app, you'll want to select "Web application." This choice determines the specific security settings that will be available to you.
Now for the most critical part: defining your Authorized JavaScript origins and Authorized redirect URIs.
- Origins: These are the domains where your application is hosted. During development, this will be something like
http://localhost:3000. - Redirect URIs: This is the exact URL that Google will send the user back to after they've successfully authenticated.
A mismatch here is the source of the infamous redirect_uri_mismatch error that has tripped up countless developers. These URIs must be an exact, character-for-character match to what's in your code.
Once you hit save, you'll be presented with your Client ID and Client Secret. These are the keys to the kingdom. For a deeper look at this process, check out our guide on how to find your https://nextnative.dev/blog/google-oauth-client-id.
Connecting Google OAuth with Your Next.js App#
Okay, you've got your credentials from the Google Cloud Console. Now for the fun part: making it all work on the frontend. This is where we’ll connect your Next.js app to Google's authentication servers and build that "Sign in with Google" experience for your users.
The very first thing you need to do—and this is an absolute must for security—is handle your Client ID correctly. Never, ever hardcode it directly into your components. Instead, it belongs in an environment variable file, .env.local.
This keeps your sensitive keys out of version control (like Git) and lets you swap them out for different environments, like development and production. In your code, you'll access it safely using process.env.NEXT_PUBLIC_GOOGLE_CLIENT_ID.
Building the Authentication URL#
That "Sign in with Google" button isn't just a simple link. It kicks off the entire OAuth flow by sending the user to a special URL that you have to build carefully. Think of it as giving Google a set of instructions.
You'll piece this URL together from a few key parameters:
client_id: This is the public Client ID you just stored in your environment variables.redirect_uri: The exact URL where Google should send the user back after they sign in. It has to be a perfect match to one of the URIs you set up in the Cloud Console.response_type: For this flow, we'll set it tocode. This tells Google we're expecting a temporary authorization code in return.scope: This defines what permissions you're asking for. For basic user info, a common scope ishttps://www.googleapis.com/auth/userinfo.profile https://www.googleapis.com/auth/userinfo.email.
You'll build this URL dynamically in your application's logic, making sure every piece is in place before the user is redirected to Google.
This infographic gives you a simplified look at the consent screen setup, which is a required step before any of this will work.
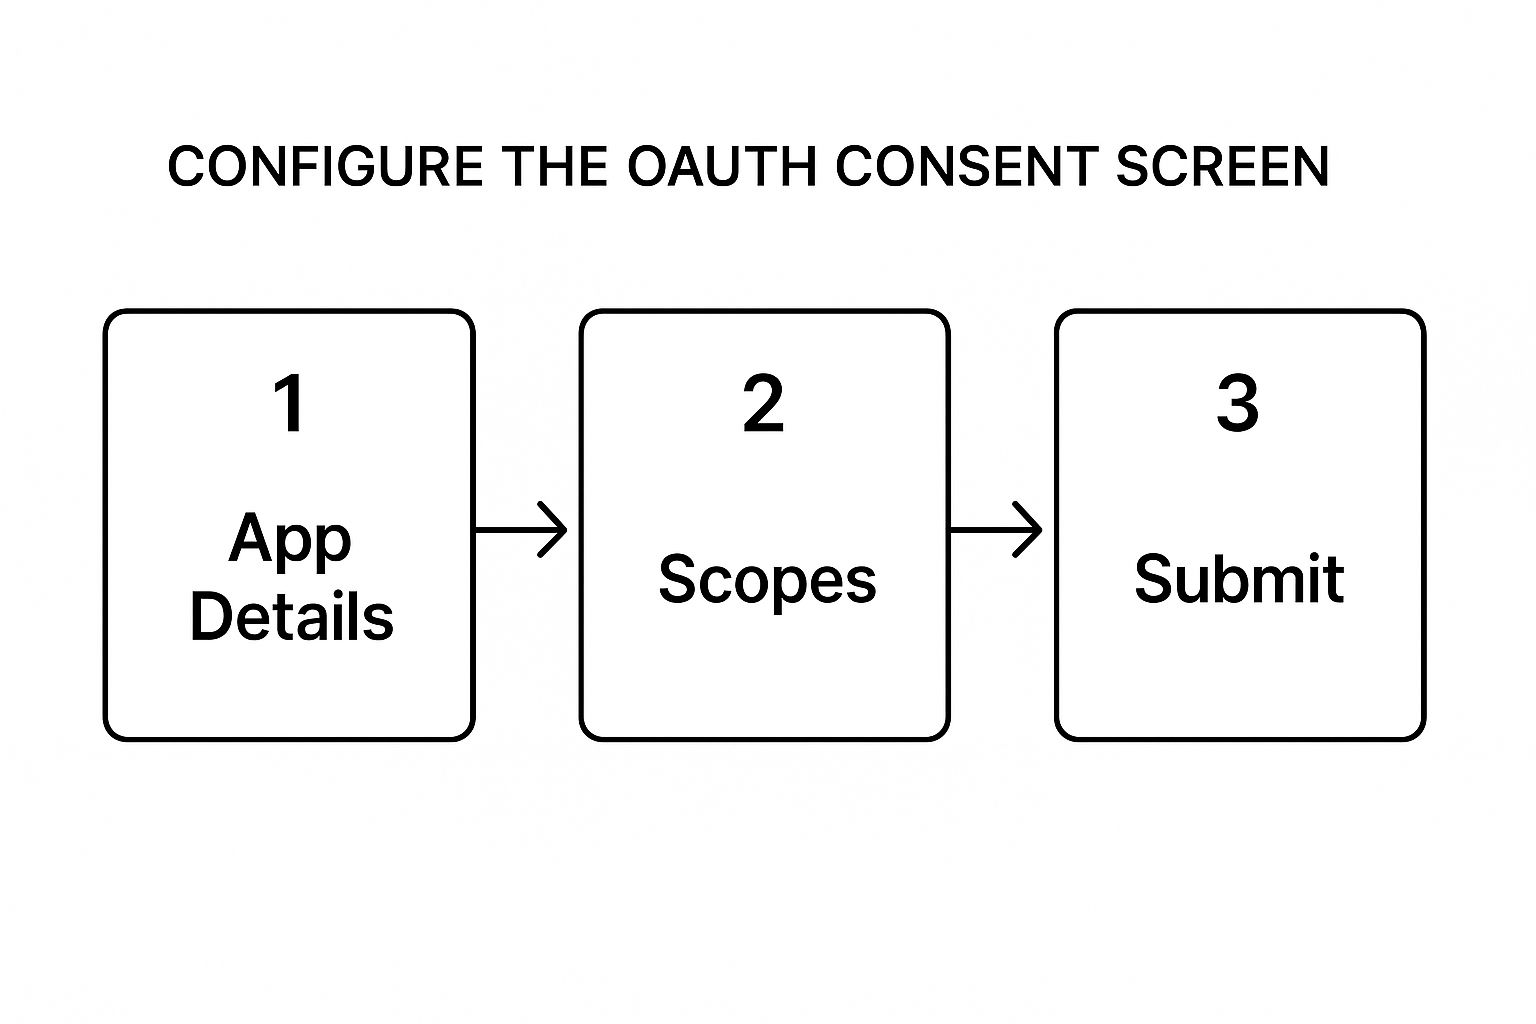
It’s a good visual reminder of the flow, from defining your app's identity to specifying the exact permissions it needs before Google will give it the green light.
Capturing the Authorization Code#
Once a user signs in with Google and agrees to your permissions, Google sends them back to the redirect_uri you provided. This is where the magic happens. Tucked into the URL will be a query parameter named code.
Your Next.js app needs to be ready to catch it. On the page you designated as your redirect URI, you'll use Next.js's router or search parameter hooks to grab this authorization code from the URL the moment the page loads.
Heads up: this code isn't the final token! It's a temporary, single-use credential. Think of it like a claim ticket. It proves the user authenticated successfully, and now you have to take that ticket to your backend to exchange it for the real access and refresh tokens.
Capturing this code on the frontend is the final step before you hand things over to a secure, server-side environment. The standard way to do this is to make a POST request from your client-side code to one of your own API routes. You can find some great patterns for this in the official documentation on building a Next.js API with NextNative.
This handoff is critical. It ensures your Client Secret and the token exchange process remain completely hidden from the user's browser. The frontend’s only jobs are to kick things off and catch the code. Everything else belongs on the server.
Handling Server-Side Token Exchange Securely#
Once your frontend successfully captures that authorization code, the baton is passed to your backend. This is where the most sensitive part of the entire Google OAuth application flow happens. That short-lived code is your one-time ticket to exchange for the real prize: an access token and a refresh token.
This exchange must happen on the server, never in the user's browser. We’ll use a Next.js API route to create a secure endpoint just for this. The logic is simple: your frontend sends the authorization code to this API route, which then makes a secure, server-to-server POST request directly to Google's token endpoint (https://oauth2.googleapis.com/token).
This request includes the authorization code along with your Client ID and, crucially, your Client Secret. Because this all happens on your server, the Client Secret remains completely protected, which is absolutely essential for security.
Understanding Access vs. Refresh Tokens#
If Google validates everything, it sends back a JSON payload with two very different, but equally important, tokens. Getting this part right is key to a good user experience.
- Access Token: This is a short-lived key, usually valid for just one hour. It grants you permission to make API calls on the user's behalf. Think of it as a temporary key card that lets you into specific rooms but expires quickly.
- Refresh Token: This is a long-lived, powerful token that lets you request a new access token after the old one expires—all without forcing the user to log in again. This is the key to maintaining a persistent session.
Think of it this way: the access token gets you in the door today, but the refresh token lets you get a new key for tomorrow without bothering the homeowner. Protecting this refresh token is paramount.
Storing these tokens requires a battle-tested strategy. The absolute best practice is to set them in HTTPOnly cookies. This type of cookie is inaccessible to client-side JavaScript, which provides a strong defense against Cross-Site Scripting (XSS) attacks. An attacker who manages to inject malicious JavaScript into your site won't be able to steal the user's tokens. For a deeper dive into protecting your application's credentials, you should check out our guide on securing API keys and other secrets.
Putting Your Access Token to Use#
With a valid access token securely stored, you can finally start interacting with Google's APIs. The process is simple: you just include the access token in the Authorization header of your API requests, typically as a Bearer token.
For example, to get the user's basic profile information, you'd make a GET request to https://www.googleapis.com/oauth2/v2/userinfo with this header:
Authorization: Bearer YOUR_ACCESS_TOKEN
Your server-side code handles this request, processes the response from Google (which contains details like the user's name, email, and profile picture), and then uses that data to either create a new user account in your database or sign in an existing user. This final step completes the authentication loop, securely connecting your application to the user's Google identity.
Taking Your Integration From Good to Great#

Getting a functional Google OAuth flow working is a huge win. But the details are what separate a quick prototype from a production-ready app that people actually trust. Let's dig into a few pro tips to harden your security and polish the user experience.
One of the easiest wins for security is implementing the state parameter. This is your first line of defense against Cross-Site Request Forgery (CSRF) attacks. Before you send the user over to Google, your app needs to generate a unique, random string and save it in the user's session. Then, you tack that same string onto the authentication URL.
When Google sends the user back, it includes that state parameter. The very first thing your app should do is check if the incoming state value matches the one you saved. If they don't line up, that's a massive red flag. It means the request might have been hijacked, and you should kill the authentication process right there.
Build a Real Logout and Handle Bumps in the Road#
A proper logout does more than just clear a local session or delete a cookie. For a truly secure sign-out, you need to tell Google your app is done with its access. This is where token revocation comes in.
You'll want to make a server-side request to Google's token revocation endpoint. This move completely invalidates both the access and refresh tokens, making them useless even if they were somehow compromised after the user logged out. It's a critical part of managing the user lifecycle securely.
Another thing that defines a quality app is how it handles errors. What happens if a user clicks "Deny" on Google's consent screen? A fragile app might crash or throw a cryptic error message, leaving the user confused.
A much better approach is to handle this gracefully. Your redirect URI can check for an error=access_denied parameter in the callback URL. If you see it, you can show a friendly message explaining why they need to grant permission and maybe add a button to try again.
The goal is to never leave the user at a dead end. A clear, helpful response to a denied request or an expired token maintains trust and keeps the user engaged with your application.
Layering Your Security#
These techniques are just one part of a much bigger security picture. For instance, integrating multi-factor authentication (MFA) has become standard practice for protecting user accounts, with business adoption growing by 51% recently. This is a direct response to the fact that 72% of successful breaches start by targeting user credentials. You can explore more data on multi-factor authentication growth at Scoop.market.us.
To build a truly resilient and trustworthy application, you need to layer your protections. By combining the state parameter, proper token revocation, and MFA, you create a much stronger defense. For a deeper dive into more comprehensive strategies, check out our guide on mobile authentication best practices.
Diving Into Common Google OAuth Questions#
Working with any auth system means you're going to hit a few snags. It’s just part of the process. When you're wiring up a Google OAuth application, a few classic issues pop up time and time again. Getting a quick answer can be the difference between a productive afternoon and a day lost to debugging.
Let's clear up some of the most common hurdles, starting with the error that trips up just about everyone at least once.
Why Am I Getting a Redirect URI Mismatch?#
This is, without a doubt, the most common roadblock. When you see a redirect_uri_mismatch error, it means the callback URL you sent in your auth request doesn't perfectly match one of the URIs you've listed in your Google Cloud Console.
And when I say perfectly, I mean it has to be an exact, character-for-character match. Seriously. The smallest difference will break the whole flow.
Check for these classic culprits:
- Using
httpin your code buthttpsin the console (or the other way around). - A missing or extra trailing slash (
/). - A different port number, like
localhost:3000vs.localhost:3100.
The fix is always the same: make sure your application's request and the console configuration are in perfect sync.
What's the Deal with Access vs. Refresh Tokens?#
It's easy to get these two mixed up, but they play very different roles in keeping your user logged in.
Think of an access token like a short-term key card. It's what you use to make the actual API calls, but it usually only lasts for an hour. A refresh token, on the other hand, is a long-term credential you use to get a new access token when the old one expires—all without forcing the user to log in again. You absolutely must store these securely on your server, never in the browser.
The core principle is simple: use the access token until it expires, then use the refresh token to get a new one. This is the magic that keeps a user's session active seamlessly.
Finally, choosing the right scopes is more of a user experience question than a technical one. The golden rule here is the principle of least privilege. If you only need a user's name and email, just request the profile and email scopes. Asking for access to their entire Google Drive will rightly make them suspicious and far more likely to click "deny."
Ready to build your mobile app without the headache? NextNative combines Next.js and Capacitor to help you ship native iOS and Android apps from a single codebase. Get started today at https://nextnative.dev.