A Guide to Google OAuth 2.0 for Next.js and Capacitor
Updated: October 21, 2025
So, what is Google OAuth 2.0, really? Think of it as a secure key that lets one app talk to another on your behalf, but only for specific tasks you approve. It's the framework that allows an application to get limited access to a user's Google account without ever asking for their password.
What Is Google OAuth 2.0 Anyway?#
At its heart, Google OAuth 2.0 is a protocol that acts like a digital valet. Instead of handing a third-party app the keys to your entire Google account (your username and password), you give it a special, temporary key that only works for specific doors. This whole process is called delegated authorization, and it's pretty much the foundation of modern web security.
This simple idea solves a massive security problem. In the early days of the web, you might have had to share your actual Google password with a new app just so it could read your contacts or calendar. That kind of practice is unthinkable today, and we have protocols like this to thank for it.
Why It's The Gold Standard#
Google OAuth 2.0 isn't just a good idea; it's a cornerstone of the internet's security infrastructure. It provides a standardized flow that both developers and users can trust, ensuring that sensitive credentials are never directly handled by third-party applications. This dramatically reduces the risk of password leaks and unauthorized access.
The benefits are crystal clear:
- Enhanced Security: Your app never stores or even sees the user's Google password.
- Improved User Experience: Users can grant access with a single click, which makes for a smooth and trusted sign-in process.
- Granular Permissions: You can request access only to the specific data your app needs (like read-only access to emails) by using scopes.
This whole flow can be broken down into a few simple steps, which the infographic below does a great job of illustrating.
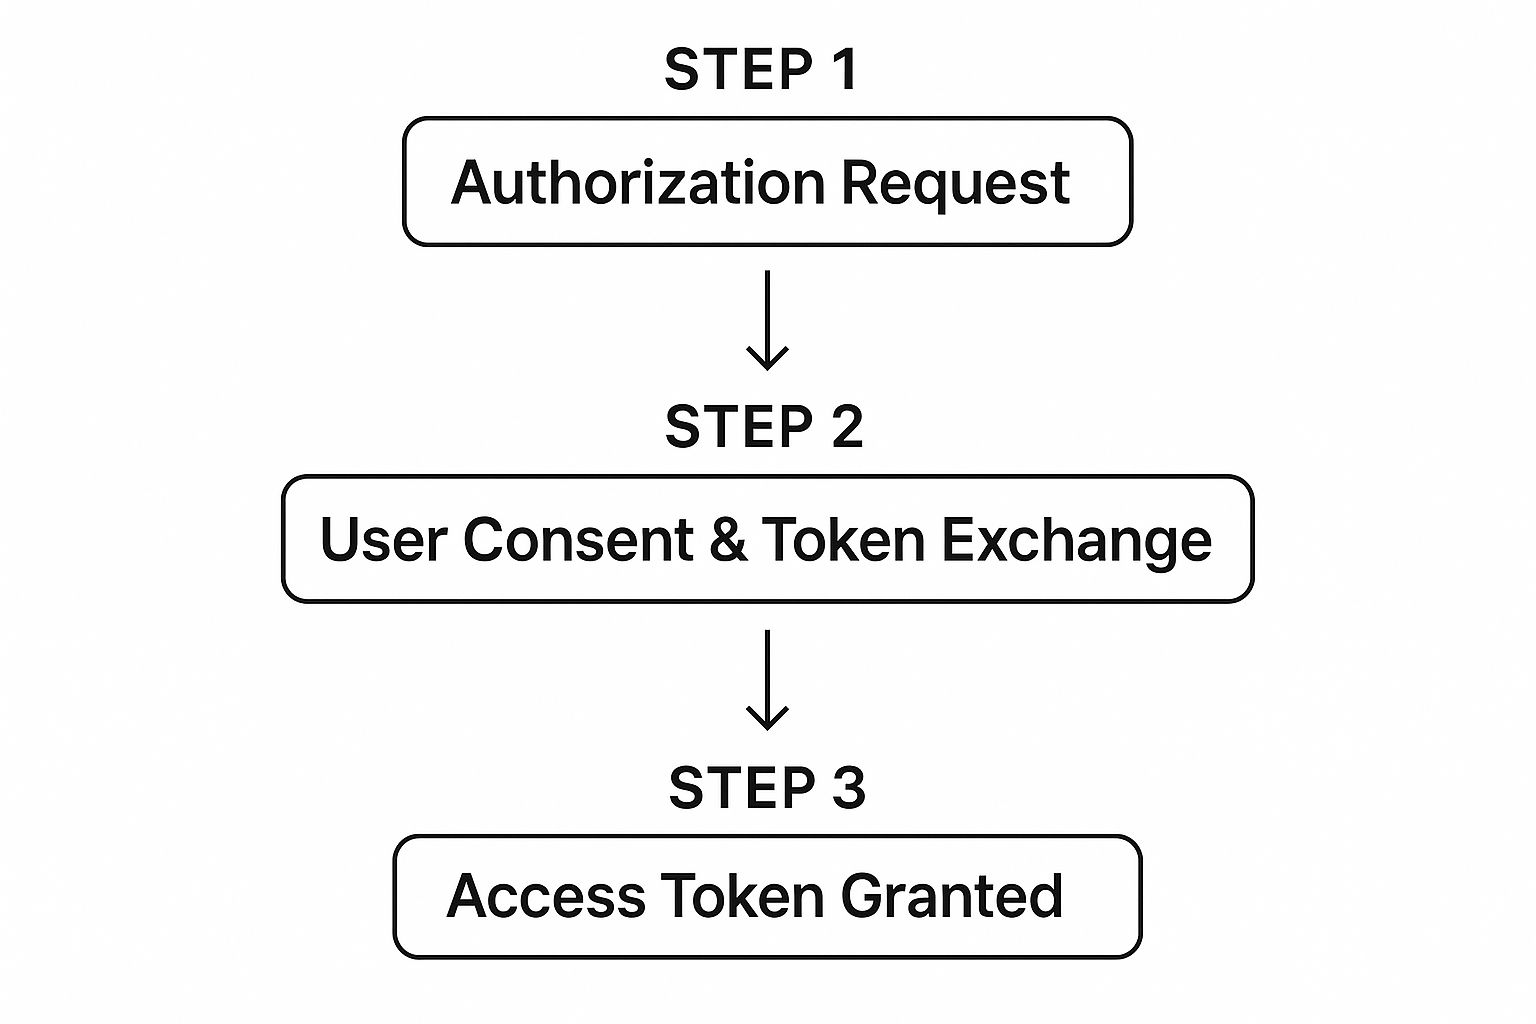
As you can see, the process moves from your app's initial request to the user's approval, and finally to your app receiving a secure access token. This token-based system is what makes the entire interaction both secure and efficient. Before we dive into the code, it's helpful to get a quick handle on the terminology.
Key Google OAuth 2.0 Concepts at a Glance#
This table is a quick summary of the essential terms you'll encounter throughout this tutorial, explaining their role in the authentication process.
| Concept | What It Means for Your App |
|---|---|
| Resource Owner | The end-user who owns the Google account and data. They're the one granting access. |
| Client | Your application. It's requesting access to the user's data on their behalf. |
| Authorization Server | Google's server. It authenticates the user and gets their consent to grant access. |
| Resource Server | Google's API server (like Gmail API or Drive API) that hosts the user's protected data. |
| Access Token | A temporary, secure credential issued by the Authorization Server that your app uses to access the Resource Server. |
| Scope | Defines the specific permissions your app is requesting (e.g., read:email, edit:calendar). |
Getting these terms straight will make the rest of the implementation process much smoother. They're the building blocks of the entire OAuth flow.
At its heart, OAuth 2.0 is about building trust between users, applications, and platforms. It creates a consent-based system where users are always in control of who can access their data and what they can do with it.
Introduced way back in 2012, Google OAuth 2.0 now secures billions of daily transactions for services like Gmail and Google Drive, which serve over 1.5 billion and 2 billion monthly users, respectively. For a deeper look at its mechanics, our own guide explores the finer points of the https://nextnative.dev/blog/oauth-2-google-api. This powerful authentication mechanism is a key part of any developer's toolkit, and it pairs well with other essential developer tools that help build secure and robust applications.
Setting Up Your Project in Google Cloud Console#
Before you write a single line of code, your journey with Google OAuth 2.0 starts in the Google Cloud Console. This is where you'll tell Google all about your application—what it is, what it needs access to, and how it will identify itself.
Think of it as getting your app an official ID badge so it can securely talk to Google's services.
The first move is creating a new project. If you're managing multiple apps, I'd strongly recommend keeping each in its own project. It’s just a cleaner way to organize your credentials and keep an eye on API usage separately. Once the project is live, the real work begins on the OAuth consent screen.
Configuring the OAuth Consent Screen#
The consent screen is the very first thing your users see from Google when they try to sign in with your app. It’s a huge trust signal, showing your app's name, logo, and the specific permissions (known as scopes) it's asking for. Getting this right is absolutely key to a smooth, trustworthy user experience.
You’ll have to choose between an "Internal" or "External" user type. "Internal" is perfect for testing within your own G Suite organization, but for any app you plan to release to the public, you'll need to select "External." This puts your app into a testing mode by default, which limits you to 100 test users until you go through Google's full verification process.
You'll then fill out some basic details:
- App name: This is what your users will see. Make it count.
- User support email: A real address where users can get help.
- Authorized domains: The domains that are allowed to host your application logic.
This is the central hub where you'll be creating and managing all the API keys and client IDs your project needs down the road.

Creating Your OAuth 2.0 Credentials#
With the consent screen ready, it’s time to generate the actual credentials. For a Next.js and Capacitor (NextNative) app, you have to think about two completely different environments: the web app and the native mobile app. That means you’ll need to create separate credentials for each platform.
For your Next.js web app: You'll create an OAuth 2.0 Client ID and pick "Web application." The most critical part here is getting the Authorized JavaScript origins and Authorized redirect URIs exactly right. The origin should be your development URL (like
http://localhost:3000), and the redirect URI is where Google sends the user back after they authenticate (e.g.,http://localhost:3000/api/auth/callback/google). Trust me, mismatched URIs are the number one cause of headaches and errors here.For your Capacitor mobile app (iOS & Android): You'll create additional Client IDs, one for iOS and one for Android. These are a bit different. They require your app's bundle ID (for iOS) or your package name plus a SHA-1 certificate fingerprint (for Android). This setup ensures that only your authentic mobile app can use these specific credentials. If you need a hand with this part, you can find a more detailed walkthrough at https://nextnative.dev/blog/google-oauth-client-id.
Once you create the credentials for your web app, Google gives you a Client ID and a Client Secret. Guard that Client Secret like a password. It should never, ever be exposed in your frontend code.
As you're setting all this up, you're essentially configuring secure access to various Google APIs. If you're curious about the principles behind what makes an API secure and well-designed, there’s a great guide on how to make an API the right way that provides some really solid foundational knowledge.
With your credentials in hand, you're finally ready to dive into the code.
Alright, you've got your Google Cloud credentials sorted. Now for the fun part: wiring up the Google OAuth 2.0 flow in your Next.js app. We'll nail down the web experience first, creating a solid foundation before we bring Capacitor into the mix for the native mobile side.
First things first, let's get the official Google API client library for JavaScript installed. It’s a lifesaver, handling a ton of the tricky token exchange logic behind the scenes so we don't have to.
Pop open your terminal and run:
npm install google-auth-library
This little package is the key to talking securely with Google's authentication servers from your backend API routes.
Building the Sign-In Button#
Everything starts on the frontend with a simple "Sign in with Google" button. When a user clicks it, our job is to send them over to Google's consent screen. This kicks off the whole OAuth 2.0 authorization code flow.
To do this, you'll need to build a specific URL loaded with a few key parameters:
client_id: The Web application Client ID you just made in the Google Cloud Console.redirect_uri: The exact callback URL you configured earlier (likehttp://localhost:3000/api/auth/callback/google).response_type: Always set this tocode. This tells Google you want an authorization code back.scope: The permissions you're asking for.openid profile emailis a standard starting point.
Your button's link will be dynamically built to point the user to the right place. This redirect is the first handshake in the OAuth dance.
Handling the Google Callback#
Once the user authenticates and gives your app permission, Google sends them right back to the redirect_uri you provided. Tucked into the URL's query parameters is a crucial piece of the puzzle: an authorization code.
This code is temporary and can only be used once. Its sole purpose is to be traded in for an access token. This exchange must happen on your server—never in the browser—to keep your Client Secret safe.
Think of the authorization code as a claim ticket. The user brings it back to your app, and your backend takes that ticket to Google's server to claim the real prize: the access token.
Your Next.js API route (the one at /api/auth/callback/google) is where this happens. It will grab the code from the request and, using the google-auth-library we just installed, make a direct, server-to-server call to Google's token endpoint.
This request will bundle up:
- The authorization code you just received.
- Your Client ID.
- Your Client Secret.
That last one, the Client Secret, is why this logic is non-negotiable for the backend. If you're looking for a deeper dive on protecting sensitive credentials like this, you might find our guide on how to secure API keys in your applications helpful.
Exchanging the Code for Tokens#
If the code is valid, Google's server responds with a payload carrying a few different tokens. Each one has a distinct job.
| Token Type | Purpose |
|---|---|
access_token |
The key to the kingdom. You use this token to make authenticated requests to Google APIs on the user's behalf. |
id_token |
A JSON Web Token (JWT) that contains the user's basic profile information, like their name, email, and profile picture. |
refresh_token |
An optional, long-lived token used to obtain a new access token after the current one expires, without requiring the user to sign in again. |
With these tokens in hand, you can verify the id_token to confirm the user's identity and use the access_token to pull in more profile details if you need them.
At this point, the user is officially authenticated. The final step is to create a session for them in your own application, which usually means setting a secure, HTTP-only cookie. This ensures they stay logged in as they navigate around your site.
Implementing Native Google Auth with Capacitor#
Alright, so you've wrapped your Next.js app with Capacitor and you're ready to go native. But there's a problem: that clunky web popup for Google OAuth 2.0 just won't cut it. It feels out of place, breaks the user experience, and screams "I'm just a website in a box."
We can do better. The gold standard for mobile is a true native sign-in, and that’s exactly what we're going to set up.
To pull this off, we need a bridge between our web code and the device's native APIs. My go-to for this is the @capacitor-community/google-signin package. It's a fantastic little plugin that gives you a simple JavaScript hook to trigger the real Google Sign-In SDKs on both iOS and Android. The end result? That smooth, secure, and familiar login screen your users know and trust.
Configuring Your Native Projects#
This is the part where we have to step out of our cozy web dev world for a minute and touch some native project files. Don't worry, it's a one-time setup that gets you the keys to the kingdom. You'll need to open up Xcode for iOS and Android Studio for Android.
- For iOS: The main thing you'll do here is configure a custom URL scheme. This is how the device knows how to hand control back to your specific app after the Google sign-in is done. You'll also need to pop your
REVERSED_CLIENT_ID(you can find this in yourGoogleService-Info.plistfile) into your Xcode project settings. - For Android: It's a similar dance. Just make sure your
google-services.jsonfile is in the right spot in your Android project. Android relies on the package name and SHA-1 certificate fingerprint you already set up in the Google Cloud Console to make sure it's your app asking for permission.
I know, it can feel a bit tedious, but getting this handshake between your app and Google's services right is non-negotiable for security. If you need a more detailed walkthrough, our article on setting up Google Sign-In for iOS with Capacitor breaks down the Xcode side of things step-by-step.
Triggering the Native Sign-In Flow#
Once you've wrestled the native projects into submission, the fun part begins. Kicking off the login from your Next.js code is surprisingly simple because the Capacitor plugin does all the heavy lifting.
All it takes is a single function call to GoogleAuth.signIn(). That's it. That one line of code tells Capacitor to trigger the native UI on the device, prompting the user to pick their Google account.
Here's the best part: when the user successfully authenticates, the plugin doesn't just give you a thumbs-up. It hands back a secure
idTokenright into your web view. That token is your golden ticket for authenticating the user with your own backend.
This native SDK approach is worlds more secure than trying to manage redirects inside a web view. The entire token exchange is handled by the official, battle-tested Google SDKs.
This whole integration is a perfect example of why Google OAuth 2.0 has become such a critical piece of modern app development. As of 2025, with over 90% of organizations relying on cloud services, secure and scalable authentication is more important than ever. Google's system supports a massive cloud infrastructure that pulled in over $43 billion in 2024 alone, proving its reliability at an incredible scale. You can find more insights on the rise of cloud-native applications on cloudzero.com. By tapping into the native SDKs, you're plugging directly into that same robust and trusted ecosystem.
Common Pitfalls and Pro Troubleshooting Tips#
Even with a perfect game plan, integrating Google OAuth 2.0 can still throw a few curveballs your way. Let's be honest, every developer has lost an afternoon chasing down a cryptic error message. From my experience, a few common snags pop up time and again, especially when you're working with a hybrid Next.js and Capacitor stack.
One of the first hurdles you’ll probably hit is the infamous redirect_uri_mismatch error. This single error is responsible for more developer headaches than almost any other. It almost always means there's a tiny mismatch between the redirect URI you registered in the Google Cloud Console and the one your application is actually sending.
Don't just glance at it—scrutinize every character:
- Protocols: Is it
http://for local development andhttps://in production? - Ports: Did you remember to include
:3000for your local Next.js server? - Trailing Slashes: Google is notoriously picky. A URL ending in
.../callback/is not the same as.../callback.
My go-to trick is to copy the exact URI from Google's error message itself and paste it directly into the "Authorized redirect URIs" field in your Cloud Console. This eliminates any chance of a typo and usually fixes the problem in seconds.
Navigating Platform-Specific Quirks#
Things get more interesting when you bring Capacitor into the mix. An authentication flow that works perfectly on the web can suddenly break on a native device. Common culprits here are misconfigured URL schemes on iOS or incorrect SHA-1 fingerprints on Android.
For instance, if the native Google Sign-In prompt appears and then just vanishes without returning a token, that’s a huge red flag. It’s a classic sign that your native project isn't configured to "catch" the callback from Google's authentication service. You'll need to jump back into your Xcode and Android Studio configurations and make sure every detail lines up with what you registered in the Google Cloud Console for your mobile OAuth clients. Nailing these details is fundamental to building a secure user experience. You can dive deeper into these concepts in our guide on mobile authentication best practices.
Another sneaky issue revolves around refresh tokens. You might find that you aren't receiving a refresh token after the initial sign-in. This often happens because the user has previously granted consent to your app. To force a new consent screen and get a refresh token during testing, you can revoke your app's access directly from the user's Google Account settings. A quicker way is to add prompt: 'consent' to your initial authorization URL request. This will always re-prompt the user, ensuring a new refresh token is issued—an invaluable trick when you're testing the full token lifecycle over and over.
Troubleshooting Common Google OAuth Errors#
Debugging OAuth can feel like guesswork, but most errors point to specific, fixable problems. Here’s a quick reference guide to help you debug the most frequent issues you might run into.
| Error Message | Common Cause | How to Fix It |
|---|---|---|
redirect_uri_mismatch |
The URI in your request doesn't exactly match one in the Google Cloud Console. | Copy the URI from the error message and paste it into the "Authorized redirect URIs" field. |
invalid_client |
The Client ID is incorrect, or the client secret (for server-side flows) is wrong. | Double-check that you're using the correct Client ID for the specific platform (Web, iOS, Android). |
invalid_request |
A required parameter is missing or invalid in the authorization request. | Review the Google OAuth 2.0 docs and compare your authorization URL against their examples. |
access_denied |
The user explicitly denied your application's request for permissions. | This is expected user behavior. Ensure your app gracefully handles the case where a user says "no." |
invalid_scope |
You requested a permission (scope) that isn't enabled for your project in the Cloud Console. | Go to the "OAuth consent screen" settings in Google Cloud and add the required scopes to your project. |
Think of this table as your first line of defense. By understanding what these common errors mean, you can spend less time debugging and more time building.
Common Questions About Google OAuth 2.0#
Jumping into a new authentication flow always kicks up a few questions. Let's walk through some of the most common ones I see developers run into when setting up Google OAuth 2.0, especially in a hybrid Next.js and Capacitor world. This should clear things up.
A big one is whether you can use the same Client ID for both the web (Next.js) and native (Capacitor) parts of the app. The answer here is a hard no. Each platform needs its own unique OAuth 2.0 Client ID configured over in the Google Cloud Console. Your web app needs one with authorized JavaScript origins, while iOS and Android each need their own with specific bundle IDs or package names.
Handling Tokens and User Sessions#
Another point of confusion I see a lot is around token management. Where do you even store the access and refresh tokens securely? On the web, best practice is to keep them in a secure, server-side session. Never, ever expose them to client-side JavaScript—that's a massive security hole waiting to be exploited.
For the native side, the Capacitor plugin usually handles secure storage for you, but the principle is the same. The tokens returned from the native SDK should be sent straight to your backend to validate the session.
Your backend should always be the single source of truth for a user's authentication state. The frontend, whether it’s web or native, just holds a session identifier (like a secure cookie) to prove it's authenticated.
This protocol's security and flexibility are why it’s a cornerstone for more than just logins. Since its launch, Google OAuth 2.0 has become essential for the digital payments ecosystem. Google Wallet, used by an estimated 200–250 million people worldwide, relies on it for every secure transaction, protecting user data on a massive scale. You can discover more insights about the growth of digital wallets on chargeflow.io.
Ready to build your native mobile app with the power of Next.js? The NextNative toolkit provides production-ready boilerplates and all the tools you need to launch on iOS and Android in record time. Get started with NextNative today!