Implement and Customize Your In App Web Browser | Guide
Updated: September 14, 2025
An in-app web browser is just what it sounds like: a browser that lives inside your mobile app. It lets users look at web content without kicking them out to an external browser like Chrome or Safari. Think of it as embedding a browser experience right into your app’s world.
This simple component is a total game-changer for keeping users engaged and preventing that jarring jump to a different application.
Why a Seamless In App Browser Is a Game Changer#
Have you ever noticed how top-tier apps like Instagram or Twitter keep you inside their universe, even when you tap on a link to an outside article? That's an in-app browser at work, and it's one of the most underrated features for creating a smooth, uninterrupted user experience.
Instead of abruptly switching apps and breaking the flow, the user stays right where they are, inside your branded environment. It might seem like a small detail, but its impact on user engagement and retention is massive.
It’s perfect for all sorts of common scenarios:
- Viewing Help Articles: Users can get the support they need without losing their place in the app.
- Reading Privacy Policies: Important legal docs can be reviewed quickly without feeling like a chore.
- Completing Secure Payments: Third-party payment gateways load securely within the app, which builds a ton of user trust.
- Social Media Logins: OAuth flows become a smooth, contained process instead of a confusing app-switching mess.
This isn’t just a technical add-on; it’s a core piece of a modern, user-friendly mobile strategy. The main goal is to cut out friction wherever you can. Every time a user has to leave your app, there’s a real risk they won’t come back. An in-app browser plugs that leak.
If you're in the process of turning a website into a mobile app, this concept is absolutely fundamental. You can dive deeper into that process in our guide on how to convert your web experience into a mobile one.
Boosting Engagement and Session Times#
It’s a simple equation: keeping users inside your app leads directly to longer, more meaningful sessions. When you get rid of the need for them to context-switch, you encourage them to explore more of your content and interact more deeply with your features.
This is a great visual of how in-app browsers directly impact user behavior and key app metrics.
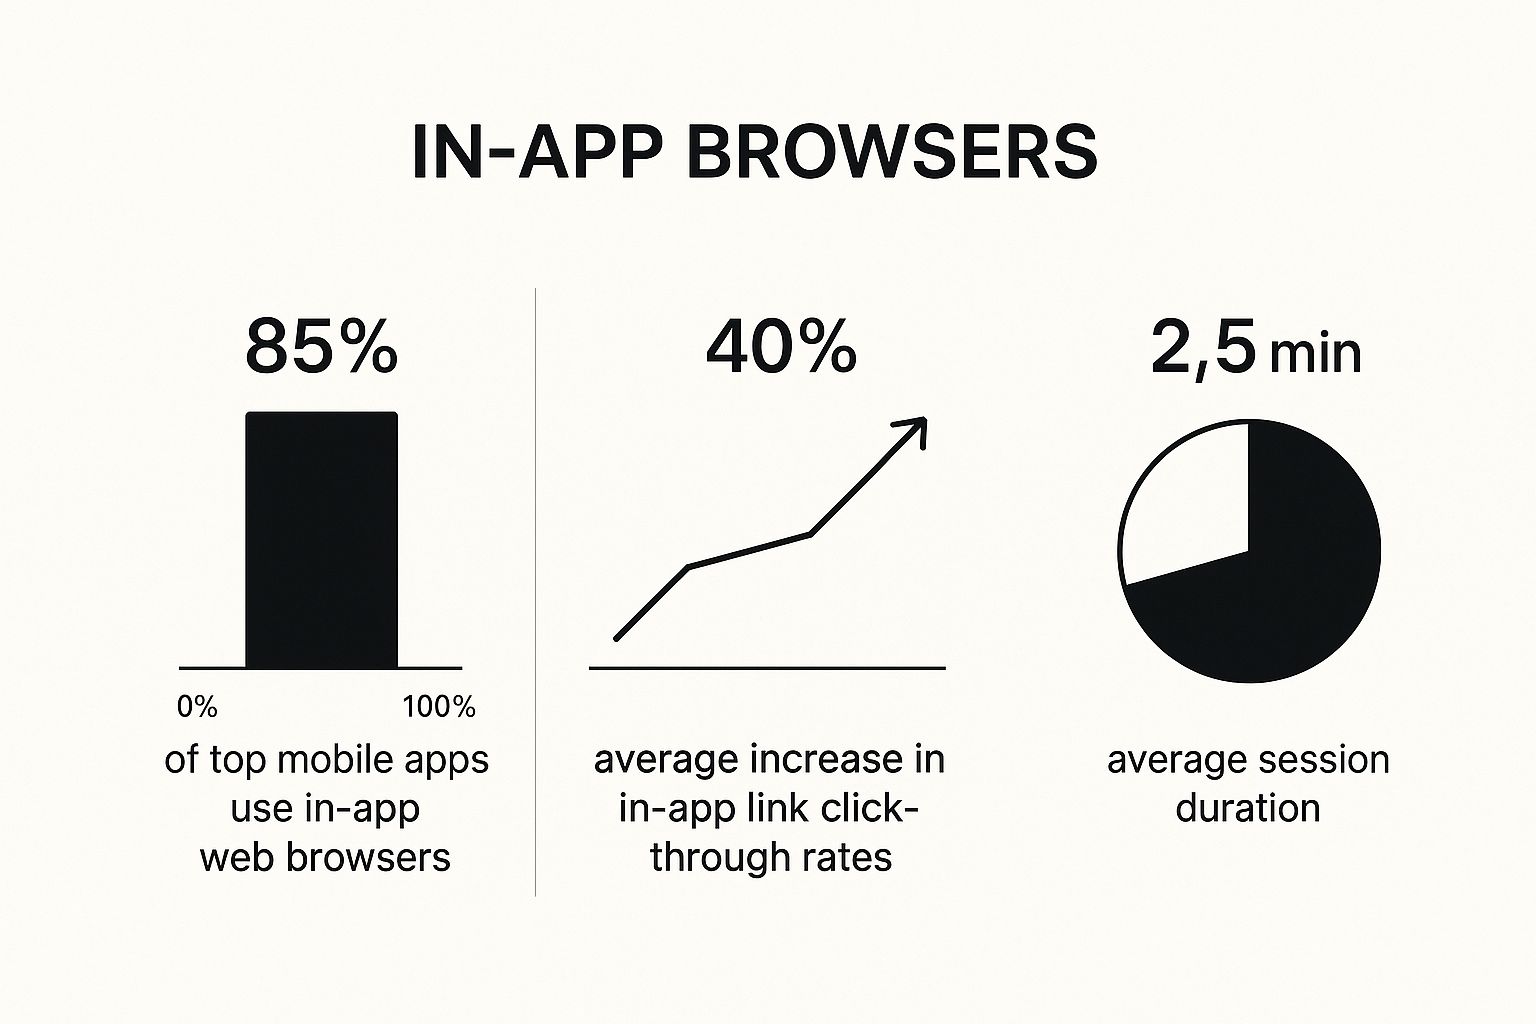
The numbers don't lie. There's a clear, strong connection between using an in-app browser and seeing better user engagement across the board.
The choice between an in-app browser and kicking the user out to their phone's default browser has real consequences for the user journey. Here’s a quick breakdown of what that choice means in practice.
In-App Browser vs. External Browser A Quick Comparison#
| Feature | In-App Browser (e.g., Capacitor Browser) | External Browser (e.g., Safari/Chrome) |
|---|---|---|
| User Experience | Seamless; keeps the user within the app's context. | Disruptive; forces an app switch, breaking the user's flow. |
| Session Continuity | High. The app remains active in the background. | Low. The user leaves your app, increasing the risk of drop-off. |
| UI Control | Can often be customized with your app's branding (colors, buttons). | No control; the browser's native UI is displayed. |
| Security | Good for sensitive flows like payments, as the context is controlled. | Can feel less secure to users, especially for transactions. |
| Implementation | Requires a library or plugin like Capacitor's Browser API. | A simple intent or URL scheme is usually sufficient. |
| Best For | Help articles, privacy policies, OAuth logins, and third-party checkouts. | Links where the user is expected to browse extensively or bookmark content. |
As you can see, the in-app browser is built for maintaining a cohesive and controlled user journey, which is exactly what modern users have come to expect.
Today's users expect a seamless journey. Forcing them to open an external browser is like sending a customer to a different store just to complete their purchase—it's an unnecessary and risky interruption.
This isn't just a theory; it's reflected in major market trends. Data from 2024-2025 shows that up to 40% of the time people spend on major social media apps involves viewing web content through their native in-app browsers. This approach has become the industry standard for one simple reason: it just works better.
Setting Up Your Project with Capacitor#
Before you can get a smooth in-app web browser running, you need a solid project foundation. That means getting Capacitor properly set up inside your NextNative application. Think of this as laying the groundwork—doing it right now prevents a lot of headaches down the road.

We'll kick things off by integrating Capacitor into your existing Next.js project. If you're starting from scratch, our guide on how to build a Capacitor app with Next.js is the perfect place to start. Getting this initial setup right ensures your web code can talk to native device features without any issues.
Initializing Capacitor and Native Platforms#
First things first, you’ll need to install the core Capacitor packages. Pop open a terminal in your project’s root directory and install both the Capacitor CLI and its core components as dev dependencies. This gives you the command-line tools you need to manage the native side of your app from your familiar web workflow.
Once that's done, you need to initialize Capacitor in your project. This command creates a capacitor.config.ts file, which acts as the central control panel for all your native settings. This is where you'll define your app’s ID, name, and, most importantly, the webDir. The webDir tells Capacitor where to find your built Next.js assets—which is almost always the out directory.
With your configuration in place, it’s time to add the native platforms you want to support. Running the commands to add iOS and Android will generate their respective native project folders (ios and android). These aren't just placeholder files; they are real, standalone native projects that you can open and manage with Xcode and Android Studio.
Pro Tip: Don't commit the entire
iosandandroidfolders to version control. It bloats your repository. Instead, just commit the core configuration files and use yourpackage.jsonscripts to let other developers regenerate the native projects when they need to. It keeps things clean and simple.
Installing the Capacitor Browser Plugin#
Alright, with the native projects ready to go, we can add the specific tool for the job: the Capacitor Browser plugin. This is the official plugin from the Capacitor team that acts as a bridge, letting your web code open the native SFSafariViewController on iOS and Chrome Custom Tabs on Android.
Installing it is a straightforward, one-line command. After it’s installed, you have to sync your project. This is a critical step you can't skip. Syncing copies your web assets into the native projects and updates their dependencies to include the new Browser plugin.
After any sync, it’s always a good habit to do a quick sanity check:
- Open the iOS project in Xcode (
npx cap open ios). - Open the Android project in Android Studio (
npx cap open android).
Make sure both projects build without any errors. This simple check confirms that all the dependencies are correctly linked and that your setup is solid, ready for you to start building out the in-app browser functionality.
Launching Your First In App Web Browser#
Alright, your project is all set up. Now for the fun part: making the in-app web browser actually appear on the screen. This is where you'll see just how a few lines of code can create a slick, seamless experience that connects your native app to the web. Let's get it working.

We’ll kick things off with the most common use case out there: opening a URL when a user taps a button. This is perfect for things like "Learn More" links, privacy policies, or just sending users to your company's main website without making them leave your app.
The Core Browser.open() Method#
The heart and soul of the Capacitor Browser plugin is the Browser.open() method. It’s an async function that just needs a single object for its options, with the url property being the only one that's required.
Here’s a real-world example of what this looks like inside a React component. Let's say you have a button that needs to open your help center.
import { Browser } from '@capacitor/browser';
import React from 'react';
const HelpButton = () => {
const openHelpCenter = async () => {
await Browser.open({ url: 'https://help.yourcompany.com/' });
};
return (
);
};
export default HelpButton;
That little snippet is honestly all it takes to get a basic in-app browser up and running. When the user taps the button, the openHelpCenter function gets called, and Capacitor does its thing, launching the URL in a native browser view that slides cleanly over your app. If you're building a mobile app with React.js, integrating simple, effective components like this is a core skill.
The whole concept of an in-app browser is tightly linked to the dominance of mobile platforms. Take Apple’s Safari, for instance. It’s the default on iOS devices and holds around 19.19% of the worldwide mobile browser market as of September 2025. Considering Apple controls roughly 27.13% of the global smartphone market, Safari's deep integration into the app ecosystem has become a key part of the modern mobile experience. You can explore the current browser market share on Backlinko.com for more stats.
Listening for Browser Events#
Just opening a URL is great, but what happens when the user is finished? A good app needs to know when the browser closes so it can react accordingly. Thankfully, Capacitor provides event listeners that make this incredibly simple.
You might want to refresh some data or pop up a "Welcome Back!" message when the user returns. You can do this by listening for the browserFinished event.
Pro Tip: Always, always add your event listeners inside a
useEffecthook that includes a cleanup function. This prevents memory leaks by making sure the listener is removed when the component unmounts—a classic source of hard-to-find bugs in complex apps.
Here’s how you can put it into practice:
import { Browser } from '@capacitor/browser';
import React, { useEffect } from 'react';
const AppLayout = ({ children }) => {
useEffect(() => {
const listener = Browser.addListener('browserFinished', () => {
console.log('User has closed the browser!');
// You could trigger a data refresh or update UI state here
});
// Cleanup function to remove the listener
return () => {
  listener.remove();
};
}, []);
return
};
By adding a listener like this, your app gains a real awareness of the browser's lifecycle. It allows you to build more dynamic and responsive features, making the in-app web browser feel less like a separate window and more like a truly integrated part of your application.
Customizing the Browser to Match Your Brand#
Let's be honest, a generic, default browser window can completely shatter the illusion. It pulls users out of the carefully crafted experience you've built and feels clunky—like a tacked-on afterthought.
The real goal is to make the in-app browser feel like a natural extension of your app. Capacitor’s Browser API gives you the tools to do just that, letting you tweak the appearance so it aligns perfectly with your brand identity. This is more than just making things look pretty; it's about building a cohesive and trustworthy user journey. Consistent design is a non-negotiable part of a great user experience, a topic we dive into in our guide to mobile app UI design best practices.
Aligning the Toolbar with Your Brand Colors#
The single most effective customization you can make is changing the toolbar color. By default, the browser uses the system's standard color, which almost never matches an app's unique palette.
With just one line of code, you can set the toolbarColor option to match your brand's primary color. This small change creates an immediate and powerful sense of consistency.
For example, if your app's main color is a specific shade of blue (#1D4ED8), you can pass that hex code directly into the Browser.open() method. Suddenly, the browser feels like it belongs to your app.
import { Browser } from '@capacitor/browser';
const openBrandedLink = async () => {
await Browser.open({
url: 'https://nextnative.dev/',
toolbarColor: '#1D4ED8'
});
};
Now, whether a user is on iOS or Android, the browser's top bar will reflect your brand's visual language. This subtly reinforces their connection to your app, making the whole experience feel seamless.
Platform-Specific Customizations and Considerations#
While Capacitor gives you a clean, unified API, it's working with two different native components under the hood: SFSafariViewController on iOS and Chrome Custom Tabs on Android. Knowing their unique behaviors is the key to getting a polished result on every device.
The dominance of these native tools isn't surprising when you look at the browser market. Google Chrome, first launched in 2008, has grown to command nearly 69% of the worldwide browser market share as of August 2025. This influence naturally extends to its role as the go-to for in-app browsing on Android, which itself powers about 70% of global smartphones. You can explore more browser market trends on StatCounter.
For iOS, you have a few other tricks up your sleeve. You can adjust the presentationStyle, for instance. The default is a full-screen modal, but setting it to 'popover' can create a less intrusive experience for certain links, especially on larger devices like iPads.
A customized in-app web browser does more than just look good. It builds user trust by signaling that even external content is being handled within your app's secure and familiar environment.
At the end of the day, these small-but-mighty customizations are what separate a good app from a great one. They show an attention to detail that users notice and appreciate, making every single interaction feel deliberate and professional.
Advanced Techniques and Common Pitfalls to Avoid#
Once you've got the basics of your in-app browser working, it's time to tackle the tricky parts. This is what separates a decent implementation from a great one. Moving beyond just opening links means handling complex user flows and sidestepping common issues that can frustrate users and create nasty bugs.
A major hurdle is managing authentication, especially OAuth logins for services like Google or Facebook. These flows often redirect multiple times, and your app needs to gracefully handle the entire sequence without dropping the ball. The key is to listen for specific URL patterns that signal a successful login, then programmatically close the browser and securely store the authentication token. If you mishandle this, you can leave users stuck in a web view or, even worse, compromise their session data.

This level of detail is also crucial for performance. An in-app browser that feels sluggish or unresponsive will quickly annoy users. For more tips on keeping your entire application snappy, check out our guide to improve mobile app performance.
Common Implementation Mistakes#
From my experience, I've seen developers stumble over the same few pitfalls when first implementing an in-app browser. Spotting these ahead of time can save you hours of frustrating debugging.
Here are a few common mistakes to watch out for:
- Forgetting Fallbacks: Not every Android device will have Chrome installed. While Capacitor provides a graceful fallback to another browser, failing to test this scenario can lead to an inconsistent or broken user experience for a segment of your audience.
- Ignoring UI Inconsistencies:
SFSafariViewControlleron iOS and Chrome Custom Tabs on Android are not identical. I've seen developers apply a customization that looks great on one platform but appears broken or misaligned on the other. Always test your designs on both. - Mishandling Browser Events: Forgetting to remove event listeners (like
browserFinished) when a component unmounts is a classic mistake. This creates memory leaks that can degrade app performance over time and cause unpredictable behavior.
A robust in-app browser implementation isn't just about opening a URL. It’s about anticipating edge cases, managing complex state transitions, and ensuring a consistent, secure experience on every device.
Debugging in the Browser Sandbox#
One of the trickiest parts of working with an in-app browser is that it operates in its own sandboxed process. This means your app’s usual debugging tools won't see what's happening inside the web view, making it tough to diagnose rendering issues or network errors.
When something goes wrong, your first move should be to connect your device to your computer and use the native platform's inspection tools.
- For iOS: Use Safari's Web Inspector. With your app running on a physical device or simulator, you can open Safari on your Mac, go to the
Developmenu, and select your device to inspect theSFSafariViewControllerinstance. - For Android: Use Chrome's Remote Devices tool. Connect your device, open Chrome on your desktop, and navigate to
chrome://inspect. You'll see your device and the open Chrome Custom Tab, allowing you to access the full suite of Chrome DevTools.
These tools are your lifeline for troubleshooting. They give you access to the console, network requests, and element inspector, just as you would have for a standard website. Mastering them is essential for building a truly reliable and polished in-app web browser.
A Few Common Questions#
When you're working with Capacitor's Browser plugin, a few questions always seem to come up. Let's tackle them head-on so you can build with confidence.
Can I Execute JavaScript Within the Capacitor In-App Browser?#
The short and simple answer is no.
The Capacitor Browser plugin is built for security and simplicity, using native OS components like SFSafariViewController on iOS and Chrome Custom Tabs on Android. These components are intentionally sandboxed, meaning they run in a process that’s totally separate from your app.
This separation is a critical security feature. It's designed to prevent web content from accessing your app's data, and vice-versa. If you really need that kind of deep, two-way communication with web content, a standard WebView component is the right tool for the job.
How Is the Capacitor Browser Different from a Regular WebView?#
This really comes down to user experience versus direct control. The Capacitor Browser gives you a full-featured, familiar browsing experience right out of the box. It includes all the standard UI you’d expect—navigation buttons, an address bar, sharing options—making it perfect for displaying external websites or articles.
A regular WebView, on the other hand, is a blank slate. It’s a component you embed directly into your app’s layout, giving you complete control over its content and enabling deep JavaScript interaction. The catch? You're responsible for building all the surrounding UI yourself.
Think of it this way: use the Capacitor Browser for showing someone else's website. Use a WebView when you need to render your own web-based UI as a native part of your app.
What Happens If a User Does Not Have Google Chrome on Android?#
This is a great practical question. On Android, the Capacitor Browser relies on a feature called Chrome Custom Tabs, which is provided by the Google Chrome app.
So what if a user doesn't have Chrome installed, or they've disabled it? The system handles this gracefully. Capacitor will fall back to opening the URL in whatever default web browser is available on the device.
While you lose the slick UI customizations and the seamless in-app feel of Custom Tabs, the core functionality remains. The user can still access the content, ensuring your app doesn’t hit a dead end.
Ready to stop wrestling with complex native setups and start shipping? NextNative provides a production-ready toolkit that combines Next.js and Capacitor, letting you build beautiful iOS and Android apps with the web skills you already have. Check out NextNative and launch your mobile app in record time.