Capacitor Camera Flash A Simple Control Guide
Updated: September 2, 2025
Ever found yourself needing to control a phone's flashlight from your app? Maybe for scanning a QR code in a dim room or just adding a handy utility feature. This is where the Capacitor Camera Flash plugin comes in. It’s a simple but powerful tool that connects your web-based code directly to the native flashlight hardware on both iOS and Android.
No need to dive into complex native code. We're going to walk through a streamlined process that gives you direct, reliable control over the camera flash. This is your starting point for adding a bright, practical feature to your next project.
Why Direct Flash Control Matters#
Gaining control over a device’s flash is about more than just a novelty; it's about creating a professional and truly integrated user experience. Think about it. An app that needs to scan barcodes in a warehouse or a utility app with a flashlight tool feels incomplete and clunky without direct hardware access.
The core technology isn't new. The modern electronic flash, which uses a high-capacitance capacitor to create a brief, intense burst of light, has been around since 1931, completely changing photography. That same principle of storing and rapidly discharging energy is what powers your phone's LED flash today. You can read the whole story of how flash photography has evolved on its Wikipedia page.
By using a Capacitor camera flash plugin, you can skip the native boilerplate and get straight to the good stuff:
- Improve the User Experience: Add essential functionality for any app that deals with photos, videos, or scanning.
- Increase Engagement: Create interactive features that make clever use of the device's hardware.
- Maintain a Single Codebase: Avoid the headache of writing separate Swift and Kotlin code for such a common feature.
Preparing Your Project for Flash Control#
Before we can start toggling the flashlight, we need to get your project ready. Getting this initial setup right is the key to making sure the plugin integrates smoothly and prevents a lot of common headaches down the road.
First things first, let's talk about your development environment. You'll need the right versions of Node.js and Capacitor installed, along with the native toolchains for whichever platforms you're targeting. For iOS, that means you need Xcode, and for Android, you'll need Android Studio. These tools are non-negotiable—they’re what actually build and run your app on a real device.
Installing and Syncing the Plugin#
With your environment ready to go, adding the Capacitor camera flash plugin is pretty straightforward. Just open your project's terminal and run this one command:
npm install @capacitor/camera-flash
Once that finishes, you have to do the most important step: syncing your Capacitor project. This command copies all your web code over and updates the native iOS and Android projects, which makes the plugin's native code available to your app.
npx cap sync
This is how a capacitor actually works to create a camera flash—it rapidly stores and discharges energy.
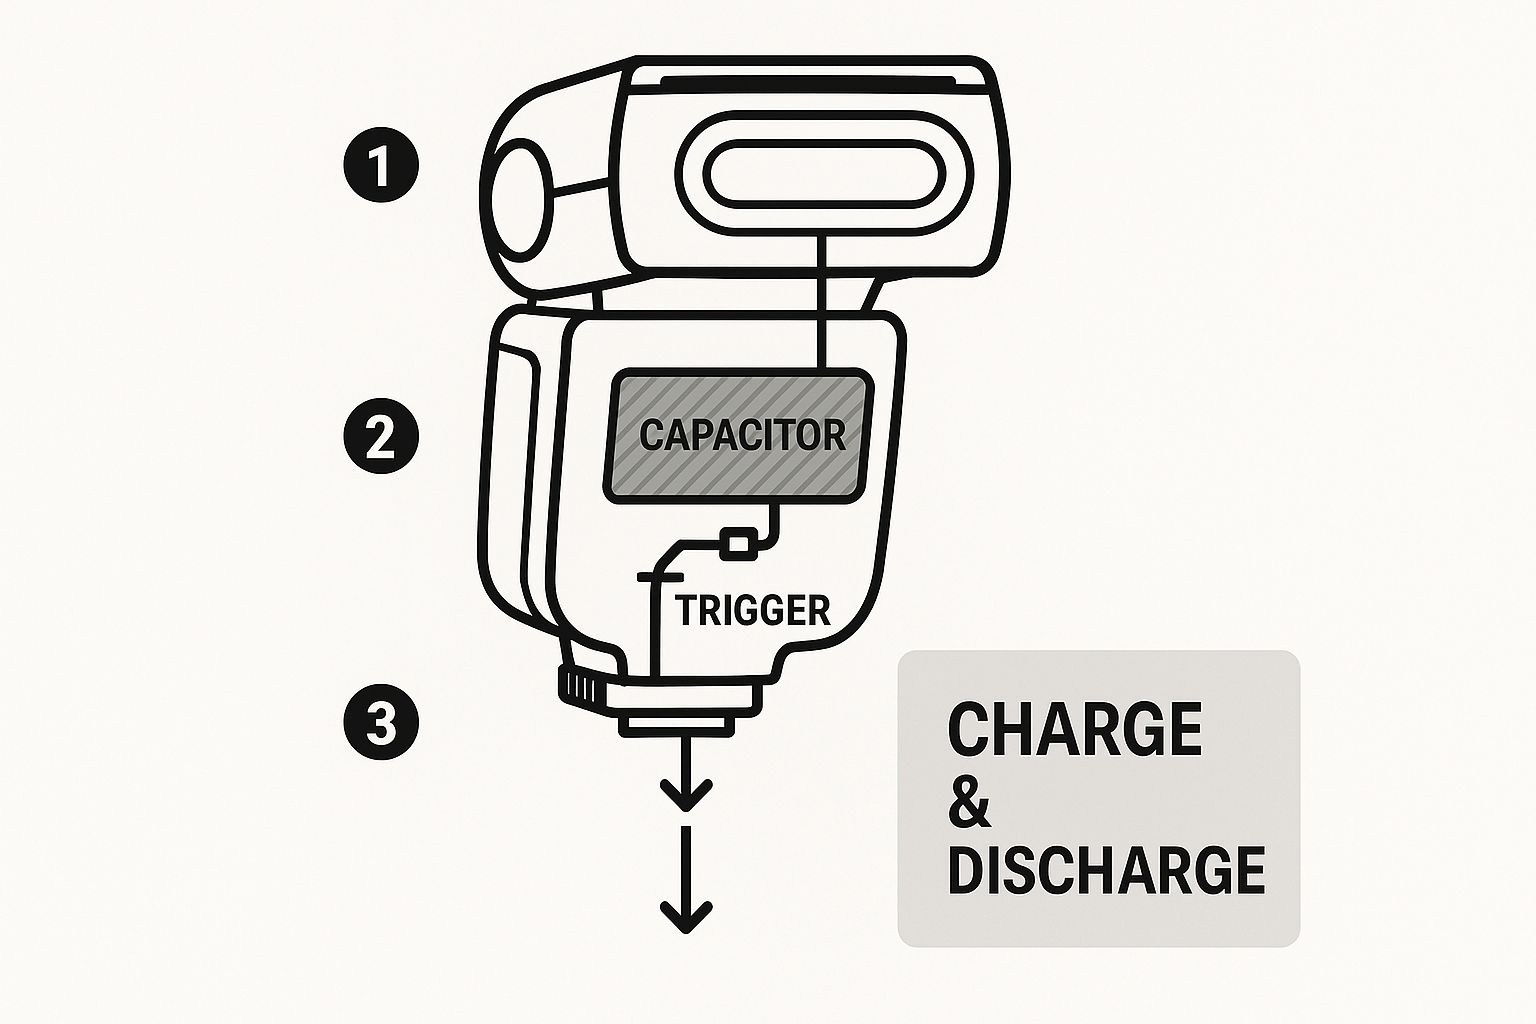
That quick charge-and-discharge cycle is exactly what our plugin triggers through its native bridge when we call its methods from our web code.
Pro Tip: I make it a habit to always run
npx cap syncafter installing or uninstalling any Capacitor plugin. Forgetting this step is probably the number one reason a plugin doesn't seem to work, because the native side of your project doesn't even know it exists yet.
To give you a clearer picture of what you're working with, here's a quick rundown of the plugin's core functions.
Core Plugin Functions at a Glance#
This table breaks down the main functions available in the Capacitor Camera Flash plugin, what they do, and a typical scenario where you'd use each one.
| Function | Description | Typical Use Case |
|---|---|---|
| isAvailable() | Checks if the device has a camera flash unit. | Disabling a "Toggle Flash" button on devices without a flash. |
| switchOn() | Turns the flashlight on. | Activating the light when a user taps a button in your UI. |
| switchOff() | Turns the flashlight off. | Deactivating the light after it's been turned on. |
| isSwitchedOn() | Returns the current state (on or off) of the flash. | Updating your UI to show the correct state, like a toggle switch. |
Knowing these functions is half the battle. Now that the plugin is installed and synced, your project is fully aware of these new flash capabilities.
This sets the stage for the next part, where we’ll dive into the code to actually control the hardware. Integrating features like these is a core part of building powerful mobile apps with web tech. To see what else is possible, you can learn about implementing other native device features in your Capacitor projects.
Bringing Flash Control to Life with Code#
Now that the project is configured, it's time for the fun part: making things happen. This is where we connect our web code to the device's physical hardware, turning a simple button into a powerful tool. Let's dig into the JavaScript and TypeScript needed to get that flash firing.
First things first, you need to bring the plugin's functionality into your component. You'll import the CameraFlash object straight from the plugin's package. This little object is our gateway to all the methods we need for controlling the device's flashlight.
import { CameraFlash } from '@capacitor/camera-flash';
With that imported, you can start calling the methods we talked about earlier. For example, whipping up a function to switch the flash on is dead simple.
const turnFlashOn = async () => {
await CameraFlash.switchOn();
};
That one line of code reaches down into the native layer on iOS or Android and flips the switch. This kind of simplicity is exactly why developers love Capacitor—it hides all the complex, platform-specific code. If you're new to this concept, our guide on https://nextnative.dev/blog/how-to-build-cross-platform-mobile-apps gives a great overview of how it all works.
Creating a Reactive Toggle Button#
A simple "on" button is a good start, but a smart, reactive toggle button is a much better user experience. To build one, we need to know the flash's current state so we can update our UI to match. Let's put together a more complete function that toggles the flash based on its actual status.
import { useState } from 'react';
const [isFlashOn, setIsFlashOn] = useState(false);
const toggleFlash = async () => {
const { value } = await CameraFlash.isSwitchedOn();
if (value) {
await CameraFlash.switchOff();
setIsFlashOn(false);
} else {
await CameraFlash.switchOn();
setIsFlashOn(true);
}
};
In this React example, we're using a state variable, isFlashOn, to keep track of the flashlight's status. The toggleFlash function first asks the device if the flash is currently on. Depending on the answer, it either turns it off or on, then updates our component's state. This re-renders the UI, maybe changing a button's icon from a "flash off" to a "flash on" symbol.
This whole approach of using familiar web tech to control native hardware is the core philosophy of Capacitor, as you can see from their homepage.
It's pretty amazing when you think about it. The technology we're using is a direct descendant of capacitor-based flashes that transformed photography. Those units store up energy and then release it in a massive burst of light in under 1 millisecond—a principle that enables the instant-on functionality we're coding right now.
Key Takeaway: Before you even build a toggle button, it's a smart move to check if the device has a flashlight at all. Use the
isAvailable()method when your component first loads. If it returnstrue, render the button; if not, don't. This simple check saves users from seeing a useless button on devices without a flash, like some tablets.
Getting It to Work on a Real Phone#
Simulators are great for a lot of things, but they can't fake a physical camera flash. To really know if your Capacitor camera flash code is working, you absolutely have to test it on a real iPhone and an Android device. This is the only way to be sure your app is talking to the device's hardware correctly.
The workflow is pretty straightforward. First, you build your Capacitor project. Then you open the native platform folders—the ios folder in Xcode and the android folder in Android Studio. From there, just plug your phone in with a USB cable and hit the run button.
This is the moment of truth. Once the app launches on your phone, keep an eye on the console logs in Xcode or the Logcat window in Android Studio. This is where you'll see live feedback from the device, including any ugly error messages if the plugin fails to start or if the user denies permission.
Navigating Common Deployment Hurdles#
From my experience, a few common headaches pop up right about now. You might run into build errors, especially if your native dependencies aren't perfectly in sync. Permission denials are also super common—don't forget, both iOS and Android need the user's explicit permission to touch the camera hardware, and that includes the flash.
Here are a few tips to get you through it:
- Double-check Your Permissions: Make sure you've actually declared camera usage in your
Info.plist(for iOS) andAndroidManifest.xml(for Android). A missing declaration is a guaranteed way to fail. - Clean and Rebuild: Sometimes, the native project just gets confused. Running a "clean build" in both Xcode and Android Studio can magically fix a lot of strange, unexplainable errors.
- Update Your Tools: Always make sure Xcode and Android Studio are up to date. Outdated versions can cause weird compatibility problems with newer Capacitor releases.
A critical part of mobile development is understanding the native platforms your code runs on. When working with native features, grasping the underlying systems is crucial; resources that explore Android Developer roles can offer valuable insights into native capabilities and requirements.
Once you’ve tested everything and you’re happy with how the flash is working, the next step is getting it into your users' hands. For more on that, you can check out our detailed guide on how to submit your app to the App Store.
Handling Permissions and Edge Cases Like a Pro#

A great app doesn't just work—it anticipates what the user needs and handles the unexpected with grace. When you're adding a capacitor camera flash, this means managing permissions thoughtfully and building a UI that adapts to the hardware it's running on.
Simply blasting a permission pop-up the second someone opens your app is a surefire way to annoy them. A much better approach is to ask for access at the exact moment it's needed. For instance, when a user taps your flash icon for the very first time, that's your cue to present the dialog, maybe with a quick note on why you need it. A contextual request feels less intrusive and dramatically increases the odds of them tapping "Allow."
Creating a Smarter UI#
Here's something a lot of developers forget: not every device has a flashlight. Some tablets and budget phones just don't have the hardware. Showing a useless button is a dead giveaway of an unpolished app, but thankfully, the plugin gives you an easy way to handle this common edge case.
Before you even think about rendering your flash button, always check if the hardware is actually there by calling the isAvailable() method.
import { CameraFlash } from '@capacitor/camera-flash';
const deviceHasFlash = async () => {
const { value } = await CameraFlash.isAvailable();
return value;
};
By checking for hardware availability first, you can conditionally hide the feature and avoid confusing your users. It's a small step, but it makes your app feel significantly smarter and more professional. This same logic can be applied to other device-specific features, like push notifications. Our guide on how to configure push notifications offers more tips on handling these kinds of device-specific setups.
My Personal Tip: Store the flash availability status in your app's state management as soon as the component loads. This keeps you from repeatedly pinging the hardware every time the user interacts with the UI, which results in a much snappier and more efficient experience.
This thoughtful approach to both permissions and hardware checks elevates your app from a simple proof-of-concept to a polished product. It shows a real commitment to a clean, intuitive user experience that works flawlessly across a huge range of devices. This mirrors the reliability we see in the evolution of flash technology itself—electronic capacitor flashes took over from old flashbulbs because they were durable and instantly reusable, a legacy that continues in today's mobile devices. You can discover more insights about the history of flash photography and its key milestones.
A Few Common Questions About Capacitor Flash#
Whenever you start digging into native device features, a few questions always bubble up. It's totally normal to wonder about the little details, especially how a plugin like Capacitor camera flash talks to the operating system. Getting these answers sorted out now can save you a ton of headaches later.
One of the first things people ask is if camera permissions are really necessary just to turn on the flashlight. The answer is a hard yes. On both iOS and Android, the flashlight hardware is physically part of the camera module. Because of that, you have to request and get the user's permission for camera access before any of the flash functions will work.
Can I Control the Flash Brightness?#
Another great question is about adjusting the flash intensity. Can you dial it back to 50% brightness, for instance? The short answer is no, not with this plugin.
This particular plugin was built for simplicity and nails the most common use case: a simple on/off toggle. Direct brightness control is a much deeper native feature that isn't exposed through this plugin's API. When you call the switchOn() method, the flashlight fires up at its standard, default intensity—which is exactly what nearly all apps need anyway.
For anyone looking to get a better handle on these kinds of native limitations, our guide on mobile development best practices offers some great context.
What Happens When the App Closes?
This is a smart question to ask, especially when thinking about battery life. If a user turns the flash on and then swipes the app away, will it stay on and drain their phone? Thankfully, no. Both iOS and Android are smart enough to automatically kill the flashlight when an app is terminated. Still, it’s good practice to programmatically switch it off during your app's lifecycle events, like when it’s sent to the background.
Finally, developers sometimes ask about that high-pitched whining sound some phone flashes make. Don't worry, that's completely normal. The noise comes from the inverter circuit charging the capacitor. It’s just a hardware quirk as it rapidly stores energy and doesn't mean there's anything wrong with your code or the device.
Ready to stop wrestling with native toolchains and start building powerful mobile apps with the web skills you already have? NextNative provides production-ready boilerplates and a complete toolkit to help you launch on iOS and Android in record time. Get started with NextNative today!