How to Submit App to App Store: Easy Step-by-Step Guide
Updated: July 30, 2025
Before you even think about hitting that "Submit for Review" button, there's some crucial prep work to do. Getting your app ready for the App Store isn't just about finishing the code; it’s about setting the stage for a successful launch. Think of this as your pre-flight checklist—it's what separates a smooth, stress-free submission from one that gets bogged down in rejections and delays.
Your Essential Pre-Submission Checklist#

One of the biggest mistakes I see developers make is jumping straight into App Store Connect without having all their ducks in a row. The first step, and it's non-negotiable, is getting enrolled in the Apple Developer Program. This is your key to the kingdom, giving you access to all the tools and platforms you’ll need.
With over 1.96 million apps vying for attention on the App Store, solid preparation is what will make you stand out. Your app needs to be more than just a cool idea; it has to be a polished, feature-complete product. This means it's been rigorously tested and is as bug-free as you can possibly make it.
Gather Your App Store Assets#
Your App Store listing is your app's digital storefront. You wouldn't open a physical shop with empty shelves, right? The same logic applies here. Before you start the submission process, you need all your marketing materials polished and ready to go. This planning phase is a core part of the overall https://nextnative.dev/blog/mobile-app-development-process.
Here’s a quick rundown of the assets you'll need:
- App Icon: This is your app's face to the world. Make it simple, memorable, and ensure it looks great in all the required sizes. It's often the first thing a potential user will see.
- Screenshots: Don't just take random snaps. Curate a set of high-quality images that tell a story, showcasing your app's best features and slickest UI.
- App Previews: These short videos (up to 30 seconds) are your chance to show your app in action. A well-made preview can have a huge impact on download rates.
- Promotional Text & Description: Write a clear, compelling description that explains what your app does and why someone should download it. Focus on the value you provide.
Pro Tip: I can't stress this enough: stay organized! Create a dedicated folder for all your App Store assets. Use a clear naming convention like "iPhone-14-Pro-Max-Screenshot-1.png" to save yourself a massive headache later.
Juggling all these moving parts can get overwhelming. Seriously consider setting up a robust personal productivity system to keep track of everything. A structured approach helps you nail every detail, from asset creation to final review notes, making the whole submission journey far less painful.
Decoding Certificates, Profiles, and Identifiers#
Let's be honest—navigating Apple’s world of certificates, identifiers, and profiles can feel like you’re trying to crack a secret code. But it's a necessary step. Think of these credentials as your app's digital passport. They're what prove to Apple that your app is legitimate, comes from you (a trusted developer), and hasn’t been messed with along the way.
Getting this right is a fundamental part of successfully submitting your app to the App Store.
Your first move is to generate a Certificate Signing Request (CSR). You'll do this using the Keychain Access app that’s already on your Mac. This process creates a unique, secure key on your computer that essentially says, "I am who I say I am." With that CSR file in hand, you’ll head over to the Apple Developer portal to create your official certificates for both development and distribution.
As the image below shows, this all happens after you've properly set up your Apple ID and enrolled in the Developer Program. Don't jump ahead!
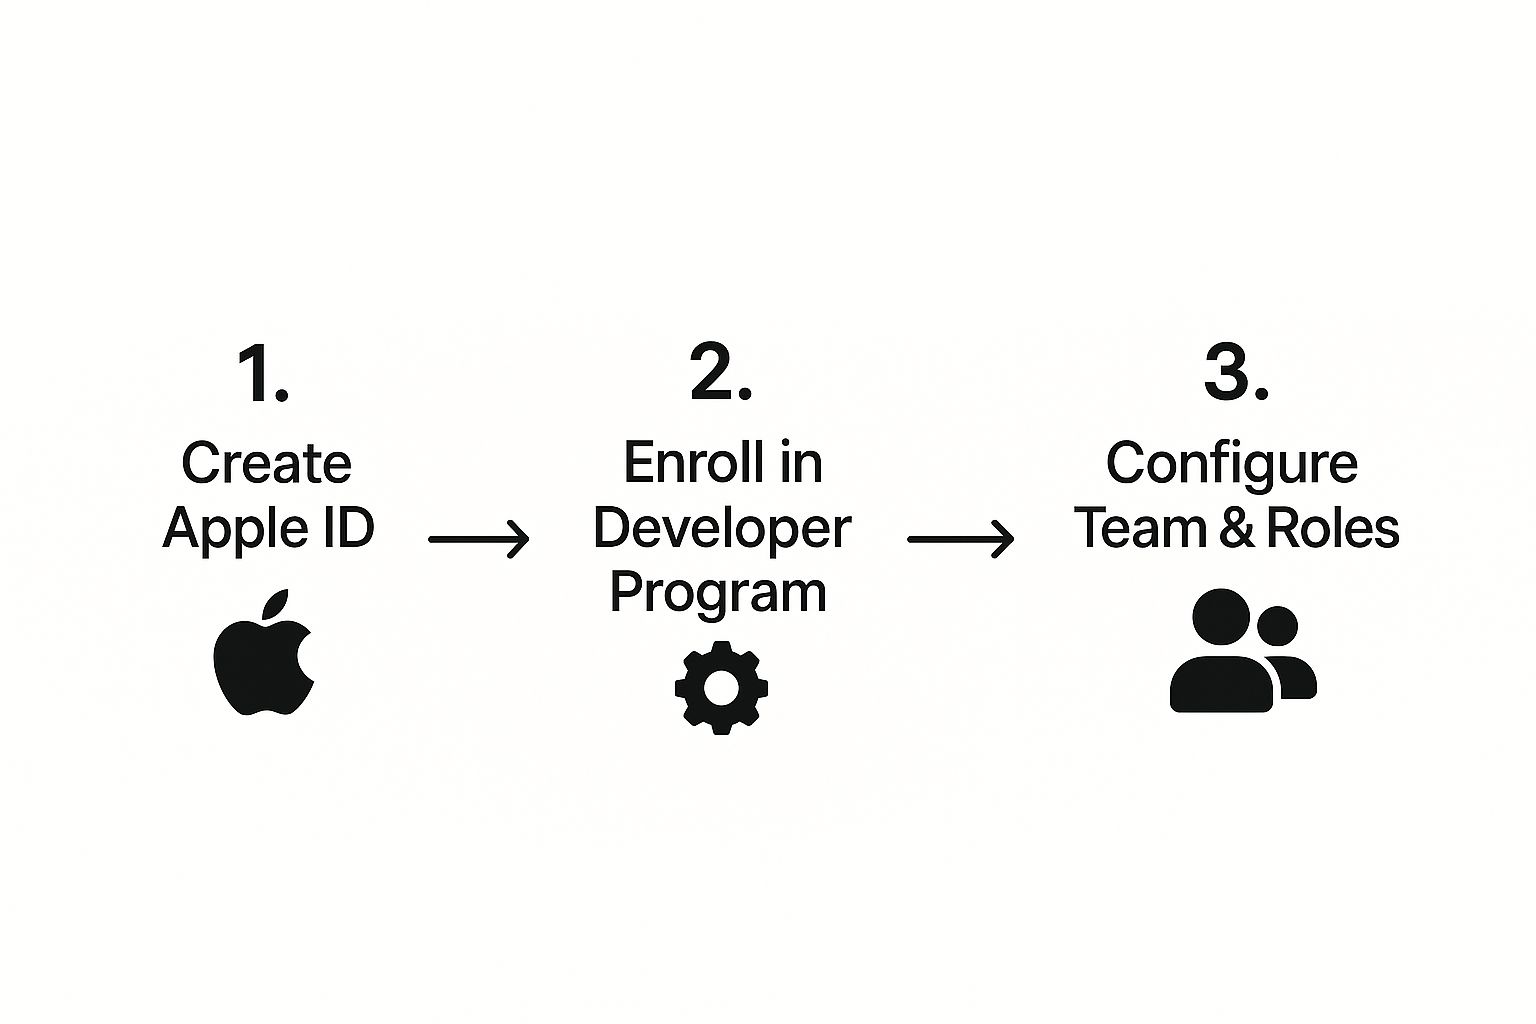
The image really drives home that you need a solid foundation with your developer account and team roles before you can even think about certificates.
App IDs and Provisioning Profiles#
With your certificates sorted, the next piece is the App ID. This is exactly what it sounds like: a one-of-a-kind string that registers your app with Apple. You have two main options here. You can create a specific App ID (like com.yourcompany.awesomenewapp), which is necessary if you plan to use services like push notifications or HealthKit. Or, you can use a wildcard ID (like com.yourcompany.*) for a simple app or a suite of apps that don't need those special capabilities.
Once you have your certificate and App ID, it’s time to create provisioning profiles. These are the magic files that tie everything together.
- A Development Profile is for your internal testing. It lets you install the app directly onto specific, registered iPhones and iPads so you and your team can debug and make sure everything works.
- A Distribution Profile is the one that matters for release. This is the profile you’ll use to sign the version of the app you submit to the App Store for the whole world to see.
To help you keep these straight, here’s a quick reference table.
App Store Credential Types Explained#
| Credential Type | Purpose | Where to Create It |
|---|---|---|
| Certificate | Proves your identity as a developer. Used to "sign" your app code. | Apple Developer Portal (after generating a CSR in Keychain Access) |
| App ID | A unique identifier for your app within Apple's ecosystem. | Apple Developer Portal |
| Provisioning Profile | Ties your certificate and App ID together for a specific purpose (testing or release). | Apple Developer Portal |
Think of this table as your cheat sheet. Getting these details right is crucial.
A quick tip from experience: One of the most common reasons for an app rejection is signing the build with the wrong profile. Always, always double-check you're using the App Store Distribution profile before you upload. It will save you a headache and days of waiting.
This setup is also critical for your testing workflow. For a deeper dive into making sure your app is rock-solid before launch, our guide on mobile app quality assurance is a great next read. A clean credential setup makes the entire journey from your computer to the App Store that much smoother.
Setting Up Your App in App Store Connect#
Alright, let's dive into App Store Connect. Think of this as your app's mission control. It's the central hub where you'll manage your app's presence on the store, track its performance, and see how it's selling. It’s time to create the official record that will soon become your app's home.
First thing's first: log in and hit the button to create a new app. This is where you’ll connect that Bundle ID you made earlier. You'll also need to lock in some foundational info:
- App Name: What your app will be called on the App Store.
- Primary Language: The main language your app uses.
- SKU (Stock Keeping Unit): This is just for your own reference and won't be seen by users. I usually use something simple and descriptive, like
MYAWESOMEAPP_V1_0_0.
Crafting Your Storefront Metadata#
Once the basic record is created, the fun really begins. Now you get to craft the metadata that will convince people to actually download your app. Getting this right is a massive part of a successful submission, as great copy and keywords directly translate to more downloads.
Your app's description is your sales pitch. Don't just rattle off a boring list of features. Instead, tell a story. Explain the value you're providing and how your app solves a real problem for your users. Use clear, engaging language that shows off your app's personality.
Your keywords are just as vital. Apple gives you a 100-character field to fill with comma-separated terms. Put yourself in your user's shoes. What words would they actually type into the search bar? Don't just think like a developer; think like a customer.
A personal tip from my own experience: treat your privacy policy like a feature, not a legal chore. Be upfront and clear about what data you collect and why. This kind of transparency builds trust right from the start and can help you breeze through Apple's review process, which takes privacy very seriously.
Pricing and Privacy#
Deciding on a price can feel a bit daunting, especially when you consider there are nearly 787,123 publishers on the platform. The competition is real. In 2023, most non-gaming apps were priced under $1—often at $0.79—while many games started even lower. For a lot of developers, a free-to-download app supported by in-app purchases is the most sustainable path. You can dig into these pricing trends and other App Store insights to help guide your strategy.
Lastly, you absolutely must provide a URL to your privacy policy. This isn't optional; Apple requires it to be a live, publicly accessible link. See it as more than just a checkbox—it’s a public statement about how much you value your users' security and data.
Getting Your Build Ready in Xcode#
Alright, your app now has a home waiting for it in App Store Connect. The next step is to package up all your hard work and send it over to Apple's servers. This is where we jump back into Xcode for the final, hands-on technical push before the review process begins.
First things first, you need to tell Xcode you're making a build for the store, not just for a test device. Look at the top of the Xcode window, right next to the run and stop buttons. You'll see your app's scheme and the current device target. Click there and switch the target to Any iOS Device (arm64). This simple change is crucial—it builds a generic, optimized version of your app that can run on any compatible iPhone or iPad.
Creating a Clean Archive#
With the correct target set, head up to the menu bar and choose Product > Archive. This triggers Xcode to compile your app using the 'Release' configuration, which strips out debugging symbols and optimizes the code for performance. It’s the real deal.
Once the process finishes, the Organizer window will automatically pop up. You’ll see your app, complete with its version number and build date, sitting in a neat little list. This is your archive—your app, all bundled up and signed with the distribution certificate we handled earlier.
Inside the Organizer, you'll spot two very important buttons: "Validate App" and "Distribute App."
Pro Tip: I always hit Validate App first. Think of it as a free dress rehearsal. Xcode sends a quick request to Apple to double-check your app's signature, entitlements, and basic structure. This has saved me countless headaches by catching small issues, like a missing icon or an incorrect setting, before I commit to a full upload.
After you get the green light from the validation step, you're ready to go. Click Distribute App. A wizard will guide you through the final options. Just make sure you select "App Store Connect" as the destination, and Xcode will take care of the rest, uploading your binary directly to Apple.
Once it's done, you'll get a satisfying green checkmark. Your build is officially on its way! It can take anywhere from a few minutes to an hour (sometimes longer) for it to process and appear in the TestFlight section of App Store Connect.
While you wait, it’s the perfect time for a final check of your notes. Solid testing is non-negotiable for a smooth launch, and our mobile app testing checklist is a great resource to make sure you’ve covered all your bases.
The Home Stretch: Finalizing and Submitting for Review#
Your build has finished processing, and you're officially in the final lap. This is where you’ll dot the i's and cross the t's in App Store Connect before hitting that glorious "Submit for Review" button.
First things first, head back to your app's version page. You should now see the build you just pushed from Xcode available for selection. Go ahead and select it. This is the moment you officially link your compiled code to the store listing you’ve been carefully preparing.
A Few Last-Minute Details#
Before you can submit, Apple has a couple of final compliance questions. You'll be asked about things like export compliance for any encryption your app uses and whether you have the proper rights to third-party content. It's crucial to answer these honestly to prevent any delays down the line.
Next up is the Notes for Reviewer section. This is your direct line of communication with the real person who will be testing your app. Seriously, don't skip this.
This note section is your secret weapon for a smoother review. If your app requires a login, provide a demo account (username and password). If a key feature is tucked away behind a few taps, spell out exactly how to find it. The clearer you are, the lower the chances of a rejection simply because the reviewer got confused.
Making the reviewer's job as easy as possible is the single best thing you can do for a speedy approval. The submission process is known for being strict; Apple's team tests everything from functionality to privacy and security. While wait times can range from a few hours to several days, remember that around 1,700 apps get the green light every day.
With your notes and compliance filled out, it's time for the moment you've been waiting for. Take a deep breath and click that "Submit for Review" button. Your app's status will flip to "Waiting for Review" as it enters the queue.
For a deep dive into exactly what reviewers are looking for, be sure to check out our detailed guide on the official App Store review guidelines.
Got Questions About App Store Submission? Let's Unpack Them#
Even with the best-laid plans, hitting that "Submit for Review" button can feel like sending your app into a black hole. Questions always come up, so let's walk through some of the most common ones I've fielded over the years. Knowing what to expect can make these final steps a lot less stressful.
The one question on every developer's mind is, "How long will Apple take to review my app?" The real answer is, it depends. I’ve had minor bug-fix updates sail through in less than a day, but I've also seen new, feature-rich apps take several days or even a week.
As a general guideline, I tell my teams to plan for a 24-48 hour turnaround. But always have a buffer, especially around major holidays or when Apple releases a new version of iOS—things can get backed up.
What if My App Gets Rejected?#
First off, don't panic. An app rejection can feel like a punch to the gut, but it's a rite of passage for many developers. It's more common than you think. In 2022, about 1.7 million app submissions were turned away, with 400,000 of those rejections tied to specific guideline violations. If you're curious, you can dig into these App Store rejection statistics and see you're in good company.
When a rejection happens, Apple sends you a message in the Resolution Center explaining why. Read this carefully—it's your roadmap to getting approved.
- Pinpoint the problem: The message will usually cite a specific App Store Review Guideline. Make sure you understand it, then make the necessary fixes in your code, metadata, or app description.
- Explain your fix: When you resubmit, leave a clear, professional note for the reviewer. Briefly explain what the issue was and how you’ve corrected it. A little courtesy goes a long way.
- Know when to appeal: If you truly believe the reviewer misunderstood your app's functionality or that the rejection was an error, you can submit an appeal. Just be sure you have a strong, well-reasoned case.
This is just one of the hurdles you might face. For a wider view of potential issues, we've put together a guide on the most common mobile app development challenges.
Pro Tip: My app's status has been "In Review" for over a week. What should I do?
If your app seems stuck in limbo, my advice is to wait it out for at least a full week. Sometimes complex apps just take longer. If there's still no movement after that, it's perfectly fine to reach out. Use the "Contact Us" section in App Store Connect to politely inquire about the status of your review.
Tired of wrestling with native configurations? With NextNative, you can lean on your existing web skills to build and ship production-ready iOS and Android apps much faster. Grab your all-in-one toolkit at https://nextnative.dev.