Build Your Next JS Mobile App With NextNative
Updated: July 22, 2025
Imagine this: you write your code once and it seamlessly becomes a high-performance website, a polished iOS app, and a native Android app. That's the core promise of building a Next.js mobile app, especially when you bring a toolkit like NextNative into the mix. It's a game-changer that saves a ton of development time and keeps the user experience perfectly consistent across every device.
This approach really bridges the gap between the web development you know and the native mobile performance users demand.
Why Build Your Mobile App With Next.js?#
Picking your tech stack is one of those foundational decisions that can make or break a project. While Next.js earned its fame building blazing-fast, SEO-friendly websites, its power goes way beyond the browser. Let's dig into the real strategic perks of using it for a genuine next js mobile app.
And to be clear, we're not just talking about stuffing your website into a clumsy web-view container. This is about using the web skills you already have to craft a true native application that feels snappy, fluid, and completely at home on the user's phone.
The Power of a Single Codebase#
If there's one killer reason, it's pure efficiency. Instead of juggling three separate projects for your web, iOS, and Android platforms, you have just one unified codebase. A feature you build for your website can be live in your mobile apps almost instantly. It’s as good as it sounds.
- Slash Development Costs: Less code means you need fewer developers, which is a direct win for your budget. You’re not paying separate teams to reinvent the wheel three times over.
- Get to Market Faster: Launching on all platforms at once is suddenly within reach, even for small teams or solo founders trying to make a big impact.
- Simplify Maintenance: Bug fixes and updates? Apply them once, and they're rolled out everywhere. This drastically reduces the long-term headache and cost of upkeep.
This unified strategy is especially powerful for startups and businesses that need to grow fast without a bottomless budget.
Unlocking Native Performance with Web Tech#
I get it—the big worry with cross-platform tools is always performance. But here’s the thing: modern frameworks compile your code to native UI components. This completely sidesteps the sluggishness of older, web-view-based methods. Your Next.js components become actual, native iOS and Android elements.
From the user’s point of view, the app feels native because it is native. The buttons, the scrolling, the animations—they are the same ones they use every day on their device. It just works.
It's no surprise that the enterprise mobile app development market is expected to hit a staggering $193.9 billion by 2025. This growth is fueled by the demand for apps that deliver this exact blend of speed and cross-platform ease.
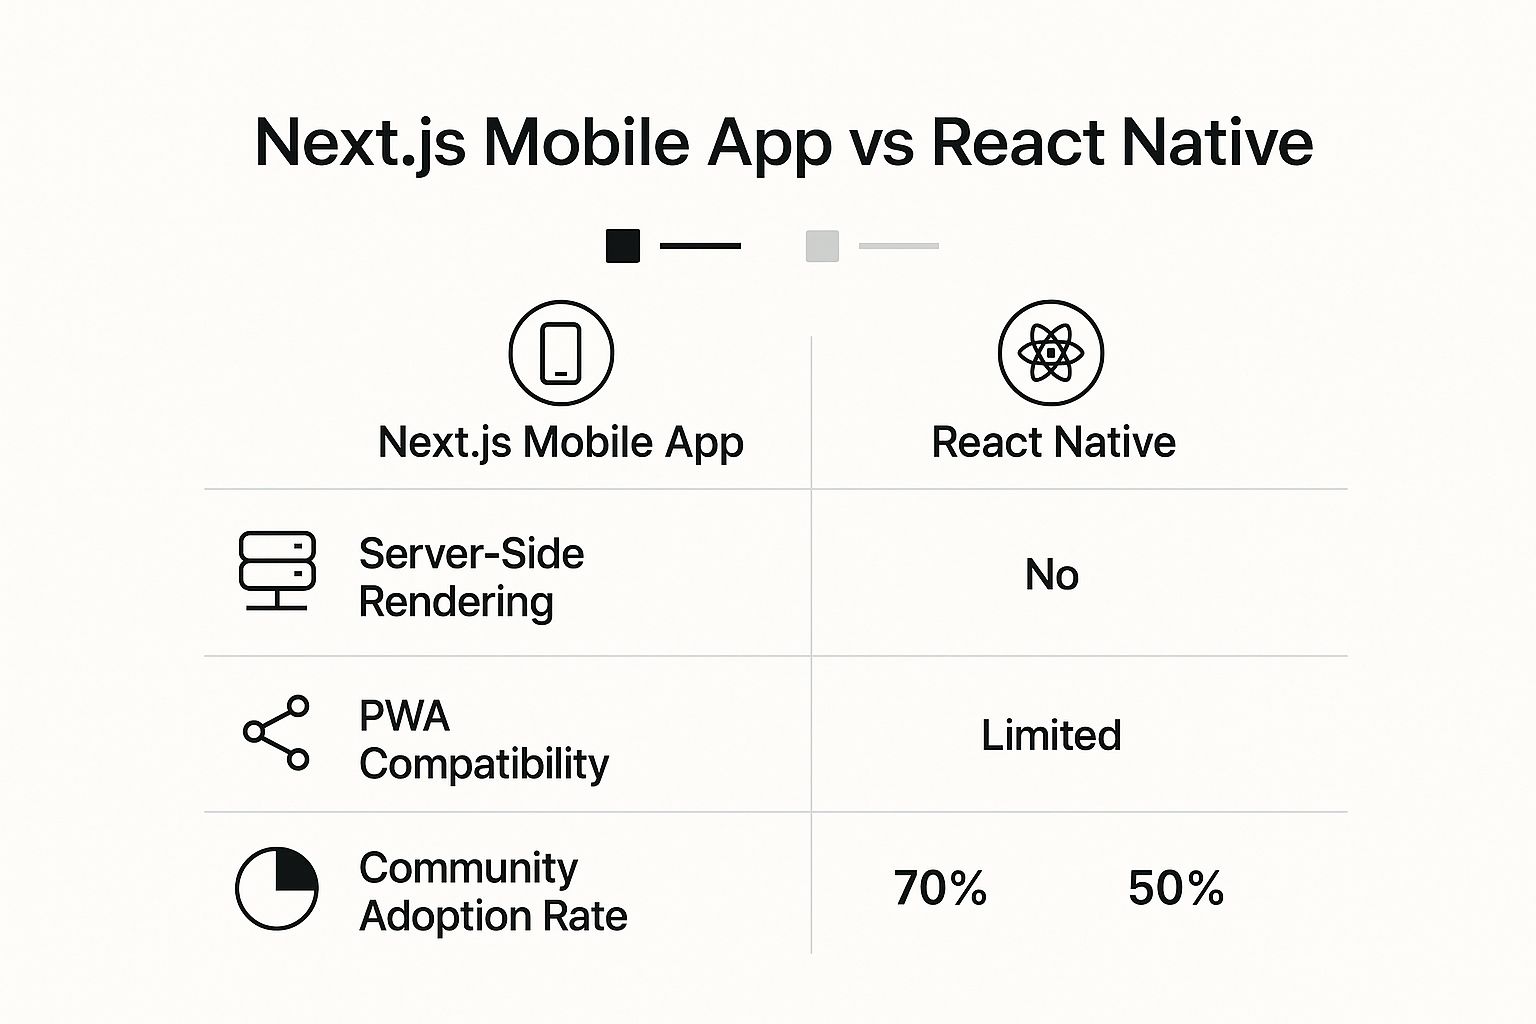
As you can see, Next.js brings some unique firepower to the mobile world, like its famous Server-Side Rendering, which isn't a standard feature in a typical React Native setup.
Next.js vs Traditional Native Development At a Glance#
To put it all into perspective, let's compare building with Next.js versus the old-school native approach.
| Feature | Next.js (with NextNative) | Traditional Native (Swift/Kotlin) |
|---|---|---|
| Codebase | Single codebase for Web, iOS & Android | Separate codebases for iOS (Swift) & Android (Kotlin) |
| Development Speed | Very fast; build once, deploy everywhere | Slower; features built separately for each platform |
| Team Skills | React/JavaScript/Web development skills | Specialized iOS & Android developers required |
| Cost | Lower; smaller team, unified codebase | Higher; larger, specialized teams needed |
| Performance | Excellent; compiles to native UI components | Excellent; direct access to native APIs |
| Consistency | High; UI/UX is consistent by default | Challenging; requires careful coordination |
This table makes it clear: while traditional native development offers raw power, the Next.js approach provides an incredible balance of speed, cost-effectiveness, and performance that's hard to beat for most projects today.
SEO and Discoverability Benefits#
Finally, don't forget that your web presence is your app's best friend. A Next.js mobile app strategy starts with a high-performance, SEO-optimized website that acts as your main marketing channel. Users find you on Google, love the web experience, and are then naturally guided to download the even richer mobile app.
It’s a powerful, self-sustaining growth loop that mobile-only development simply can't offer. If you want to dive deeper into this workflow, check out our guide on how to build cross-platform mobile apps.
Setting Up Your Development Environment#
Getting your development environment right from the start is one of those things that pays off big time. Before you even think about writing the first line of code for your UI, taking the time to build a clean, solid foundation will save you from a world of frustration later. This isn't just about installing a few packages; it’s about making sure all the moving parts work together smoothly to build your Next.js mobile app.
The idea is simple: create a local setup that acts just like a real-world production environment. We'll walk through the must-have tools, from the JavaScript runtime to getting your project started with the right settings. Once we're done, you'll have a project that's ready for you to build on with confidence.
Getting the Core Tools in Place#
First things first, you can't do much in the JavaScript world without Node.js. It’s the engine that runs your code outside of a browser, powering everything from your development server to the Next.js framework itself.
When you install Node.js, you also get npm (Node Package Manager), which is your go-to tool for managing all the libraries and dependencies your project will need. My advice? Grab the latest LTS (Long-Term Support) version of Node.js to ensure you have a stable, reliable setup.
Kicking Off Your Next.js Project#
With the basics handled, it's time for the fun part: creating your actual project. The official, and frankly best, way to do this is with the create-next-app command-line tool. It automates the entire setup, giving you a perfect starting point with all the necessary files and folders.
Just pop open your terminal and run this command:
npx create-next-app@latest your-app-name
You'll be guided through a quick interactive setup. It’s going to ask you a few questions, like if you want to use TypeScript and the App Router. For any new project in 2024, I strongly recommend saying "yes" to both. The App Router is especially important, as it’s the future of Next.js and what makes a lot of the mobile magic possible.
Once it's finished, you'll have a brand-new directory with a clean Next.js project inside. This is the web half of what will soon become your mobile app.
My Two Cents: Seriously, when it asks about the App Router, say yes. It’s built for modern web standards and is the bedrock that tools like NextNative use for mobile integration. If you stick with the old
pagesdirectory, you'll be boxing yourself in and missing out on key features.
Bringing in NextNative for Mobile#
Alright, your Next.js web app is ready. Now, let's turn it into a mobile app. This is where NextNative steps in, taking your web project and giving it the power to run on iOS and Android.
Integrating NextNative is surprisingly straightforward. You'll add its packages to your project and run an initialization command. This doesn't throw away your Next.js code—it builds on top of it. It automatically adds the right configurations for Capacitor, the tech that wraps your web code in a native mobile shell, and creates the necessary iOS and Android project folders for you.
Here's a look at what the NextNative toolkit brings to the table, making the jump from web to mobile feel seamless.
The real win here is having a unified stack. All those web development skills you've honed are now directly applicable to building fantastic mobile apps.
From a single codebase, you now have three distinct targets:
- A high-performance website built with Next.js.
- A native iOS app you can open and run in Xcode.
- A native Android app you can open and run in Android Studio.
This "build once, deploy everywhere" approach is the core benefit. Any component you create or API route you define can now serve your website, your iOS app, and your Android app. If you want a deeper dive into how this all comes together, check out this overview of the typical mobile app development process to see how this setup makes every stage more efficient.
By the end of this, you’ve got a development environment that's a true triple threat.
Crafting Your App's Core Structure and Navigation#
Let's be honest, a clunky or confusing app structure is a deal-breaker. If a user can't figure out how to get around your app in the first few seconds, they're probably going to uninstall it. It's that simple.
This is where we'll build the backbone of our Next.js mobile app. The goal is to make the user experience feel completely intuitive from the very first tap. We'll achieve this by blending the power of Next.js's file-based routing with a solid, mobile-first navigation library. This combo gives us the best of both worlds: the structured, SEO-friendly nature of Next.js for our web version, and the fluid, native-feeling transitions that mobile users have come to expect.
We're going to dive into some practical setups for common navigation patterns and, just as importantly, how to organize your files so your project stays clean and doesn't become a nightmare to maintain.
Organizing Your Project for Web and Mobile#
Before we even think about installing navigation libraries, let's talk about folders. A smart project structure is everything, especially when you're juggling code that needs to run on web, iOS, and Android. I’ve found a simple but incredibly effective pattern that keeps the chaos at bay.
Inside your app/ directory, create (mobile) and (web) folders. This isn't just for looks; it uses Next.js's Route Groups feature, which lets us organize our files into logical sections without messing with the actual URL paths.
app/(web)/is where you'll put pages that are exclusive to your website.app/(mobile)/will hold all the screens for your iOS and Android app.app/(the root) is perfect for shared layouts and pages—like a home page or login screen—that need to exist on both web and mobile.
This setup gives you a clean separation of concerns. Your platform-specific logic stays neatly contained, but you can still maximize code reuse for your components and API routes.
Implementing React Navigation#
For the mobile side of things, we're going to lean on React Navigation. It’s the community standard for a reason: it's robust, has fantastic documentation, and gives us that native look and feel we're after.
Let's start by getting the core dependencies installed. Pop open your terminal and run:
npm install @react-navigation/native @react-navigation/native-stack npm install react-native-screens react-native-safe-area-context
These packages are our foundation. @react-navigation/native is the main engine, and native-stack provides the classic stack navigator. You know the one—where new screens slide in from the side and a back button magically appears. It's a fundamental pattern for most mobile apps.
A quick tip from experience: Don't just blindly copy-paste install commands. It helps to know why you're installing something.
react-native-screensandsafe-area-contextare vital because they hook into native platform code to manage how screens are displayed and to avoid phone notches or system UI elements. This is a small detail that makes a huge difference in how "native" your app feels.
Building Your First Navigation Stack#
Okay, let's put this into practice. Imagine you have a main "Feed" screen and you want users to tap on someone's profile to see a dedicated "Profile" screen. This is a perfect job for a stack navigator.
You'd create a new component to define this flow, maybe something like AppNavigator.tsx.
// In app/(mobile)/_layout.tsx or a dedicated navigator file import { createNativeStackNavigator } from '@react-navigation/native-stack'; import FeedScreen from './feed'; import ProfileScreen from './profile';
const Stack = createNativeStackNavigator();
function AppStack() { return ( <Stack.Navigator> <Stack.Screen name="Feed" component={FeedScreen} /> <Stack.Screen name="Profile" component={ProfileScreen} /> </Stack.Navigator> ); }
This little snippet sets up the entire flow. It tells the navigator that the Feed screen is the first one to show. When you navigate to "Profile," the navigator takes care of the screen transition, the header, and the back button, all automatically. This is exactly the kind of responsive behavior that makes a Next.js mobile app feel polished.
Adding a Tab Navigator for Main Sections#
Of course, most apps are more than just a single stack of screens. They usually have a few main sections—like Home, Search, and Settings—accessible from a bottom tab bar. We can easily build this by combining a tab navigator with the stack we just created.
First, you'll need the tabs package:
npm install @react-navigation/bottom-tabs
Then, you can start nesting your navigators to create a more realistic app structure. For example, your main navigation could be the tab bar, and each tab could have its own stack of screens inside it.
A Common Tab Bar Setup
| Tab | Screen Component | Description |
|---|---|---|
| Home | HomeStack |
Contains the main feed and detail screens. |
| Search | SearchScreen |
A dedicated screen for finding content. |
| Profile | ProfileStack |
Manages the user's profile and settings screens. |
This nested approach is a game-changer. It keeps your navigation logic modular and easy to follow. You build small, focused navigators (like HomeStack) and then compose them into a bigger, app-wide layout like your TabNavigator. Getting this foundation right ensures your app can grow in complexity without turning into a tangled mess of code.
Integrating Native Device Features and APIs#

This is where the magic really happens. So far, we've built a solid, well-structured application that runs across multiple platforms. Now, it's time to bridge that final gap between a web app and a genuine mobile experience by tapping directly into the device's hardware.
The real power of building a Next.js mobile app with a tool like NextNative is the ability to call native APIs right from your familiar JavaScript codebase. This means you can access the camera, get a user's location, or send push notifications without ever having to leave your React components.
Let's move past the theory and build something tangible.
Accessing Native APIs the Smart Way#
The secret sauce here is a "bridge" that translates your JavaScript calls into native Swift or Kotlin code. This is handled for you by Capacitor, the underlying engine in our NextNative setup. It exposes a clean, consistent API that just works, whether you're on iOS or Android.
So, instead of getting bogged down in complex native code, you just import a plugin, call a method, and get the data you need. For example, if you want to use the device's camera, you don't need to know the first thing about AVCaptureDevice on iOS or CameraX on Android.
The core idea is simple: let the native experts build the bridge, and you focus on using it within your app's logic. This approach saves hundreds of hours and frees you up to build features, not wrestle with platform-specific SDKs.
This streamlined workflow is a huge reason why frameworks like Next.js are becoming so popular for mobile development. In fact, Next.js adoption among JavaScript frameworks for mobile apps shot up by 28% in the last year alone.
A Practical Example: Building a Profile Picture Uploader#
Let's walk through one of the most common mobile features out there: letting a user snap a new photo for their profile. This one task actually involves three key native interactions:
- Checking for and requesting camera permissions.
- Opening the native camera interface.
- Getting the image file back into our application.
First things first, we need to install the Capacitor camera plugin. Pop open your terminal and run:
npm install @capacitor/camera
After it's installed, it's crucial to sync your project. This command makes sure the native iOS and Android projects know about the new plugin you just added.
npx cap sync
Now, head over to your Profile component. We'll create a function to handle the entire photo-taking process. This is where you'll see just how elegantly your JavaScript code can command the device's hardware.
The code itself is surprisingly simple. We just import the Camera object from the plugin and call its getPhoto method. This one function handles permissions, opens the camera, and gives us back the image data.
import { Camera, CameraResultType, CameraSource } from '@capacitor/camera';
const takePicture = async () => { try { const image = await Camera.getPhoto({ quality: 90, allowEditing: true, resultType: CameraResultType.Uri, // We want the file path source: CameraSource.Camera // Or CameraSource.Photos for the gallery });
// image.webPath will contain the path to the photo
// Now you can display it or upload it
console.log('Photo taken:', image.webPath);
} catch (error) { console.error("Error taking picture", error); } };
Managing Permissions Gracefully#
Did you notice we didn't write any special code to ask for permission? The Capacitor plugin handles that for us. The first time a user tries to take a photo, the operating system will automatically show the standard prompt: "This app would like to access your camera."
This is a huge win for user experience. Requesting permissions right when they're needed (known as "just-in-time" permissions) feels much more natural to the user than asking for everything the moment they open the app.
Common Native APIs You'll Want to Use
| API | Capacitor Plugin | Typical Use Case |
|---|---|---|
| Geolocation | @capacitor/geolocation |
Showing a user's location on a map or finding nearby places. |
| Push Notifications | @capacitor/push-notifications |
Sending alerts and updates to re-engage users. |
| Haptics | @capacitor/haptics |
Providing physical feedback for actions, like a slight vibration on success. |
| Device Info | @capacitor/device |
Checking the OS, model, or battery level for analytics or logic. |
Each of these integrations follows the same straightforward pattern: install, sync, and call the JavaScript API. This consistency makes adding powerful native features to your Next.js mobile app incredibly fast. For a deeper look at optimizing these interactions, check out our guide on how to improve mobile app performance.
Getting Your App Onto the App Stores#
You’ve poured your energy into building an incredible app—now it’s time for the final, most rewarding part: getting it into the hands of your users. This is your launch guide, walking you through the entire process of prepping your Next.js mobile app for a production release and getting it published on the Apple App Store and Google Play Store.
This is where the rubber meets the road. Moving from a development environment to a live, production-ready app isn't just a flip of a switch. It involves a few crucial steps to lock in performance, security, and, of course, to make sure you meet all the store guidelines.
Creating Your App’s Visuals#
Before you can even think about submitting, your app needs to look the part. This starts with creating the essential visual assets: the app icon and the splash screen. These need to be sharp and professional on every single device out there.
A classic rookie mistake I see all the time is just making one or two image sizes. With the huge variety of screen densities on modern phones, that's a recipe for blurry icons and stretched splash screens. You need a complete set for both iOS and Android.
- App Icons: This is literally the face of your app on a user's home screen. You'll need a whole range of sizes, from a tiny 29x29 pixels all the way up to the master 1024x1024 image required for the App Store.
- Splash Screens: As the first thing users see, a great splash screen makes your app feel responsive while it initializes in the background.
Thankfully, you don't have to do this by hand. There are plenty of great online tools and CLI utilities that can take one high-resolution image and spit out all the different sizes you need. It’s a massive time-saver.
Nailing the Production Build#
What you run on your local machine is a world away from a production build. The final version needs to be highly optimized, with all your code bundled and minified for the fastest possible load times. For a Next.js mobile app built with Capacitor, this really boils down to two key commands.
First, you’ll want to create that optimized build of your Next.js web code.
npm run build
Then, you have to sync these new web assets over to your native projects and let them know what's changed.
npx cap sync
Don't underestimate that sync command—it's absolutely critical. It ensures your native iOS and Android projects are aware of any new plugins you’ve added and have the latest version of your web code ready to be packaged into the final app.
Pro Tip: I can't stress this enough: always, always clear out your old build artifacts before creating a new production release. I’ve wasted countless hours chasing down bizarre bugs that were caused by leftover files from a previous build. A clean slate is your best friend here.
Signing and Submitting Your Masterpiece#
Alright, here we go—the final push. To get your app onto the Google Play Store and the Apple App Store, you first need to digitally sign it. Think of this as a seal of authenticity. It proves you're the legitimate developer and that the app code hasn't been messed with since you built it.
For a smooth, repeatable process, setting up robust CI/CD pipeline tools is a game-changer. It automates testing and deployment, making releases far less stressful.
The signing process itself is a bit different for each platform:
- Android (Google Play Store): You'll need to generate what’s called a keystore file. This file holds the private key you'll use to sign your Android Application Package (APK) or Android App Bundle (AAB). Guard this file with your life. Seriously. If you lose it, you can't publish any future updates to your app.
- iOS (Apple App Store): Apple handles everything through Xcode and the Apple Developer portal. It's a system of provisioning profiles and signing certificates that essentially link your app to your developer account.
Once your app is signed, you're ready to upload. You'll use the Google Play Console for Android and App Store Connect for iOS. These are the dashboards where you’ll fill out all your app’s metadata—descriptions, screenshots, pricing, and privacy policies. Be meticulous here; a detailed, honest listing is your best bet for sailing through the review process. For a deeper dive, our mobile app deployment checklist is an invaluable resource that covers every little detail.
The opportunity you're stepping into is enormous. In 2025, the mobile app market continues its explosive growth. Global app downloads are on track to hit 299 billion—a growth rate of 8% year-over-year since 2023—and consumer spending on mobile apps is estimated to fly past $150 billion this year. Understanding these trends can really put the wind in your sails.
Common Questions About Building Mobile Apps with Next.js#
When you first start exploring how to build a Next.js mobile app, a few key questions always come up. It’s a pretty unique way of blending web and native development, so it's natural to have some "how does this actually work?" moments. Let's walk through the most common questions I hear from developers.
My goal here is to give you straightforward, practical answers drawn from real-world projects. This should clear up any confusion and help you sidestep some common bumps in the road.
What's the Real Difference Between NextNative and React Native?#
This is easily the question I get asked the most. The answer really boils down to your workflow and how much you want to avoid repeating yourself.
If you go the standard React Native route, you're essentially building your mobile app in a separate universe from your website. They don't share code, so you’re maintaining two distinct projects.
Using Next.js with NextNative changes the game completely. It's built on the idea of a unified codebase. You get to share a huge amount of your work—components, custom hooks, business logic, and even API routes—between your website and your mobile apps. You get all the SEO and performance wins from your Next.js site, and you use those exact same React skills for a true native mobile experience. It’s one project, one team, one process.
How Does Performance Stack Up Against a Fully Native App?#
Let's be honest: a 100% native app built in Swift or Kotlin will always have a slight edge for super intensive tasks like 3D gaming. But for the vast majority of applications, the performance difference is practically zero. A well-architected Next.js and NextNative app feels incredibly fast and smooth.
The secret sauce is that NextNative and the Capacitor engine it uses don't just wrap your site in a web view. They compile your React code down into actual native UI elements. It's the real deal.
For most apps you can think of—e-commerce stores, social media feeds, productivity tools, you name it—your users will get a snappy, responsive experience. They won't be able to tell it wasn't built "traditionally." That tiny, often unnoticeable performance trade-off is well worth the massive gains in development speed and cost savings.
Can I Add This to My Existing Next.js Project?#
Yes, absolutely! And frankly, this is one of its most powerful features. You don't need a blank slate to get started.
You can integrate NextNative right into an existing Next.js project. This is a massive win for businesses that have already invested heavily in their website. By adding a few packages and configurations, you can start building out mobile-specific views while reusing all the authentication, business logic, and API endpoints that already power your site. It's the fastest way to get your brand onto the app stores without starting over.
What Are the Main Limitations I Should Know About?#
The limitations are pretty much the same ones you'd find with React Native itself. If your app idea is really out there—relying on complex background processing, niche hardware SDKs that don't have a community module, or heavy graphical computations—you might hit a wall.
In those rare cases, you might have to write a custom native module in Swift or Java to bridge the gap, which means you'll need someone with native coding skills on your team. But for well over 95% of typical app use cases, the enormous ecosystem of existing libraries and NextNative’s core features give you everything you need without ever writing a line of native code.
Thinking ahead is key. Before you get too deep into development, you should always get familiar with the latest App Store review guidelines to make sure your great idea doesn't get rejected for a simple, avoidable reason.
Ready to stop juggling separate codebases and start building faster? With the NextNative All-in-One boilerplate, you get a production-ready foundation for your Next.js web, iOS, and Android apps, complete with authentication, payments, and native components. Skip the setup and start building your dream app today. https://nextnative.dev