Your TypeScript Mobile App Development Guide
Updated: July 25, 2025
So, you're thinking about building a mobile app with TypeScript? You've come to the right place. In a nutshell, this approach means using TypeScript—a powerful, typed version of JavaScript—to create native apps for both iOS and Android. It's a game-changer, especially when paired with frameworks like React Native or NextNative. It lets web developers like us bring our skills into the mobile world, but with some serious upgrades in code quality and reliability.
Why Smart Developers Choose TypeScript for Mobile Apps#
Before we jump into the code, let's talk about why this is such a popular move. Experienced development teams don't just pick a language on a whim. Opting for TypeScript is a strategic choice that pays off in project stability, team productivity, and even how fast you can ship new features.
The most obvious win is a massive drop in runtime errors. We've all been there with plain JavaScript—chasing down a bug that only shows up after you've built the app and started testing. It's frustrating. TypeScript nips those problems in the bud by catching type-related mistakes while you're still writing the code.
The Real-World Impact on Development#
Let's make this tangible. Imagine you have a component that needs a user object. In JavaScript, you could easily pass user.id as a string when it should be a number. The app might not crash immediately, but it could lead to some bizarre behavior or a silent failure that's a nightmare to track down later.
With TypeScript, that mistake would be highlighted right in your editor before you even save the file. This early feedback loop is incredibly powerful.
Here’s what that really means for your day-to-day work:
- Faster Debugging: You’ll spend way less time hunting for ghosts in your code and more time actually building things.
- Clearer Collaboration: When you're working on a team, TypeScript's explicit types act like built-in documentation. It's instantly clear what kind of data a function expects, making handoffs and code reviews much smoother.
- Fearless Refactoring: Ever needed to rename a property across a huge project? In JavaScript, it's a "find and replace and pray" situation. In TypeScript, you can refactor with confidence, knowing the compiler will point out every single spot you missed.
By creating a clear "contract" for how different pieces of your code interact, TypeScript helps you build an app that's solid and predictable. This is absolutely critical when your app starts to get more complex.
Thinking about the big picture, the mobile app market is booming. It was valued at $475.90 billion back in 2022 and is on track to hit $756 billion by 2027. This explosive growth is why efficient, cross-platform tools are in such high demand, putting TypeScript front and center.
Development Experience With and Without TypeScript#
To see the difference side-by-side, here’s a quick comparison of what it’s like to work on a mobile project with plain JavaScript versus TypeScript.
| Feature | Plain JavaScript | TypeScript |
|---|---|---|
| Error Detection | Runtime (after code runs) | Compile-time (while you code) |
| Code Readability | Depends on JSDoc & conventions | Self-documenting types |
| Tooling & Autocomplete | Basic, less reliable | Rich, intelligent suggestions |
| Refactoring | Manual, high-risk | Automated, safe |
| Team Onboarding | Steeper learning curve | Faster, thanks to clear types |
The table really tells the story. While you can certainly build great apps with JavaScript, TypeScript provides a safety net and a set of tools that make the entire process more efficient and less prone to human error.
Ultimately, when you combine TypeScript with a modern framework, you're not just writing code; you're setting your project up for long-term success. If you're looking to dive deeper into this workflow, our guide on how to build cross-platform mobile apps is a great next step. It’s about turning a smart language choice into a powerful development strategy.
Getting Your Development Environment Ready#
Every great mobile app starts with a solid foundation, and that foundation is your local development environment. Before we even think about writing a line of TypeScript, we need to get your machine set up with the right tools. Trust me, spending a little time here will save you a ton of headaches down the road and make the whole process feel much smoother.
The entire TypeScript mobile app development journey, from this initial setup to launch day, follows a pretty clear path. This graphic gives you a bird's-eye view of the stages we'll be tackling together.
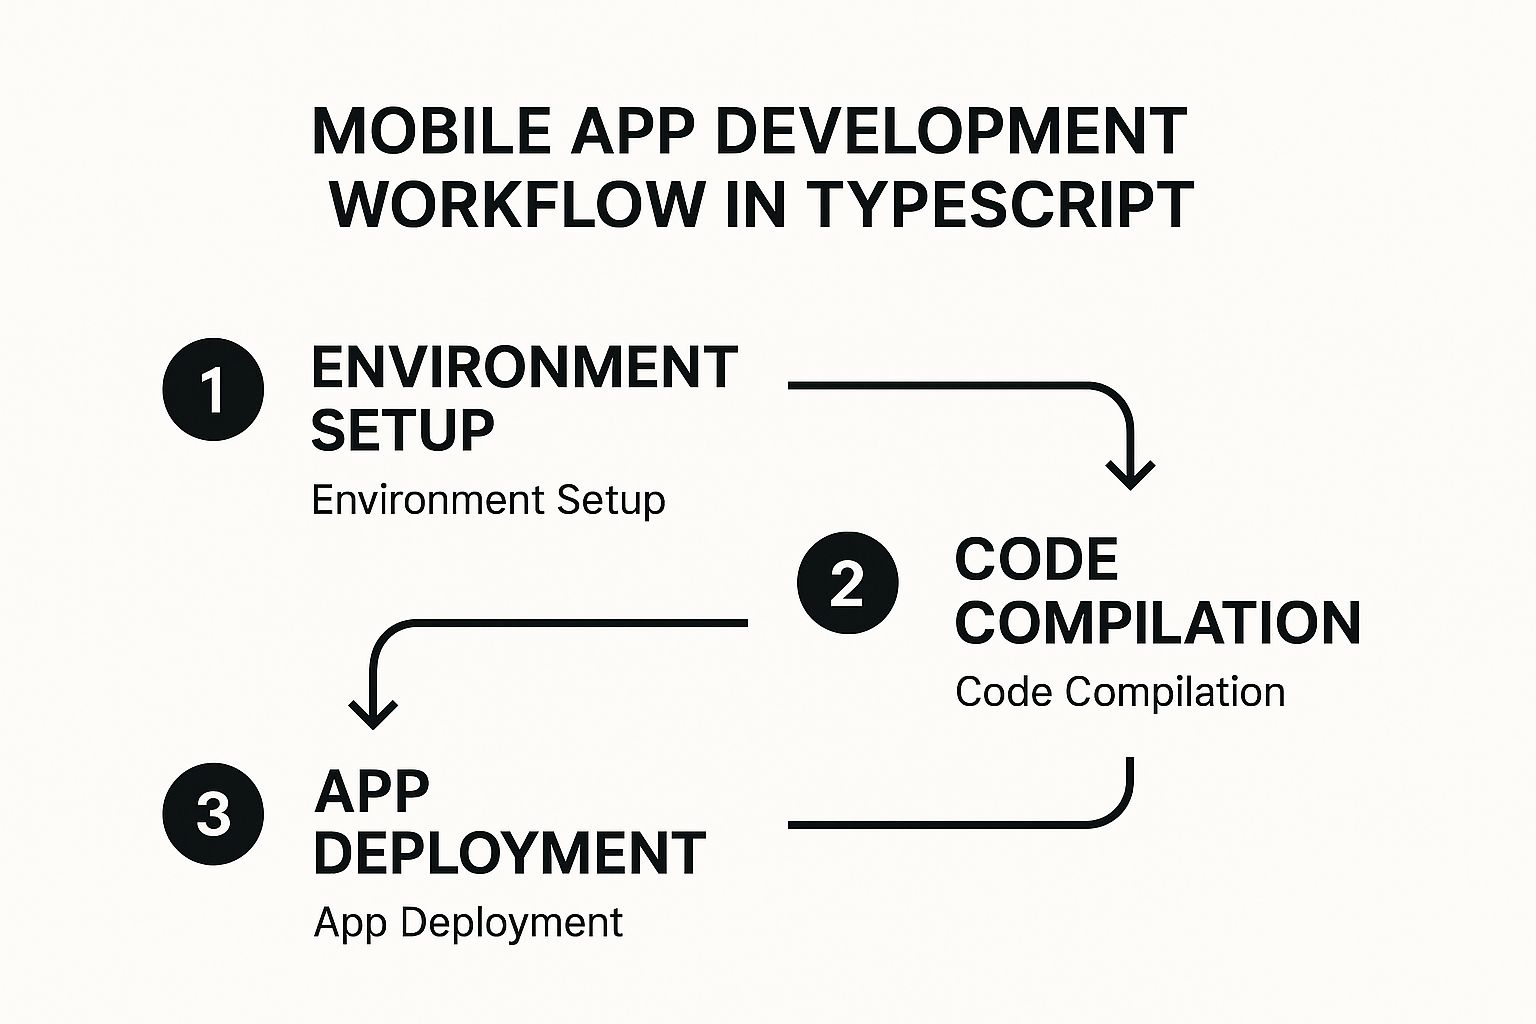
As you can see, this one-time setup kicks off a cycle of coding, compiling, and testing that eventually leads to getting your app on both the Apple App Store and Google Play.
Core Tooling Installation#
First things first, you'll need to install Node.js. Think of it as the engine that lets you run JavaScript (and by extension, TypeScript) on your computer, outside of a web browser. It's the powerhouse behind almost all modern development tools, including the Expo CLI we’ll grab next.
I highly recommend using a version manager like nvm (Node Version Manager) for this. It lets you switch between different Node.js versions with a simple command, which is a lifesaver when juggling projects with different dependencies. Go ahead and install the latest Long-Term Support (LTS) version—it's always the most stable and reliable choice.
With Node.js in place, the next step is to install the Expo Command Line Interface (CLI). Expo is an incredible platform built on top of React Native that handles a lot of the tricky native configuration for you.
Just open your terminal and run this simple command:
npm install -g expo-cli
This uses npm (Node Package Manager), which came bundled with Node.js, to fetch the Expo CLI. The -g flag installs it globally, so you can run expo commands from anywhere on your machine. If you want to zoom out and see how this fits into the bigger picture, our guide on the complete mobile app development process is a great resource.
Supercharging Your Code Editor#
You can write code in a simple text editor, but why would you? Using a tool like Visual Studio Code (VS Code) with a few key extensions will make you a much more productive developer. It’s free, fast, and has a massive community building plugins for it.
Here are the extensions I absolutely refuse to work without:
- ESLint: This is like having a senior developer looking over your shoulder. It catches potential bugs and enforces a consistent coding style, which is essential for any project, especially if you're working on a team.
- Prettier - Code formatter: This handy tool automatically cleans up your code's formatting every time you hit save. Say goodbye to pointless arguments over tabs versus spaces!
- Expo Tools: This is the official extension from the Expo team. It adds helpful code snippets and integrates Expo's commands right into VS Code, streamlining how you run and debug your app.
My Pro Tip: Take a few extra minutes to get ESLint and Prettier configured to play nicely together. This powerhouse combo will catch errors before they even become a problem and keep your code looking perfect, all without you lifting a finger. It frees you up to focus on what really matters: building awesome features.
With these tools installed and configured, your local environment is officially ready for action. Let's start building
Building Your First Real-World App Screen#
Alright, enough with the setup and theory. It’s time to get our hands dirty and build something you’d actually see in a real application. Forget "Hello World"—we're jumping straight into creating a dynamic contact list screen. This is a core feature in so many apps, making it the perfect place to start.

This is where you'll really see the magic of TypeScript mobile app development come to life. By defining our data structures from the get-go, we'll sidestep common bugs and write code that’s far easier to manage down the road.
Defining Your Data With TypeScript Interfaces#
First things first: before we touch a single pixel of the UI, we need to map out what our data looks like. This is a cornerstone of working with TypeScript, as it forces us to be intentional and consistent. For our contact list, we’ll do this by creating a Contact interface.
Think of an interface as a contract or a blueprint for your objects. It spells out exactly what properties an object needs and what type of data each property holds. In your project, go ahead and create a new file—I usually call mine types.ts—and add this interface.
// types.ts
export interface Contact {
id: string;
name: string;
phone: string;
email?: string; // The '?' makes this property optional
}
Did you notice the ? next to email? That little character makes the property optional, which is perfect for real-world data where you might not have an email for every single contact. Now, if we ever try to create a Contact object without an id, name, or phone, TypeScript will immediately let us know we've made a mistake.
Building Reusable UI Components#
With our data structure locked in, it's time to build the visual pieces that will display it. We’ll start small by creating a single ContactListItem component. Its only job is to render the details for one contact.
This approach is all about reusability. Instead of coding one massive, monolithic screen, we're creating small, focused building blocks that we can assemble together. It's a much cleaner way to work.
Let's make a new component file, ContactListItem.tsx. Inside, we'll use a couple of React Native's core components:
- View: Your go-to for creating layouts. It’s the mobile equivalent of a
<div>in web development. - Text: As the name suggests, this is for displaying any and all text.
// ContactListItem.tsx import React from 'react'; import { View, Text, StyleSheet } from 'react-native'; import { Contact } from './types'; // Import our interface
interface Props { contact: Contact; }
const ContactListItem: React.FC
// ...add StyleSheet styles here
See how we imported our Contact interface and used it to define the props for our component? This is TypeScript working its magic. If you accidentally tried to pass something that doesn't match the Contact shape to this component, your code editor would light up with an error, saving you a headache later.
The rise of cross-platform frameworks has profoundly influenced mobile app development, with TypeScript playing a significant role. React Native, which often uses TypeScript for enhanced type safety, is the number 1 non-native framework on the Apple App Store and number 2 on Google Play, after native languages. Its market share increased from 4.73% in 2022 to 6.75% in 2024. Discover more insights about the latest cross-platform development trends.
Displaying a List of Contacts#
Now for the final piece of the puzzle: putting it all together on our main screen. To display our list, we’ll use React Native's FlatList component. It's purpose-built for rendering long, scrollable lists of data without breaking a sweat.
FlatList is incredibly efficient. It only renders the items currently visible on the screen, a clever trick called "windowing." This keeps your app feeling snappy and responsive, even if you're dealing with thousands of contacts. You can dive deeper into building functional UIs with our comprehensive mobile app development tutorial.
By getting this screen built, you've taken a massive leap from initial setup to a real, functional piece of your application. Great work
Handling App State and User Navigation#
An app that doesn’t react to user input isn’t really an app at all—it’s just a picture. The magic happens when your application can respond to taps, swipes, and data changes. This all boils down to two fundamental concepts: state management and user navigation.
This is where your TypeScript skills really start to pay off. We’ll take a static screen and breathe life into it, making it a truly dynamic and interactive experience for the user.
Keeping Track of Data with Hooks#
First things first, let's talk about managing data inside your components. For this, we'll lean on a couple of old friends from the React world: the useState and useEffect Hooks. They are the absolute workhorses of modern React development, but when you pair them with TypeScript, you unlock a whole new level of code safety.
Let’s go back to our contact list example. In the real world, you wouldn't hardcode that list; you'd probably fetch it from a server. This is a perfect asynchronous task that involves juggling different states—like knowing when the data is loading, when it has arrived successfully, or if an error popped up.
The useState Hook lets us declare what kind of data our state will hold right from the get-go. This is a game-changer because it stops you from accidentally putting a square peg in a round hole later on.
For our contacts, we can define the state like this:
const [contacts, setContacts] = useState<Contact[]>([]);
See that <Contact[]> part? That's us telling TypeScript, "Hey, the contacts state variable must always be an array of Contact objects, no exceptions." If you ever try to setContacts with a number or a random string, your code editor will flag it immediately, saving you from a nasty bug down the line.
Next up is the useEffect Hook, which is tailor-made for handling "side effects" like API calls. We can use it to fetch our data the moment the component first appears on the screen.
A common pitfall I see developers run into is not typing their loading and error flags. By explicitly defining
useState<boolean>(true)for a loading indicator, you guarantee it can only ever betrueorfalse. This makes your component's logic so much cleaner and more predictable.
Building a Multi-Screen Experience#
A single screen is a great start, but users need to move around. That’s where a good navigation library comes in. For anyone working in the React Native world, React Navigation is the gold standard. It’s powerful, flexible, and has fantastic TypeScript support built-in.
We'll start by installing the packages for a "stack navigator." Think of it like a deck of cards—when a user goes to a new screen, we just place a new card on top of the stack.
Once it's installed, the most important step is to define your app's routes in a type-safe way. This means creating a type that lists all your screens and any data (or "params") they expect to receive.
Here’s a quick look at how you might type your navigation stack:
import type { NativeStackScreenProps } from '@react-navigation/native-stack';
export type RootStackParamList = { ContactList: undefined; // This screen doesn't need any data ContactDetails: { contactId: string }; // This one needs a contactId };
export type ContactDetailsProps = NativeStackScreenProps<RootStackParamList, 'ContactDetails'>;
By creating this RootStackParamList, you've just made a single source of truth for your app's entire navigation flow. Now, when you navigate from ContactList to ContactDetails, TypeScript will literally force you to provide the contactId parameter. No more crashes from missing data—just smooth, reliable, and type-safe navigation.
Bringing Your App to the World: From Code to Launch#

Alright, you've put in the work. Your app is coded, you've squashed the bugs, and the user interface feels just right. Now for the exciting part—getting it off your computer and into the hands of real people. This final leap, deployment, can seem intimidating, but the tools we have today make it much more manageable than it used to be.
We’re going to use Expo Application Services (EAS) to handle the journey from your TypeScript code to the app stores. Think of EAS as the bridge that simplifies the notoriously tricky build process for both iOS and Android. It takes care of a lot of the grunt work behind the scenes.
Creating Your First Production Build#
First things first, you need to create a production-ready build. This is different from the development builds you've been using. A production build is all about performance, stability, and keeping the app size down, whereas development builds are geared for fast reloads and debugging.
Using EAS, you can start a cloud build with just one command from your terminal. This is a game-changer. It compiles your app in a fresh, managed environment, completely avoiding that classic "it works on my machine" headache. More importantly, it tackles one of the biggest hurdles in mobile deployment: app signing.
EAS Build is a lifesaver because it securely manages your app signing credentials—things like Android Keystores and iOS Provisioning Profiles—in the cloud. This means you don't have to manually generate, store, and protect these files yourself, which is a massive relief and a common tripwire for developers.
Getting Ready for the App Stores#
With your build ready, you're close, but not quite at the finish line. Both Apple’s App Store and the Google Play Store have their own set of rules and requirements you need to meet. This is also where project management comes into play; knowing how to effectively hire remote developers is a common and smart move for teams looking to scale.
Before you even think about submitting, double-check that you have all your assets in order:
- High-Resolution App Icons: They need to look crisp and clean on a wide range of devices.
- Engaging Screenshots: Show off your app's best features and give potential users a feel for the experience.
- Solid Metadata: Your app's name, description, and keywords are vital for getting discovered in the stores.
- A Privacy Policy: This is mandatory for both stores, so don't skip it.
The typescript mobile app development scene is a major player in the global software market, which was on track to reach a staggering $195.77 billion in revenue by 2025. By nailing these final steps, you're setting your app up for a shot at that success.
Once everything is prepped, you’ll use EAS Submit to push your build and metadata directly to App Store Connect and the Google Play Console. This command is the final step that kicks off the official review process. While you wait for that approval email, it’s a perfect time to read up on common mobile app development challenges so you're even more prepared for your next big idea.
Got Questions About TypeScript for Mobile? Let's Clear Them Up.#
Whenever you're jumping into a new way of building things, you're bound to have questions. This is especially true when it comes to TypeScript mobile app development, particularly with a framework as powerful as React Native. Let's tackle some of the most common ones I hear from developers so you can avoid hitting those frustrating early roadblocks.
Can I Add TypeScript to My Existing JavaScript Project?#
This one comes up all the time. You’ve got a perfectly good React Native app built with JavaScript, and you want to start adding the safety of TypeScript without rewriting everything from scratch.
The good news? The answer is a big yes. The process is actually designed for this kind of gradual adoption. You’ll start by adding the TypeScript compiler and the necessary type definitions for the libraries you're using.
After that, you can begin renaming your .js and .jsx files to .ts and .tsx. The best part is that you can configure TypeScript to coexist happily with your old JavaScript files. This means you can migrate your app component by component, at your own pace, without bringing your development to a halt.
What About Performance and Tooling?#
Another hot topic is performance. Developers often worry, "Will using TypeScript slow down my React Native app compared to plain old JavaScript?"
Put simply, no. You won't see any meaningful performance hit at runtime.
TypeScript is a compile-time tool. It does all its work during development, catching type errors before your code gets bundled. The final output that runs on your user's phone is just standard, optimized JavaScript. Your app will be just as snappy and responsive as ever.
Finally, what’s the big deal with a managed workflow like Expo? The benefit here is radical simplicity. Expo takes care of the tedious parts of the development cycle for you.
It offers pre-configured project templates, including one set up specifically for TypeScript, which means you can skip hours of manual configuration and get straight to coding.
When you're building out critical features like user login, having this solid, secure foundation is a game-changer. For a deeper dive into that specific topic, we've put together some detailed guidance in our article on mobile authentication best practices. Combining TypeScript’s type safety with Expo’s streamlined tooling is a powerful recipe for building better, more secure apps, faster.
Ready to build mobile apps with the tools you already love? With NextNative, you can transform your Next.js skills into native iOS and Android applications, skipping the steep learning curve of new frameworks. Get started with NextNative today