React JS for Mobile App Development
Updated: August 5, 2025
You bet. Using React JS for mobile development is not only possible, it’s one of the smartest ways to build apps today. By pairing a powerful web framework like Next.js with a native runtime like Capacitor, you can build genuinely high-performance, cross-platform mobile apps—all with the React skills you already have.
Why Choose React JS for Mobile Development?#
For a long time, React developers wanting to go mobile had a tough decision: learn a whole new framework like React Native, or just stay on the web. But that's changed. A modern, web-first strategy has emerged, and frankly, it's a game-changer.
The idea is simple but powerful. You build your app once with Next.js, and that single codebase can be deployed as a website, a native iOS app, and a native Android app. This isn't just convenient; it's a massive shift away from the old, siloed way of doing things.
The biggest win here is pure efficiency. Think about it: one codebase for every platform. That means less code to write, less to test, and way less to maintain. Instead of needing separate web, iOS, and Android teams (or trying to be all three yourself), a single developer or team can ship everywhere. For startups, solo devs, and anyone on a tight budget, this is huge.
Bridging Web and Native Worlds#
Don't mistake this for just wrapping your website in a clunky web view. That's old news. Capacitor is a sophisticated bridge that gives your Next.js app deep, direct access to the device's native hardware and APIs.
This opens up a world of possibilities. You can easily implement features that users expect from a modern mobile app, like:
- Tapping into the device's camera for photo uploads.
- Using GPS for location-aware features.
- Sending push notifications to keep users coming back.
- Storing data securely on the device for offline use.
You truly get the best of both worlds: the incredible speed and rich ecosystem of React and Next.js, combined with the power and performance of a native mobile app.
The chart below shows just how much developers are embracing this approach and the time savings they're seeing.
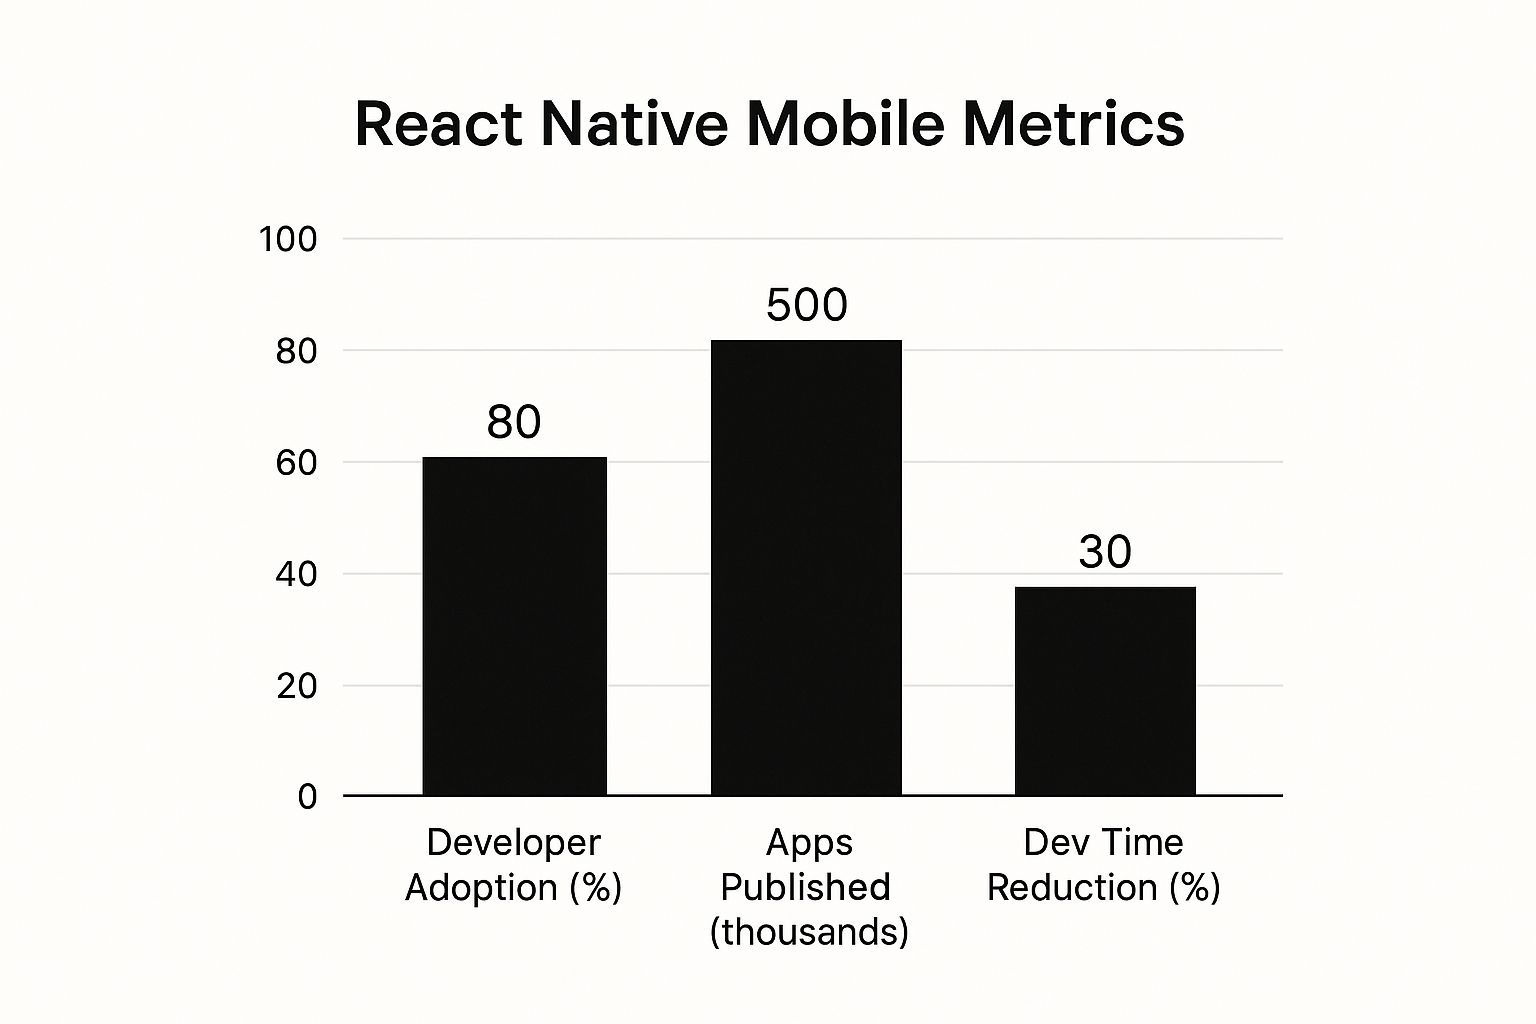
These aren't just vanity metrics. They show a real trend toward high developer satisfaction and serious efficiency gains, making this stack a go-to choice for new projects.
A Proven, Production-Ready Path#
This isn't some experimental idea; it's a battle-tested approach that companies are using in production right now. While React Native's market share climbing from 4.73% in 2022 to 6.75% in 2024 shows the strength of React in the mobile space, the Next.js + Capacitor method offers a different, often more direct, path for web developers.
To give you a clearer picture, let's compare this modern approach with the more traditional React Native route.
Next.js + Capacitor vs. Traditional React Native#
| Feature | Next.js + Capacitor (NextNative) | Traditional React Native |
|---|---|---|
| Core Paradigm | Web-first. Build a Next.js app, then adapt for mobile. | Mobile-first. Uses native UI components via a JavaScript bridge. |
| Codebase | Single codebase for web, iOS, and Android. Truly write once, run anywhere. | Primarily for mobile. A separate web version usually requires a different framework. |
| UI/UX | Renders with HTML/CSS. Consistent look and feel across all platforms out of the box. | Renders to native UI components. Can feel more "native" but requires platform-specific tweaks. |
| Developer Experience | Familiar for any React/web developer. Use standard web tools and libraries. | Requires learning React Native-specific components, APIs, and styling paradigms. |
| Performance | Excellent, modern web performance. Direct access to native APIs via plugins. | Very high, close-to-native performance. Optimized for mobile interactions. |
Both paths are fantastic, but the NextNative approach is often a much smoother transition for those already comfortable with web development, letting you get to market faster on all platforms.
The best part? You can use the web development skills you already have. This lets you skip the steep learning curve of native languages like Swift or Kotlin and focus on what really matters: building an amazing experience for your users.
In this guide, we're going to build a production-ready app from the ground up using this very stack. If you want a higher-level overview first, you can also check out our guide on how to build cross-platform mobile apps.
Alright, let's roll up our sleeves and get this project off the ground. This is where the real fun begins—we're about to take a standard Next.js web project and give it the superpowers it needs to become a native iOS and Android app. If you've spent any time in the React world, you'll feel right at home. The whole process is surprisingly smooth.
First things first, we need to scaffold a new Next.js application. Pop open your terminal and run the command that’s probably second nature to you by now:
npx create-next-app@latest my-mobile-app
This kicks off a handy little setup guide. It'll ask you a few questions to get things started. For this walkthrough, we're going with TypeScript, Tailwind CSS, and the App Router. This stack gives us a fantastic, modern foundation that's type-safe, easy to style, and ready for the latest React features.
Bringing Capacitor into the Mix#
Now that our Next.js app is ready, it's time to introduce its new best friend: Capacitor. This is the magic ingredient that wraps our web code into a native mobile package. Think of it as the ultimate bridge, letting your React JS for mobile components access a phone's hardware directly.
Let's start by hopping into our new project directory:
cd my-mobile-app
Next, we'll install the Capacitor CLI and its core libraries. These are the tools that let us initialize Capacitor and manage the native iOS and Android projects it will create for us.
npm install @capacitor/cli @capacitor/corenpm install @capacitor/android @capacitor/ios
Once those packages are finished installing, we can officially initialize Capacitor in our project. This command sets up the essential config files and the native project folders that Xcode and Android Studio will use.
npx cap init
The CLI will ask for your app's name and a unique App ID. A good practice here is to use reverse domain notation, something like com.yourcompany.yourapp. Once you're done, you'll find a new capacitor.config.ts file chilling in your project's root. This file is basically the control panel for your entire native integration.
The team behind Capacitor really gets it—they're all about empowering web developers to build incredible cross-platform apps using the skills they already have.

That philosophy is exactly what we're tapping into. We're using our web expertise to craft an experience that feels perfectly at home on any mobile device.
Nailing the Production Build Configuration#
This last bit of setup is absolutely crucial, so don't skip it. We need to tell Capacitor where to find our app's optimized, production-ready web files. Next.js exports a static version of the site into an out folder by default, so we'll just point Capacitor right to it.
Crack open your capacitor.config.ts file and tweak the webDir property like this:
import { CapacitorConfig } from '@capacitor/cli';
const config: CapacitorConfig = {
appId: 'com.example.app',
appName: 'my-mobile-app',
webDir: 'out', // This is the key! Point it to the Next.js static export folder.
server: {
androidScheme: 'https'
}
};
export default config;
Setting
webDirto'out'is hands-down the most important tweak you'll make in this file. It guarantees that Capacitor bundles the sleek, static version of your Next.js site, not the raw development code.
Finally, we just need to let Next.js know that we want it to generate these static files. Head over to your next.config.js file and add one line.
/** @type {import('next').NextConfig} */
const nextConfig = {
output: 'export', // This enables static HTML export.
};
module.exports = nextConfig;
And that's it! With these configurations locked in, your project is now a unified powerhouse. You can build for the web, iOS, and Android all from one codebase. If you're curious about how this approach compares to other popular frameworks, our article on Capacitor vs React Native is a great read.
Alright, with our project all set up, it’s time to get our hands dirty and start building the actual screens for our app. This is where the magic really happens. If you've worked with React.js before, you'll feel right at home because we're essentially just building standard Next.js pages and components.
Let's imagine we're creating a simple e-commerce app. We'll need at least two fundamental screens to start: a home page to showcase all our products and a detail page for when a user taps on a specific item.
https://www.youtube.com/embed/oorfevovPWw
First things first, let's head into the app directory. This is the core of our application, thanks to Next.js's App Router. Inside, we'll create a page.tsx file. Think of this as the main entry point for our home screen. Its job will be to fetch a list of products and lay them out in a nice, mobile-friendly grid.
Next up, we need a way to show individual product details. For that, we'll set up a dynamic route. Just create a new folder named app/[productId]/ and pop another page.tsx file inside it. That [productId] bracket syntax is a neat Next.js trick that tells it to create pages dynamically for paths like /1, /2, and so on for each product.
Styling for Mobile with Tailwind CSS#
Now, let's talk about making it look good. Adopting a mobile-first mindset from the get-go will save you a ton of headaches later. Tailwind CSS is an absolute game-changer for this. It lets you design for small screens first and then layer on responsive tweaks for tablets and desktops.
For our product grid on the home screen, we can use Flexbox or CSS Grid to create a layout that adapts beautifully. A simple two-column grid on a phone can effortlessly expand to three, four, or even more columns on a larger screen.
Here’s a quick peek at what a reusable product card component might look like using Tailwind classes. It’s clean, simple, and does exactly what we need.
// components/ProductCard.tsx
import Link from 'next/link';
interface ProductCardProps {
id: string;
name: string;
imageUrl: string;
}
export default function ProductCard({ id, name, imageUrl }: ProductCardProps) {
return (
<Link href={/${id}} className="group block">
{/* Pro-tip: Use next/image here for automatic image optimization! */}
{name}#
);
}
By building small, reusable components like this, we're not just writing code; we're creating a design system. This approach is incredibly efficient. In fact, many developers using cross-platform strategies report massive code reuse. It's common for React Native developers to share between 70% to 85% of their codebase across platforms, which is a huge time-saver. You can find plenty of data on cross-platform development trends that back this up.
Fetching Data the Modern Way#
Our app looks nice, but it's just static. Let's pull in some real data. The App Router in Next.js allows us to use async components, which is perfect for fetching data directly on the server. This keeps our app snappy and light on the client side—a must-have for a great mobile experience.
Over in our home page file (app/page.tsx), we can fetch our product list like this:
// app/page.tsx
import ProductCard from '@/components/ProductCard';
async function getProducts() {
// In a real-world app, you'd fetch from your API here.
// For example: const res = await fetch('https://api.my-store.com/products');
// const data = await res.json();
// return data;
// For now, we'll use some mock data.
return [
{ id: '1', name: 'Cool Gadget', imageUrl: '...' },
{ id: '2', name: 'Awesome Widget', imageUrl: '...' },
];
}
export default async function HomePage() {
const products = await getProducts();
return (
{products.map((product) => (
<ProductCard key={product.id} {...product} />
))}
);
}
A Quick Tip From Experience: By making your page component
async, you're using React Server Components. This is a big deal. It shifts the data-fetching workload from the user's device to the server, meaning the page loads faster. This is especially crucial for users on slower mobile networks.
Just like that, we've built a dynamic, responsive, and high-performing foundation for our app. We've used the same web development tools and patterns we already know and love, and it’s all ready to be bundled into a native mobile package.
Alright, let's dive into the fun part. This is where using React JS for mobile development with Capacitor really starts to feel like magic. Your Next.js app stops being just a website crammed into a webview and truly becomes a native mobile app.
Capacitor is the secret sauce here. It’s a slim yet powerful bridge that lets your web code talk directly to the native SDKs on both iOS and Android.
The best part? You can do all of this from the cozy confines of JavaScript (or TypeScript, if that’s your thing) without ever needing to write a single line of Swift or Kotlin—unless you really want to, of course.
Let's walk through how to bring a couple of essential native features to life.
Accessing the Device Camera#
Say your app needs users to upload a profile picture. Instead of a clunky file input, we can give them the slick, familiar experience of the native camera.
First up, you'll need to install the official Capacitor Camera plugin. Pop open your terminal and run:
npm install @capacitor/cameranpx cap sync
That cap sync command is your best friend. It’s a crucial step that updates your native iOS and Android projects to let them know about any new plugins you’ve added. Don't forget it!
Next, you have to configure native permissions. For iOS, you'll need to add a key like NSCameraUsageDescription to your Info.plist file explaining why you need camera access. For Android, Capacitor is smart enough to handle most of this for you.
Now, inside any React component, you can just import and use the Camera API.
import { Camera, CameraResultType } from '@capacitor/camera';
const takePicture = async () => {
const image = await Camera.getPhoto({
quality: 90,
allowEditing: true,
resultType: CameraResultType.Uri
});
// image.webPath gives you a URL you can plug right into an tag's src
const imageUrl = image.webPath;
// Now you can display the image or upload it!
};
And just like that, you've bridged the gap between your web UI and the phone's camera. It's an incredibly smooth developer experience.
Using Geolocation for Location-Aware Features#
What if you're building an app that shows nearby restaurants or events? Getting the user's current location is non-negotiable. The process will feel very familiar.
- Install the Plugin:
npm install @capacitor/geolocation - Sync the Projects:
npx cap sync - Add Permissions: Just like with the camera, you’ll need to update your
Info.plist(for iOS) andAndroidManifest.xml(for Android) with descriptions for why you need location access.
With that out of the way, you can grab the user's coordinates in your component with a simple function call.
import { Geolocation } from '@capacitor/geolocation';
const printCurrentPosition = async () => {
const coordinates = await Geolocation.getCurrentPosition();
console.log('Current position:', coordinates);
};
This API gives you everything you need—latitude, longitude, and accuracy—to start building rich, location-based experiences right inside your React app.
Storing Data on the Device#
For simple key-value storage, like saving user settings or a session token, the Capacitor Preferences API is a fantastic choice. Behind the scenes, it uses UserDefaults on iOS and SharedPreferences on Android, giving you a persistent and efficient place to stash data.
Pro Tip: You could use
localStorage, but I’d strongly recommend sticking with the Preferences API. It's more robust, survives app updates, and is the proper "native" way to store simple data on mobile.
The API itself couldn't be simpler:
import { Preferences } from '@capacitor/preferences';
// Set a value
await Preferences.set({
key: 'userName',
value: 'JaneDoe'
});
// Get a value
const { value } = await Preferences.get({ key: 'userName' });
// And remove it when you're done
await Preferences.remove({ key: 'name' });
This beautiful, unified API hides all the platform-specific messiness, letting you just focus on your app's logic.
As you start pulling in more of these native features, it's a good idea to keep performance in mind. To dig deeper into that, we've put together a guide on how to improve mobile app performance that covers optimization in much more detail. These integrations are what will take your great web app and make it an exceptional mobile one.
Alright, we're on the home stretch! This is the part where all our web development work pays off, and our Next.js project transforms into a real mobile app you can actually tap and swipe on a physical device.
Getting from web code to a native app involves a few key steps, but once you get the hang of it, it's a pretty smooth process.
First things first, we need to prep our Next.js app for Capacitor. Pop open your terminal in the project's root directory and run these two commands:
next buildnext export
The next build command creates a production-optimized version of your app. Then, next export takes that build and spits out a static version—all the HTML, CSS, and JavaScript—into a folder named out. This is the magic folder that Capacitor will grab to build the native side of things, just like we told it to in our capacitor.config.ts file.
Syncing Your Web Code to iOS and Android#
Now that your web assets are neatly packed in the out directory, it’s time to hand them over to the native projects. Capacitor makes this super easy with a single command.
npx cap sync
This little command is a powerhouse. It copies everything from your out folder into the iOS and Android projects and also updates any native plugins you might have added. It's a critical bridge between your web and native code. To see how this sync step fits into the grander scheme of things, you can read our detailed breakdown of the mobile app development process.
With the sync complete, let's open up the native IDEs.
- For iOS, run
npx cap open iosto launch the project in Xcode. - For Android, run
npx cap open androidto open it in Android Studio.
Once you're in the IDE, you'll see a standard native project structure. But if you poke around, you'll find a special www or public folder that contains your entire Next.js application. This single-codebase approach is a massive win. Using React JS for mobile this way means you maintain one set of code that works everywhere, a huge improvement over building two separate apps from scratch. You can find more details on why this cross-platform method is so efficient on aijourn.com.
Running on Simulators and Real Devices#
Inside Android Studio, you can either pick a virtual device from the AVD Manager or plug in your own Android phone with a USB cable.
As you can see in the screenshot, you just select your target device and smash that green "Run" button. Android Studio will then compile the native code, bundle it with your web app, and install the final .apk or .aab file right onto your device.
Common Pitfall to Avoid: Getting the dreaded "white screen of death"? It's a classic. This usually means Capacitor couldn't find your web assets. Go back and double-check that the
webDirincapacitor.config.tsis set to'out'. Also, make sure you actually rannext build && next exportbefore running the sync command.
The flow in Xcode is just as straightforward. Choose an iOS Simulator or your connected iPhone from the list at the top of the window, and click the "Play" button. Just like that, you'll have a fully functional app, built with React, running right in your hand. Pretty cool, right?
Common Questions About React JS for Mobile#

Whenever you dive into a new way of building things, a few questions are bound to pop up. When I first started exploring how to use React JS for mobile by combining Next.js and Capacitor, I had my own doubts about performance, native features, and whether it could handle a "real" app.
Let's get right into some of the most common questions I hear from other developers.
How Does the Performance Compare to a Pure React Native App?#
This is the big one, isn't it? I get it. The honest answer is that the performance of a Next.js app running inside Capacitor is fantastic. For the vast majority of apps out there, your users won't be able to tell the difference between this setup and a pure React Native build.
Capacitor renders your app in a cutting-edge, native WebView, which is incredibly zippy on today's phones. The real victory here is how fast you can develop and the simplicity of maintaining a single codebase for both your web and mobile apps. That benefit almost always trumps the tiny performance edge React Native might have in graphically intense scenarios, like a 3D game.
For most applications, even complex, data-heavy ones, performance is a non-issue. You get a snappy, responsive UI that feels every bit as native as you'd hope.
If you're just starting out, we've put together a friendly guide on https://nextnative.dev/blog/mobile-app-development-for-beginners that breaks down these core ideas even further.
Can I Actually Access Native Device APIs?#
Yes, one hundred percent. You get full, unrestricted access to the device's hardware and native features. It's not a walled garden. Capacitor provides official plugins for all the usual suspects:
- Camera
- Geolocation
- Push Notifications
- Filesystem
- Haptics and vibrations
And what if you need something more specific? Chances are, the community has already built a plugin for it. In the rare case you have a truly custom need, you can write your own native plugin to tap into any iOS or Android SDK you want. You'll never hit a dead end.
Is This a Good Choice for Large, Complex Applications?#
Absolutely. This stack is more than ready for prime time and scales beautifully for large, complex projects. Next.js gives you a powerful foundation with features built for scale, like automatic code splitting, server-side rendering, and a rock-solid routing system.
Capacitor itself is designed to be lean and stay out of your way. It’s all about letting your web app take center stage without the native container getting in the way. I've seen major companies use this exact web-first approach to serve millions of users across their website and mobile apps, all from a single codebase.