Mobile App Development for Beginners Guide
Updated: June 30, 2025
Have you ever had a brilliant idea for an app but thought, "I could never build that"? I'm here to tell you that getting into mobile app development for beginners has never been easier. Thanks to modern tools and booming online marketplaces, people just like you are turning their ideas into real, working apps every single day.
Why Bother Learning App Development?#
Diving into app development can feel like a huge undertaking, but the payoff is massive, both for your career and your personal satisfaction. It’s no longer a game just for giant corporations with bottomless budgets. I've seen countless independent developers and tiny teams launch incredibly successful apps, proving that a solid idea and the right skills are what truly matter.
Just think about how woven into our daily lives apps have become. We use them for practically everything:
- Getting things done: Ordering dinner, booking a taxi, or checking your bank balance.
- Being more productive: Juggling to-do lists, collaborating with colleagues, or even learning a new skill.
- Having fun: Playing the latest games, streaming movies, or catching up with friends.
This deep reliance on mobile tech has sparked some serious market growth. The global mobile app development market was recently valued at a staggering USD 269.49 billion, and it's on track to hit USD 753.34 billion by 2033. That isn't just a random number; it's a clear signal that the world is hungry for new and creative apps.
Getting a Lay of the Land#
Before you write a single line of code, it helps to know who you're building for. Right now, the mobile world is dominated by two major players: Android and iOS. This chart really puts it into perspective.
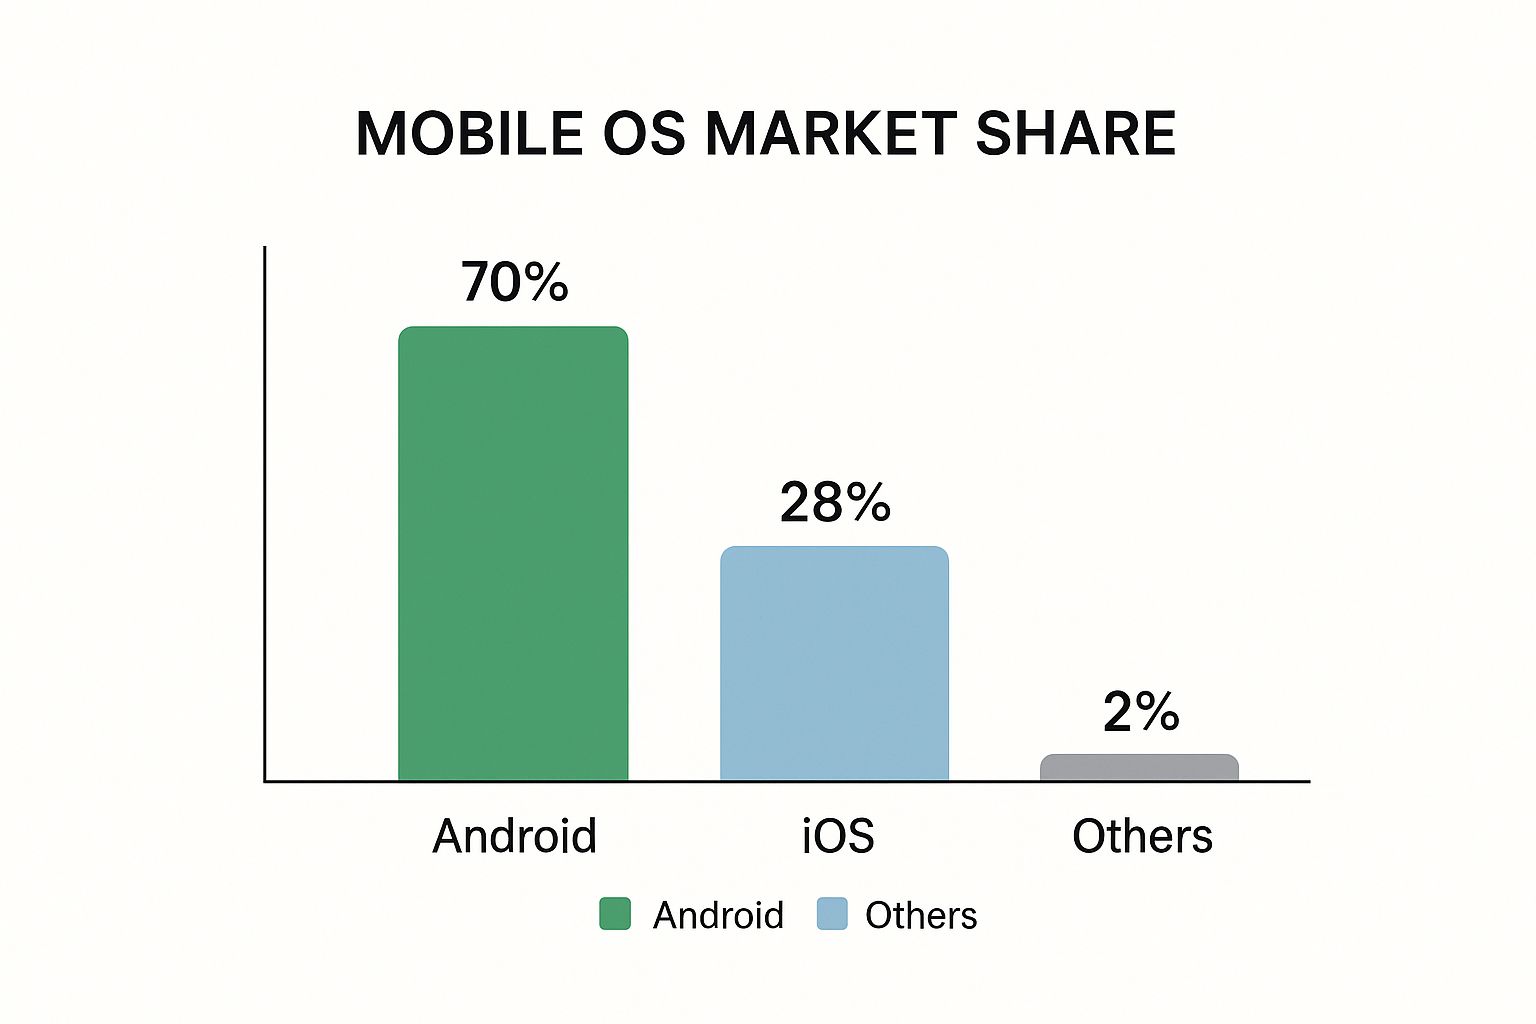
As you can see, Android holds a massive 70% of the market, which is a huge pool of potential users. At the same time, the 28% of users on iOS are known for being highly engaged and more willing to spend money on apps. This is exactly why building for both platforms at once—known as cross-platform development—is such a popular strategy.
The real magic happens when you realize you don't need to become an expert in two completely different programming languages to reach both audiences. This is where learning the modern mobile app development process becomes a game-changer for beginners.
Learning to build an app is so much more than just picking up a technical skill. It’s a creative journey and a direct path to building something of your own. Whether you're trying to solve a problem you face every day, kickstart a new business, or launch a whole new career, it all begins with that first project. You're stepping into a field where what you create can genuinely make a difference in people's lives.
Getting Your Tools and Environment Ready#

Alright, before we dive into writing a single line of code, we need to set up your digital workshop. This part can sound a bit daunting if you're new to this, but I promise it's more like setting out your ingredients before cooking. Getting everything in place now makes the whole process a thousand times smoother.
We're going to focus on the absolute essentials to get your computer prepped for mobile app development for beginners.
First on the list is a crucial background tool called Node.js. You don't need to get bogged down in the technical details right now. Just think of it as the engine that powers the modern development tools we'll be using. It's what lets your computer run JavaScript code outside of a web browser, which is key for building and packaging our app.
Next, you need a place to actually write your code. This is your code editor. While you have a few choices, Visual Studio Code (VS Code) is pretty much the gold standard today, and for good reason. It’s free, incredibly powerful, and has a huge community building extensions that help you code faster and catch mistakes early.
Installing Your Core Development Kit#
Let's get these essential tools installed. This is your first real, tangible step toward building an app.
Here’s a quick shopping list of what to grab:
- Node.js: Pop over to the official Node.js website and download the LTS version. LTS stands for Long-Term Support, which means it’s the most stable and reliable version—perfect for what we need. Just run the installer and follow the prompts.
- A Code Editor: Head to the official VS Code site and download it. The installation is a simple click-through process, whether you're on a Mac, Windows, or Linux machine.
- A Terminal: Good news—your computer already has one! On a Mac, it's simply called Terminal. On Windows, you can use Command Prompt or PowerShell. This command-line tool is where you'll run commands to install software and start your app.
A clean, correct setup from the very beginning will save you from countless hours of frustration later. Trust me, it’s the foundation of any successful project.
Once those are installed, your computer is officially a development machine. You've got the engine (Node.js) and the workshop (VS Code) ready to go. Now, what do we build with?
Choosing a Beginner-Friendly Framework#
A framework provides a solid starting structure and a set of tools specifically designed for the job at hand—in our case, building a mobile app. For a web developer, making the jump to mobile can feel like a massive leap. It traditionally means learning completely new, platform-specific languages like Swift for iOS or Kotlin for Android.
Thankfully, there's a much better way. Cross-platform frameworks let you write your code once and deploy it as a true native app on both iOS and Android. This is a game-changer, saving an incredible amount of time and effort. If you want to dig deeper into this strategy, our guide to building cross-platform mobile apps is a great read.
This is precisely why we're big fans of starting with a solution like NextNative. It cleverly combines web technologies you might already know, like Next.js, with a mobile "bridge" called Capacitor. This means you can build your entire mobile app using your web development skills, without ever needing to write native code yourself. Your setup stays simple, letting you focus on what really matters: building cool features.
Bringing Your First App Screen to Life#
Alright, your development environment is all set up. Now for the fun part: writing some code and actually seeing your idea show up on a screen. This is that magic moment where the abstract concepts click into place, and trust me, it’s a fantastic feeling.
To get our feet wet, we're going to build the first screen for a simple "Quote of the Day" app. This is a great starter project because it touches on the fundamental building blocks of a mobile app—UI, text, and buttons—without getting us lost in complicated logic right away.
Laying Out Your First Screen#
Think about your app's screen like a blank canvas. With NextNative, we'll be using components to paint on that canvas. These are just pre-built, reusable pieces of code for things like text, buttons, images, and more.
If you’ve ever dabbled in web development, this concept will feel right at home. We'll kick things off by making a new file, let's call it home.js, which will house our main screen.
Our basic structure will include just a few key pieces:
- A Container: This is the main
Viewcomponent that will hold all our other elements, kind of like a background for the screen. - Text Elements: We’ll need a
Textcomponent for the quote itself and another one for the author. Think of these as the<p>or<h1>tags of the mobile world. - A Button: We’ll also drop in a
Buttoncomponent. Later on, we’ll make it fetch a new quote, but for now, it's just a placeholder to complete the look.
This is the bare-bones skeleton of our user interface (UI). It won't win any design awards just yet, but it gets the essential elements on the page for our users to see and interact with.
Adding Visuals with Basic Styling#
An app that works is great, but an app that looks good is even better. Since NextNative is built on web tech, styling your components feels a lot like writing CSS. Let's add some simple styles to give our "Quote of the Day" screen a cleaner, more polished look.
We can create a style object to define properties like font sizes, colors, and spacing. Maybe we want the quote to have a larger, italicized font to make it stand out. The button could use a nice background color and some padding to make it easier to tap on a small screen.
Simple tweaks like centering all the text and adding some space around the button can make a world of difference. It's all about creating a clear visual hierarchy that guides the user's eye where you want it to go.
That "aha!" moment when you see your styled components render perfectly in the emulator for the first time is a huge milestone. It’s the first real, tangible proof that you're building an actual app. It’s not just code anymore; it's software.
Once you’re happy with the basic layout and style, it's time to fire it up. A simple command in your terminal will launch the app in a device emulator right on your computer. This simulator behaves just like a real phone, showing you exactly how your app will look and feel on a real Android or iOS device. Seeing it come to life is incredibly motivating.
Designing an App People Actually Want to Use#
Getting an app to work is one thing, but building an app people love and come back to every day? That's a whole different ballgame. The real goal here isn’t just to write code that doesn’t crash—it's to create an experience that feels essential to your users.
Just think about the apps you can't live without. What makes them so sticky? It's usually a mix of an easy-to-use design, quick performance, and a clear purpose. If an app is confusing or slow, it's getting deleted. But an app that solves a real problem or just brings a little bit of fun? That becomes part of someone's daily life.
What Users Really Expect from an App#
The fight for a user's attention is intense. To build something that stands out, you first have to understand what people are already doing on their phones.
Consider this: the average person uses about 10 apps every day and roughly 30 per month. With the mobile app market expected to blow past $1 trillion by 2026, the stakes are high. Gaming apps make up a whopping 56% of all downloads, and subscriptions are pulling in nearly 40% of all revenue, which tells you people crave entertainment and ongoing value.
What this data really shows is that to earn that coveted spot on someone's home screen, your app has to be more than just a tool. It needs to be a seamless and engaging part of their world.
The Building Blocks of a Great App Experience#
So, how do you actually turn these ideas into a design? It boils down to a few key principles that any developer, even a beginner, can get right.
- Make it Obvious: Can a brand-new user pick up your app and immediately know what to do? Navigation should feel natural, not like a puzzle they have to solve.
- Speed is Everything: Every millisecond matters. Nobody has the patience for slow-loading screens or clunky animations. A snappy, responsive app just feels more professional and trustworthy.
- Have a Clear Point: Your app absolutely must solve a genuine problem or provide real entertainment. Make that value crystal clear the second someone opens it.
The most successful apps don’t try to do everything. They do one thing exceptionally well. Focus on perfecting your core feature before getting distracted by adding dozens of nice-to-have functionalities.
The technology you choose plays a huge role in making all of this happen. Modern frameworks are built to help you create fast, smooth interfaces. If you're coming from a web background, it's definitely worth checking out some of the best cross-platform app development tools available. They can help you build a high-performance app without the steep learning curve, letting you focus on what truly matters: designing an app people don’t just download, but one they actually love to use.
How to Make Money with Your App#

So you’ve built a great app. That's a huge win! But let's be honest, the real goal for many of us is turning that passion project into a source of income. The good news? You don't need a million downloads to see a return. In fact, thinking about your monetization strategy from day one is one of the smartest things you can do.
The numbers are pretty staggering and show just how much opportunity is out there. Global consumer spending on apps is already cruising past $170 billion a year, with some experts predicting it could hit $270 billion by 2025. A massive chunk of that is from on-demand services—apps for things like food delivery or home repairs—which is a market projected to reach nearly $330 billion.
What this tells us is that people are absolutely willing to pay for apps that provide real value, whether that's through a direct purchase or by using a free, ad-supported app. For anyone just starting, this should be a massive confidence boost. You can build something with a real, sustainable future.
Choosing Your Monetization Strategy#
Figuring out how your app will make money isn't a simple choice; it’s deeply tied to what your app does and who you're building it for. There’s no single right answer, but there are a few tried-and-true models that work for most developers.
Let's look at the most common paths to earning revenue:
- Freemium: You give away the core app for free to get as many people as possible to try it. Then, you offer premium features, exclusive content, or an ad-free version for a fee. This is a classic for productivity and utility apps.
- In-App Purchases (IAP): This is the go-to model for mobile games and many content apps. It lets people buy digital items—think extra lives in a game, virtual currency, or special photo filters—directly inside the app.
- Subscriptions: This model brings in reliable, recurring revenue by charging a weekly, monthly, or annual fee. It’s a perfect fit for streaming services, news outlets, and any app that provides ongoing content or services.
The secret is matching your model to what your users value. A subscription only makes sense if you’re consistently delivering fresh content or a service they can’t imagine living without. For a permanent feature unlock, a one-time purchase is usually the better bet.
Implementing Revenue Models in Your App#
Once you've landed on a strategy, you have to actually build it into your app. This is where your choice of development framework can make your life a whole lot easier. If you build with a tool like NextNative, you get a head start because it’s designed to work with services like RevenueCat. RevenueCat is fantastic because it takes care of all the tricky parts of handling in-app purchases and subscriptions on both iOS and Android.
Instead of getting tangled up in two different, complex payment systems, you can manage everything from a single dashboard. For anyone diving into mobile app development for beginners, this is a game-changer. It frees you up to focus on what matters most: creating an amazing experience for your users, not getting bogged down in payment APIs.
If you want to dig deeper into how different technologies stack up, check out our guide on the best cross-platform frameworks. It’ll give you a clearer picture of how the right tools can put you on the fast track to monetization.
Testing Your App and Preparing for Launch Day#
You’re so close to the finish line! Before you unleash your app on the world, there's one last, absolutely critical phase. This is where you polish your work, iron out the kinks, and make sure all that effort translates into a genuinely great experience for your users.
Think of this less like a formal, white-coat QA process and more like a real-world shakedown.
The best place to start? Just use your own app. A lot. I mean, live in it for a few days. Go through every screen and tap every single button. Seriously, try to break it. What happens if you hammer a button twice in a row? Or if you lose your internet connection right in the middle of a process? This kind of personal dogfooding is your first and best line of defense against the most obvious bugs.
To keep yourself organized, you could even jot down a simple checklist:
- Does the main feature work flawlessly on different screen sizes?
- Do all the buttons and links actually go where they're supposed to?
- Is the layout clean and usable on a tiny phone and a big tablet?
- Does the app handle errors gracefully, or does it just crash and burn?
Getting Valuable User Feedback#
After you’ve squashed the bugs you can find, it’s time for a fresh set of eyes. This part is huge. Grab a few friends or family members—and try to get a mix of people, some who are tech-savvy and some who aren't.
Here's the key: hand them your phone and ask them to try out the app without any instructions. Just watch them. It can be a little nerve-wracking, but I promise you'll be amazed at what you discover when someone uses your app in a way you never, ever intended.
The most humbling and valuable feedback often comes from watching someone struggle with a feature you thought was perfectly intuitive. Don't defend your design; just observe and take notes. This is where good apps become great ones.
Once you’ve collected all that feedback and fixed the most important issues, you’re ready to start thinking about the app stores.
Navigating the App Stores#
Submitting to the Apple App Store and Google Play Store can feel like a huge, intimidating step, but it’s really just a matter of being prepared. You’re essentially creating a storefront for your app, and just like any store, presentation matters.
You’ll need to get a few key marketing assets ready:
- App Icon: A beautiful, high-resolution version of your app's icon. This is its face to the world, so make it count.
- Screenshots: Take clean, compelling screenshots that show off your app’s best features. You're telling a visual story here.
- App Description: Write a clear, persuasive description. The first few lines are what everyone sees, so they need to be compelling. Focus on what problem your app solves and why it's special.
The review process for both stores can take anywhere from a single day to over a week, so don’t leave this to the last minute. Getting your app approved is a massive milestone in your journey of mobile app development for beginners. The technology you choose to build with can also influence this process and your app's future; our comparison of Capacitor vs React Native offers some great insights into how those choices play out in the long run.
Ready to skip the setup headaches and start building your app today? NextNative provides a production-ready boilerplate with all the tools you need, from UI components to store deployment guides, so you can focus on creating an amazing app. Check out the toolkit at https://nextnative.dev.