A Hands-On Ionic App Tutorial for Beginners
Updated: August 3, 2025

Ever wondered if you could build an app that feels right at home on both Android and iOS, all without having to manage two completely separate projects? That’s exactly what we’re going to do here. This guide isn't about dry theory; we're jumping straight into building a real-world 'Task Tracker' application from the ground up.
If you're a web developer, you're in the right place. We'll show you how to take the skills you already have and apply them to the mobile world.

Your First Ionic App Journey Starts Here#
The magic behind all this is Ionic, which, when paired with its native runtime, Capacitor, lets you use your trusty HTML, CSS, and JavaScript to create impressive mobile apps. We're taking a practical, code-first approach to show you how a familiar web stack can produce a genuinely native experience.
This isn’t just a neat trick; it's a smart strategy. Since it first appeared in 2013, Ionic has grown from a simple open-source tool into a full-blown ecosystem. By 2025, its robust support for popular frameworks like Angular, React, and Vue is undeniable. This combination allows developers to build for Android, iOS, and the web from a single codebase, which is a massive win for saving time and money. If you're curious about the job market, you can see how developers are hired for these very skills.
What We Will Build#
Throughout this tutorial, we'll be putting together a 'Task Tracker' app. Think of it as more than just a simple "hello world" project. It's a functional tool designed to teach you the core concepts you'll need for any future Ionic project.
Our Task Tracker will let users:
- Add new tasks with a title and description.
- See a list of all their current tasks.
- Check off tasks as complete.
- Remove tasks they no longer need.
By sticking with one practical project, you'll get a much better feel for how all the different parts of the Ionic framework click together. I've always found this project-based approach works way better than jumping between disconnected examples.
Our Ionic Project Toolkit#
To build our app, we've picked a modern and powerful set of tools. It's a good idea to get familiar with what each one does before we start writing code. It'll make the whole process feel much more intuitive.
| Component | Role in Our Project | Key Benefit |
|---|---|---|
| Ionic Framework | Provides the UI components and mobile-first building blocks for our app. | Creates a native look and feel with pre-built, customizable elements. |
| React | The JavaScript library we'll use to manage our app's logic and state. | Helps us build a dynamic and interactive user experience efficiently. |
| Capacitor | The native runtime that bridges our web code to native device APIs. | Unlocks access to hardware features like the camera and geolocation. |
The combination of these three is what makes this stack so effective. You'll be writing code in React, styling it with Ionic's components, and then Capacitor takes over to make sure it runs perfectly on a mobile device.
It really does feel like web development, but the end result is a true native app that you can ship to the app stores.
By the time we're done, you won't just have a working app—you'll have the confidence and know-how to start building your own cross-platform applications with Ionic.
Alright, let's get your environment set up and start coding
Setting Up Your Development Environment#
Before we can even think about writing the first line of code for our Ionic app, we need to get our workspace in order. A properly configured environment is non-negotiable; it's the bedrock of a smooth project and helps sidestep those classic "well, it works on my machine" headaches later on. Let’s walk through setting everything up, piece by piece.
The most critical tool in our entire setup is Node.js and its sidekick, the npm package manager. Pretty much every modern web development tool, including Ionic, runs on Node.js. If you don't have it yet, your first stop should be the official Node.js website. Be sure to grab the LTS (Long-Term Support) version—it’s the most stable and the one you'll want for serious work.
Installing The Ionic Command Center#
With Node.js up and running, we can now install the Ionic CLI (Command Line Interface). This little powerhouse is your command center for everything you'll do: creating projects, running a local server for development, and building your final app. It really simplifies the whole process.
Just open up your terminal (or command prompt on Windows) and type this in:
npm install -g @ionic/cli
That -g flag is important. It installs the package globally, letting you run ionic commands from anywhere on your computer, which is super convenient.
I’ve seen a lot of developers, especially on macOS and Linux, get stuck here with a permission error. If you see an
EACCESerror, it’s just npm telling you it doesn't have the right to install things globally. The "right" way is to fix your npm permissions, but a quick (though less secure) fix is to run the command again withsudoat the beginning.
This image neatly summarizes the first few steps we're taking.
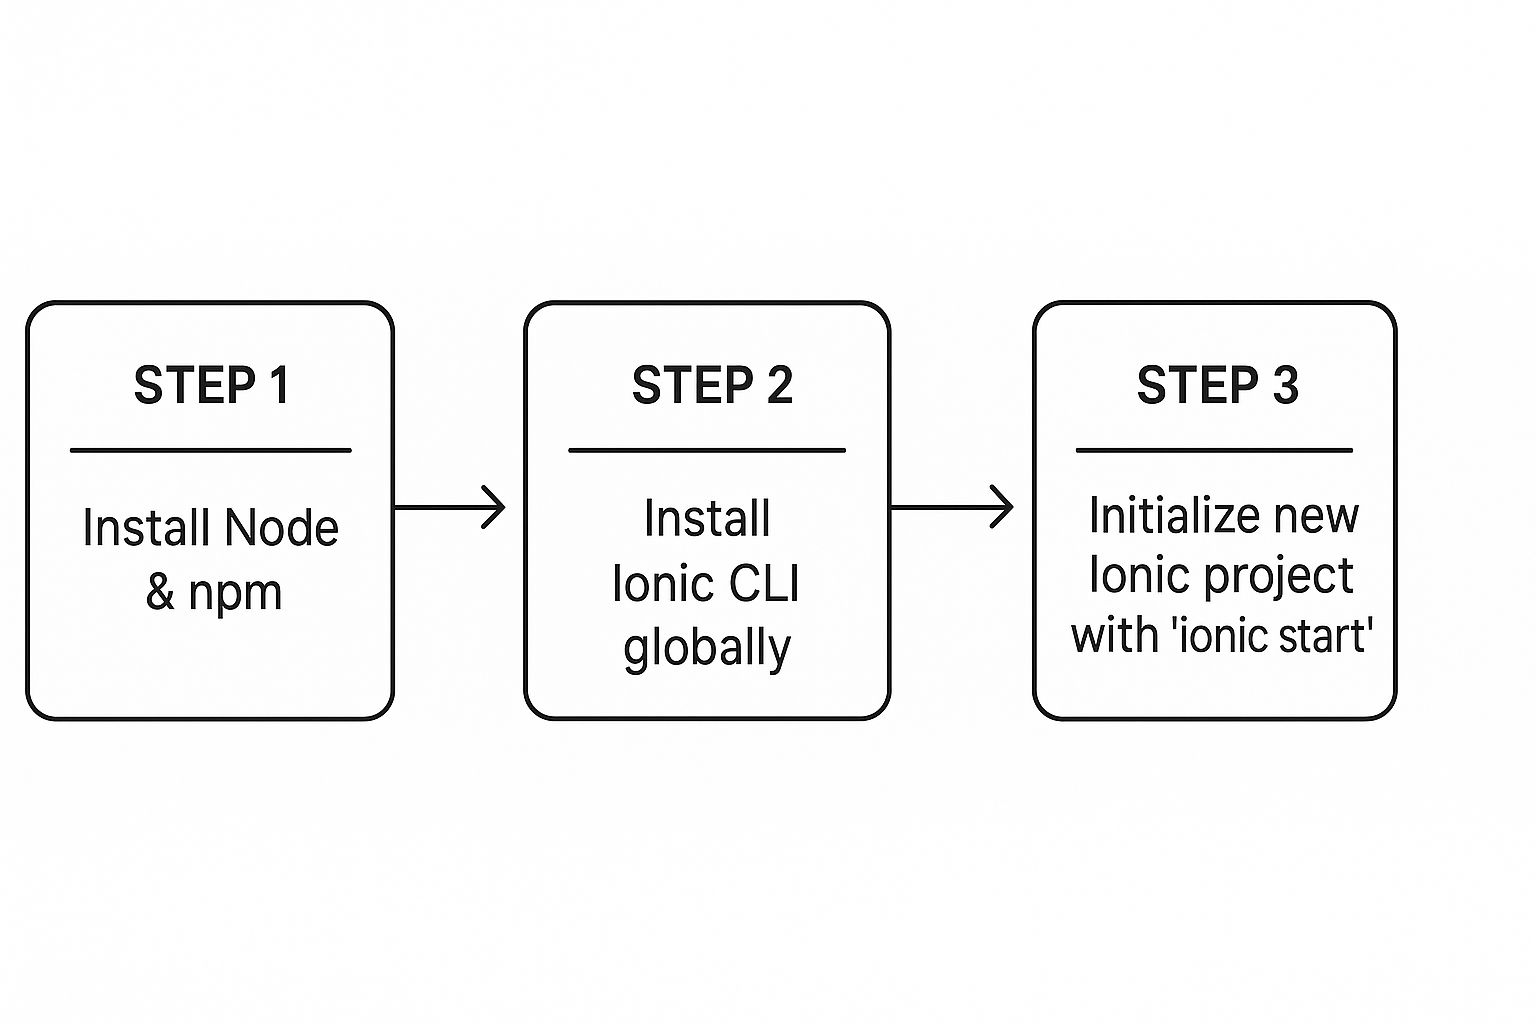
It’s a simple, linear path: get the core dependency (Node.js), install the toolset (Ionic CLI), and then create your project.
Configuring Native SDKs#
To see our app come to life on a real phone or emulator, we need the official native toolkits: Android Studio for Android and Xcode for iOS.
- For Android: You'll need to download and install Android Studio. The installer is pretty smart and will walk you through setting up the Android SDK, essential build tools, and even a virtual device (emulator) for testing.
- For iOS (macOS only): This one's a bit easier. Just grab Xcode from the Mac App Store. It bundles everything you need—the iOS SDK, simulators, and all the command-line tools—in one shot.
I'll admit, installing these big IDEs can feel a little daunting if you're new to the game. If you're just getting your feet wet, our guide to mobile app development for beginners offers a great high-level overview that can help you feel more comfortable. For now, my best advice is to just trust the installation wizards and stick with the default settings. We can always tweak things later if we have to.
Building the App's Core with Ionic and React#
Alright, with our development environment set up, it’s time for the fun part: rolling up our sleeves and actually building our 'Task Tracker' app. This is where we shift from configuration to creation, using the powerful duo of Ionic and React to craft the app's logic and user interface.

We're going to kick things off with a fresh Ionic project and immediately structure it for future growth. That means creating a logical folder structure and focusing on reusable components from the get-go. Trust me, adopting these best practices now will save you countless headaches as the app gets more complex.
Structuring Your Project for Success#
A well-organized project is a dream to work on. It's easier to find things, debug issues, and add new features down the road. While a new Ionic React project gives you a decent starting point, I always make a few small adjustments to keep things crystal clear.
Right inside the src folder, I like to create a few dedicated directories:
components: This is home base for all our reusable UI bits and pieces. Think of things like individual task list items, custom buttons, or modal pop-ups.pages: Every main screen or view in our app will get its own folder here. For our 'Task Tracker,' this is where the main task list view will live.hooks: Any custom React Hooks we create for managing state or side effects go in here. This helps keep our component files lean and focused.data: For this tutorial, we’ll use this to hold our initial task data. In a real-world scenario, this might be aservicesfolder where you manage API calls.
This isn't just about being tidy; it forces you to think in a modular way. Need to change how a task looks? Head to components. Need to adjust the main page layout? That's in pages. It’s intuitive.
Crafting the User Interface with Ionic Components#
One of the biggest wins when you build an Ionic app is tapping into its massive library of pre-built components. These are professional, platform-aware UI elements you can drop right into your React code.
We'll be using several of these to piece together our interface:
<IonHeader>&<IonToolbar>: These give us the top navigation bar to hold our app's title.<IonContent>: This is the main scrollable container where our task list will live.<IonList>&<IonItem>: Perfect for displaying our list of tasks in a clean, mobile-first format.<IonInput>: The text field for users to type in a new task.<IonButton>: A simple button to submit the new task.
Using these is a lot like using standard HTML tags, but they come supercharged with built-in styling and animations that automatically adjust to look native on both iOS and Android.
This is the real magic of Ionic. You write your UI logic once with familiar web technologies, and the framework takes care of the platform-specific look and feel. It’s an incredible time-saver compared to maintaining separate codebases.
If you really want to level up, it helps to understand what's happening under the hood. For that, I’d recommend a deep dive into how JavaScript works. Knowing the engine that powers everything makes you a much more effective developer.
Managing State with React Hooks#
Our app needs to be interactive—users have to add tasks, check them off, and delete them. We'll manage all this interactivity using React's built-in state management tools, primarily the useState hook.
The useState hook is a simple function that lets a component remember things. We’ll use it to hold our list of tasks. When a user adds a new task, we don't manipulate the screen directly. Instead, we update our state, and React intelligently re-renders the component to show the change.
Here's the basic flow:
- Initialize State: We'll start with an empty list of tasks using
const [tasks, setTasks] = useState([]); - Add a Task: When a user submits the form, we'll create a new task object in our code.
- Update State: Then, we call
setTasksand give it a new list containing all the old tasks plus the new one.
This declarative pattern is the heart of React. You tell it what the UI should look like for a given piece of data, and React handles the how of updating the DOM efficiently. It makes the logic for our 'Task Tracker' surprisingly simple and easy to follow as we build out the add, view, and delete features.
Alright, let's bring our 'Task Tracker' app to life. Right now, it's a slick web app, but it's stuck inside the browser's sandbox. To make it feel like a real mobile app, we need to tap into the phone's hardware—think camera, GPS, and push notifications.
This is where Capacitor works its magic. It’s the bridge that connects our React web code to the native world of iOS and Android. It’s what lets us call the phone's camera directly from our JavaScript, turning our web project into a powerful, native-feeling application.
Getting Capacitor Set Up#
Integrating Capacitor is surprisingly painless. When you start a new Ionic project, it's already included, but we need to tell it which native platforms we’re building for.
Just pop open your terminal in the project's root directory and run these two commands:
npx cap add ios
npx cap add android
What these commands do is create brand new ios and android folders right in your project. These aren't just wrappers; they are complete, native projects for Xcode and Android Studio. Every time you build your app, your web code gets copied over, ready to run.
A common myth is that you're just "wrapping" a website in a native shell. The reality is much cooler. Capacitor creates a genuine native app and places your UI inside a high-performance web view, giving you full-throttle access to every native SDK.
Using the Camera to Attach Photos#
Let's dive in with a practical feature: letting users attach a photo to a task. We'll use the official Capacitor Camera plugin, which makes this incredibly simple.
First, you'll need to install the plugin:
npm install @capacitor/camera
Once that's done, you have to sync these changes with your native projects. It's a crucial step that people often forget.
npx cap sync
With that handled, we can now call the Camera API straight from a React component. Let's say we have an "Add Photo" button. The function behind that button would look something like this:
import { Camera, CameraResultType, CameraSource } from '@capacitor/camera';
const takePicture = async () => {
try {
const image = await Camera.getPhoto({
quality: 90,
allowEditing: false,
resultType: CameraResultType.Uri,
source: CameraSource.Camera // Or use CameraSource.Photos to pick from the gallery
});
// The image.webPath gives you a URL you can pop right into an <img> tag.
// From here, you can save this path to your task's state.
const imageUrl = image.webPath;
console.log('Image URL:', imageUrl);
} catch (error) {
console.error("Error taking picture", error);
}
};
This bit of code fires up the native camera, lets the user take a picture, and hands back a temporary path to the image that our app can display. It’s that easy.
A Quick Word on Native Permissions#
The first time your app tries to access the camera, the operating system will step in and ask the user for permission. This is a massive moment for user trust, so you need to get it right.
For iOS, you have to explicitly state why you need access. You do this by adding a couple of keys to your Info.plist file, which you can find in the ios/App/App directory.
You'll want to add these:
NSCameraUsageDescription: "We need access to your camera so you can attach photos to your tasks."NSPhotoLibraryUsageDescription: "We need access to your photo library so you can select existing photos for your tasks."
Don't skip this! A clear, honest explanation is key to getting your app approved and building trust with your users. The great thing about Ionic is its massive community and well-documented plugins, which is why it's trusted by over 10,000 mobile apps.
If you're still weighing your options between different cross-platform tools, it helps to see how they compare head-to-head. We've put together a deep dive on Capacitor vs. React Native that breaks down the pros and cons of each.
Testing and Deploying Your Ionic App#
Alright, you've done the hard work. Your app is built, you've woven in those cool native features, and now you're at the finish line. This is where we shift from building on our local machines to creating a polished, production-ready app that you can actually get into people's hands.
Let's get it tested and prepped for the app stores.
The very first thing you need to do is test your app on a real, physical phone. Simulators are fantastic for day-to-day development, but they can’t truly mimic the nuances of a real device. When it comes to testing things like the camera, haptic feedback, or geolocation, nothing beats the real thing. This is where we put everything we've built through its paces.
Live Reloading on a Real Device#
One of my absolute favorite features in this ionic app tutorial is debugging directly on a physical device with live reloading. It’s the perfect blend of web development’s instant feedback and the native platform’s power.
To get started, plug your phone into your computer with a USB cable and make sure you have developer mode enabled. Then, pop open your terminal and run the right command for your target platform:
- For Android:
ionic cap run android -l --external - For iOS:
ionic cap run ios -l --external
The -l flag is what kicks on live reload, and --external lets your phone talk to your computer's development server. Now, every time you save a change in your code, the app magically updates on your phone. It’s a total game-changer for getting your UI just right and squashing bugs in real time.
Just a friendly tip: For live reload to work its magic, make sure both your computer and your phone are connected to the same Wi-Fi network. This direct link is what makes the updates so fast and keeps your development cycle moving quickly.
This single-codebase approach has really taken off. In fact, Ionic is now the third most popular cross-platform framework among developers, with an 11% adoption rate worldwide. This isn't just a trend; it's driven by serious cost savings. Companies can trim their development budgets by 30-50% by not needing separate native teams for iOS and Android.
Creating a Production Build for Android#
Once you're happy with how your app looks and performs, it's time to package it for production. For Android, that means generating a signed Android App Bundle (AAB), which is the official format for the Google Play Store.
First, let's create a production-optimized build of your web code:ionic build --prod
Next, we need to sync these fresh web assets with your native Android project:npx cap sync android
Now, go ahead and open the Android project in Android Studio. From the top menu, navigate to Build > Generate Signed Bundle / APK. A wizard will pop up and walk you through creating a new keystore, which is basically your app's digital signature. Treat this file like gold—you'll need it for every single update you ever publish. Once you've signed the app, Android Studio will spit out the .aab file, ready for you to upload.
Creating a Production Build for iOS#
The path for iOS is quite similar, but the final steps all happen inside Xcode. You'll start with the exact same commands we used for Android to get your web assets ready.
ionic build --prodnpx cap sync ios
Next, open your iOS project in Xcode. You'll need to head over to the "Signing & Capabilities" tab to set up your team and bundle identifier. This is how you connect the app to your Apple Developer account.
With that configuration sorted, the last step is to archive the project. From the Xcode menu, just select Product > Archive. This compiles everything and bundles it up for distribution. When it's done, the Organizer window will appear, giving you the option to validate your app and upload it straight to App Store Connect. It's always smart to plan these deployment steps ahead of time, which you can learn more about in this guide on the typical mobile app development timeline.
Common Questions About Ionic Development#
As you wrap up your first project following this ionic app tutorial, a few questions are bound to pop up. That’s perfectly normal. Let's go through some of the most common queries I hear from developers who are just getting their feet wet with Ionic, from performance concerns to framework choices.
Getting these answers sorted out can give you the confidence you need to dive into your next big idea. So, let’s clear up some of that common confusion.
Is an Ionic App as Fast as a Native App?#
This is the big one, isn't it? The million-dollar question. While a purely native app built from the ground up in Swift or Kotlin might have a slight performance advantage for incredibly demanding tasks, modern Ionic apps deliver a near-native feel for the vast majority of projects out there.
Honestly, thanks to how powerful our phones have become and how optimized web views are now, any performance difference is practically unnoticeable for most business, e-commerce, or utility apps. If you're building a high-intensity 3D game, you'll probably still want to go native. But for the slick animations and complex UIs that are standard in most apps today? Ionic is more than up to the task.
Should I Use Ionic with Angular, React, or Vue?#
The real beauty of Ionic today is that it lets you work with the tools you already know and love. There's no single "best" choice here—the right answer comes down to what your team is already good at.
- React: If your team is full of React pros (like we were in this tutorial), sticking with it just makes sense. You’ll be able to move fast and build efficiently right out of the gate.
- Angular: A lot of enterprise teams are heavily invested in Angular. Ionic actually started here, and the support for Angular is absolutely fantastic.
- Vue: For teams that prefer Vue's gentle learning curve and progressive framework, Ionic provides first-class integration. You won't be missing out on any features.
The key thing to remember is that Ionic is framework-agnostic. You get full access to all the same powerful native features through Capacitor, no matter which JavaScript framework you pick. The best decision is always the one that lets your team be most productive.
The goal is to build a great app, not to learn a new framework just for the sake of it. Stick with what lets you build faster and more reliably.
How Do I Handle App Updates with Ionic?#
When it comes to major updates—the kind that add significant new features or change the underlying native code—you’ll submit a new version to the Google Play Store and Apple App Store. This process is exactly the same as for any other mobile app.
But here’s where things get interesting. For smaller changes, like fixing a typo, tweaking the UI, or updating some business logic, Ionic offers a powerful commercial service called Appflow. Its "Live Updates" feature lets you push these web-based changes directly to your users' devices, completely bypassing the often lengthy app store review process. This is a total lifesaver for rolling out quick bug fixes or A/B testing a new button color.
Ensuring you have a solid update strategy is a core part of effective mobile app quality assurance, making this a feature worth looking into for any serious project.
Ready to stop configuring and start building? With NextNative, you can launch your Next.js mobile app in a fraction of the time. Get production-ready templates, native components, and everything you need to go from idea to app store, fast. Check out NextNative today and see how quickly you can bring your project to life.