A Guide to Flawless OTA Updates Android Apps
Updated: September 18, 2025
Over-the-Air (OTA) updates for Android are a game-changer. They let you push new software, bug fixes, or feature tweaks directly to devices, completely skipping the usual app store submission process. If you’re using a framework like Capacitor, this means you can instantly push changes to your web assets—like HTML, CSS, and JavaScript—and bypass the lengthy Google Play review entirely.
Why OTA Updates Are Your Secret Weapon#
If you’re a Capacitor developer, you know the pain of the app store review cycle. You spot a critical bug or a simple typo right after a big launch, and your only option is to build a new version, submit it, and wait. Days can go by. This delay frustrates users and can completely kill your momentum.
This is where having ota updates android capabilities becomes a massive strategic advantage, not just a nice-to-have.
Imagine shipping a hotfix for a crashing bug within minutes, not days. Or picture yourself A/B testing a new call-to-action button for a small slice of your user base without a full deployment. This is the kind of agility that OTA updates deliver.
Bypassing the App Store Bottleneck#
The traditional mobile development lifecycle is just plain slow. Every tiny change forces a full binary update, which then gets stuck in the review queue. OTA updates completely sidestep this for the web-based parts of your app.
Here’s what that looks like in the real world:
- Instant Bug Fixes: Patch critical issues that are ruining the user experience immediately.
- Rapid Iteration: Deploy UI tweaks, text changes, or new promotional banners on the fly.
- Continuous Improvement: Push small, steady improvements without annoying your users with constant "update now" pop-ups.
The real power of OTA isn’t just speed; it’s about de-risking your entire development process. When you can fix mistakes instantly, you can afford to move faster and experiment more boldly, because you know you have a safety net.
Enhancing Your Development Workflow#
Bringing an OTA service like NextNative into your Capacitor workflow doesn't just make your users happy; it cleans up your internal processes. You can finally separate your web asset deployments from your native code releases. Your web team can push updates whenever they need to, while your native team stays focused on the bigger, platform-level features.
To get the most out of OTA updates, it helps to know the platform you're building on. Understanding the pros and cons of the Android OS for app development can give you a better sense of how your update strategy fits into the bigger picture.
This guide is all about showing you how NextNative makes this process incredibly simple for Capacitor developers. We'll skip the high-level theory and get right into how you can configure, deploy, and manage your live updates. If you want a deeper dive into the fundamentals first, you can learn more about what an OTA update is and how it all works in our detailed article.
Integrating NextNative Into Your Capacitor Project#
Alright, we've talked about why OTA updates are so valuable for Android apps. Now let's get our hands dirty and actually wire one up. Adding an OTA service like NextNative to your Capacitor project isn't some huge, complicated ordeal. It really just comes down to installing the right package and dropping a few lines of code in the right place.
The goal here is simple: connect your app to the NextNative dashboard. That dashboard becomes your command center for pushing out live updates whenever you want. The connection is made through a secure API key, which makes sure only you can deploy changes to your users.
Initializing the NextNative SDK#
First things first, you need to add the NextNative SDK to your project. This is as simple as running an npm or yarn command, just like you would for any other package in your web project.
Once it's installed, the most important part is initializing the service. You want to do this as early as possible in your app's lifecycle, so it can check for new updates every time a user opens it. The perfect spot for this is usually right at the root of your application, inside your main App.tsx or main.js file.
// Example initialization in your app's entry point
import { NextNative } from '@next-native/capacitor';
NextNative.initialize({
androidKey: 'YOUR_ANDROID_API_KEY_HERE',
// other configuration options
});
This little snippet is basically the handshake between your app and the NextNative service.
Managing Your API Keys#
You probably noticed the androidKey in that config. It’s absolutely critical to handle these keys correctly. The last thing you want is to accidentally push a half-finished test update to your entire production user base. Trust me, it happens.
The common best practice here is to use environment variables to swap out keys depending on your build type:
- Development Key: For all your local testing and internal builds.
- Staging Key: For QA and pre-production testing with a small, controlled group.
- Production Key: For the live app that goes on the Google Play Store.
Keeping these separate prevents costly mistakes and keeps your update channels clean and predictable.
Remember, the API key is the only thing linking your compiled Android app to a specific NextNative project. Guard your production key carefully and only use it in your final release builds.
If you're just getting started with Capacitor, nailing the initial project structure is key before you even think about OTA updates. If you need a quick refresher, we have a great guide on how to build a Capacitor app from scratch.
Here’s a look at a typical Capacitor project structure before you even touch NextNative.
As you can see, it’s a clean, web-centric folder structure. This is what makes tools like NextNative so powerful—your core logic stays right where you're used to it, in your familiar web directories.
With the SDK installed and initialized, your app is now officially "live-update-aware." Every time it starts up, it will ping the NextNative servers, ready and waiting to pull down any new bundles you deploy. Now, let's move on to actually pushing your first update.
Pushing Your First Live Update#

Alright, you've got the NextNative SDK set up in your project. Now for the satisfying part: pushing a live fix or feature to your users in minutes. This is where the power of ota updates android really hits home. You're no longer just shipping code; you're directly improving the user experience on the fly.
Let's imagine a classic, real-world scenario. Your marketing team just messaged you—there's a typo in the main promo banner on the app's home screen. In the old world, that meant a whole new build, a tedious submission to Google Play, and days of waiting for approval. With your new setup, it's a five-minute job.
All you have to do is correct the typo in your web code, build your web assets, and then head over to the NextNative dashboard to kick off a new deployment. This dashboard is your command center for managing every live update.
Navigating the Deployment Dashboard#
We designed the NextNative dashboard to be dead simple. When you create a new deployment, you'll upload your updated web asset bundle—that’s just the minified code containing your fix. This is the exact package that will get beamed down to your users' devices.
But before you hit "Deploy," you have some powerful controls at your fingertips:
- Targeting Specific Versions: You can push an update only to users on a certain app version, like
1.0.1. This is perfect for ensuring your web code doesn't clash with older or newer native builds. - User Segmentation: Want to test the waters first? You can roll out the update to a small percentage of users or a specific segment, like your internal QA team.
- Scheduling Deployments: You can schedule the update to go live overnight or during a quiet period to avoid disrupting users during peak hours.
These controls give you the confidence to manage your app's evolution safely and effectively. For a quick, hands-on walkthrough, check out our tutorial on how to ship your first update in 5 minutes; it covers these dashboard features in more detail.
Setting Up Your Safety Nets#
One of the most critical features you should always have ready is the rollback mechanism. What if that "simple" typo fix accidentally breaks the layout on certain devices? Instead of panicking, you just go back to the dashboard and redeploy the previous, stable version. This action immediately tells all devices to revert, containing the issue instantly.
A good OTA strategy isn't just about speed; it's about control. Knowing you can undo a problematic deployment in seconds removes the fear of breaking things and encourages faster, more confident iteration.
This kind of rapid iteration is becoming standard in the Android ecosystem. Just look at Google Play Services, which receives constant OTA updates. Version 25.32, for example, rolled out improved storage alerts and cross-device Wi-Fi sync without requiring a full OS upgrade. These incremental ota updates android capabilities allow platforms like Google to enhance security and add features across billions of devices quickly.
With your first update pushed, you've officially closed the loop. You've gone from a local code change to a live deployment without ever touching the app store. That’s the magic of OTA.
Advanced Strategies for Smart Deployments#
Pushing a simple fix is one thing, but really mastering OTA updates on Android means you have to think strategically. It's about more than just shipping code faster; it's about using live updates to build a smarter, more resilient application. This is where you graduate from reactive bug squashing to proactive, data-driven improvements.
A cornerstone of any smart deployment is the phased rollout. Instead of blasting an update to 100% of your users at once and hoping for the best, you can release it incrementally. Start with a small, controlled group—maybe just 5% of your user base—and watch the metrics like a hawk. This acts as an early warning system, letting you catch unexpected bugs or performance regressions before they impact everyone.
A/B Testing with Live Updates#
Beyond just playing it safe, phased rollouts unlock some seriously powerful A/B testing capabilities. Ever argued with your team about whether a green or blue "Buy Now" button would convert better? With OTA updates, you can stop guessing and start measuring.
It's as simple as deploying two different versions of your UI to two distinct user segments. Let the test run for a few days, gather real-world analytics on user behavior, and then use that hard data to make an informed decision. Suddenly, your OTA system is no longer just a deployment tool; it's a powerful product optimization engine.
The infographic below puts some real numbers behind the importance of a well-managed update process, highlighting the gains in efficiency and security.
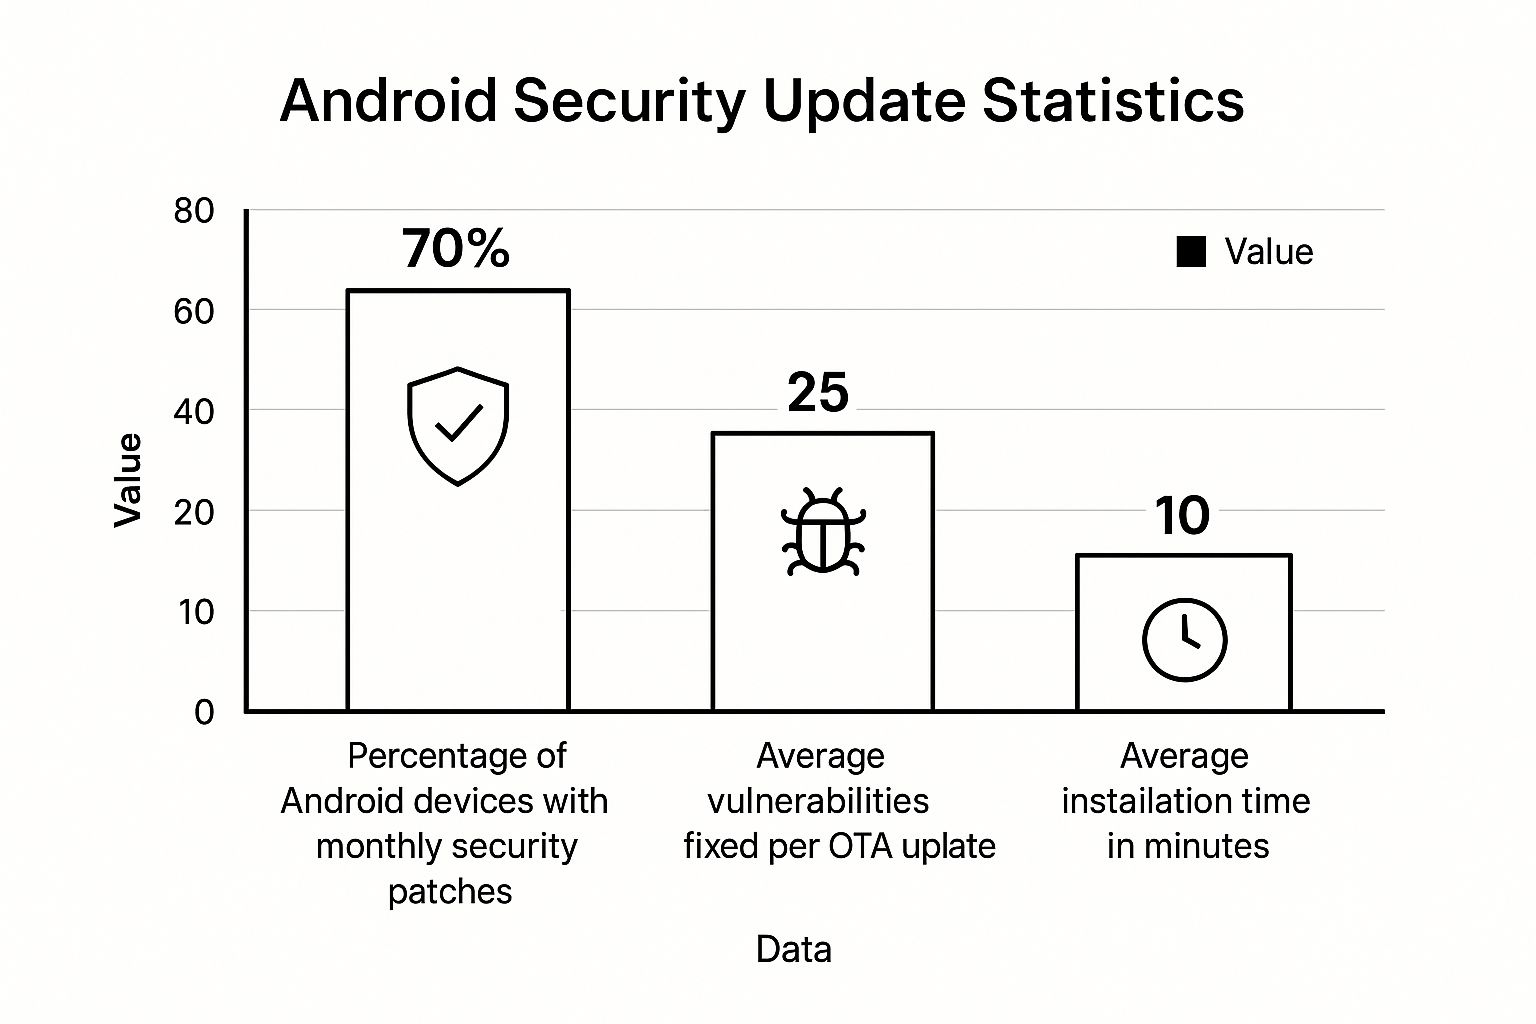
What this data really shows is that while security patches eventually reach a high percentage of devices, it's the efficiency of the update process—measured in vulnerabilities fixed and installation time—that defines a seamless user experience.
Managing Complex Deployment Scenarios#
Real-world deployments are messy. You can't just assume every user has a perfect connection and a fully charged battery. A robust strategy has to account for all the edge cases.
- Offline Devices: Your app needs to handle being offline gracefully. The NextNative SDK makes this easy; it will simply check for the update the next time the app is opened with an active connection.
- Low Battery: Nobody wants an update to drain their battery. You can configure updates to only download over Wi-Fi or when the device has plenty of juice, preventing a frustrating user experience.
- Version Management: This one is crucial. Clearly versioning both your native builds and your web bundles is the only way to avoid painful compatibility issues down the road.
Choosing the right deployment strategy is key to balancing speed with stability. Not every update is the same—a minor text change doesn't carry the same risk as a complete checkout flow redesign.
OTA Update Strategy Comparison#
The table below breaks down a few common strategies to help you match your deployment approach to your update's goal and risk level.
| Strategy | Best For | Risk Level | Implementation Notes |
|---|---|---|---|
| Full Rollout | Minor bug fixes, text changes, or urgent security patches. | High | Simplest to implement, but offers no safety net. All users get the update at once. |
| Phased Rollout | New features, UI changes, or performance improvements. | Medium | Release to incremental percentages (e.g., 1%, 10%, 50%, 100%) while monitoring analytics. |
| A/B Test | Comparing two versions of a feature or UI element. | Low | Deploy two variants to distinct user segments to measure which performs better against a key metric. |
| Canary Release | High-risk changes or major refactors. | Low | Release to a very small, specific group first (e.g., internal testers, a specific region). |
Ultimately, a flexible OTA system lets you pick the right tool for the job, ensuring you can move fast without breaking things.
Even Google demonstrates the power of staggered, controlled releases. A great example was the Android 16 QPR1 beta, which introduced a 'No Data Wipe' feature allowing testers to leave the program without a factory reset. This showed a deliberate, user-centric approach to deployment and stability—a lesson every developer can learn from. You can read more about this Android update strategy on 9to5google.com.
By embracing these advanced techniques, you elevate your OTA process from a simple bug-fixing tool to a strategic asset for evolving your app in real-time.
Troubleshooting When Updates Go Wrong#
Sooner or later, an OTA update will hit a snag. It happens to everyone. The key is to stay calm and have a solid process for figuring out what broke. When an update goes sideways, the problem almost always falls into one of just a few buckets. Knowing where to start looking is half the battle.
The first thing I always ask is: where did it fail? Was it during the download? The installation? Or right after the app restarted with the new code? The reports you get from users will give you the first clue. If an update seems to hang forever, it’s probably a network issue. If the app crashes on startup right after the update, you're likely looking at a bug in the new bundle.
Identifying the Root Cause#
When users report that an update isn't showing up at all, your first stop should always be the NextNative dashboard. Pop it open and check your deployment settings. Did you target the correct native app version? It’s a surprisingly common slip-up to push an update for v1.2.0 when your users are still running v1.1.9.
If the dashboard settings look right, it’s time to get your hands dirty with device logs. On Android, Logcat is your best friend. Filter the logs for tags related to NextNative or Capacitor, and you'll get a play-by-play of the update check. This is where you’ll find those revealing errors—like network timeouts or permission denials—that are completely invisible to the end user.
The most elusive bugs often have the simplest solutions. Before you dive deep into debugging your code, do a quick sanity check: are your API keys correct for the build environment? Is the deployment really targeting the right version string? This five-minute check can save you hours of frustration.
For more complex problems, like a download failing on a spotty connection, the only real defense is a good offense. In other words: robust testing. A comprehensive testing strategy is non-negotiable for shipping reliable updates. For a deep dive, our mobile app testing checklist at https://nextnative.dev/blog/mobile-app-testing-checklist offers a structured way to catch these problems before they get to your users.
Common Failure Scenarios and Solutions#
Let’s walk through a few real-world problems I've run into and how to tackle them. Each one has a slightly different diagnostic path.
- Update Downloads but Fails to Apply: This often points to a corrupted bundle. First, make sure your build process is actually generating a valid package. A quick way to test this is to try and manually load the bundle in a local dev environment. It could also be a permissions issue where the app simply can't write the new bundle to its designated folder on the device.
- App Crashes After a Successful Update: This is almost certainly a bug in your new JavaScript code. The OTA process itself worked perfectly, but the new code is unstable. This is exactly why having a simple rollback mechanism is a lifesaver. Just redeploy the last known-good version from the NextNative dashboard. This immediately fixes the issue for your users while you debug the faulty code on your own time.
- Version Mismatch Bugs: This is a classic. A user receives an update meant for a newer native version, and the app crashes when the web code calls a native API that doesn't exist yet on their device. Enforcing strict version targeting in your deployment is the primary defense against this entire category of bugs.
By systematically working through these steps, you can turn a stressful production fire into a manageable task. A clear head and a good set of logs will almost always point you straight to the solution.
A Few Common Questions About OTA Updates#
Jumping into Over-the-Air updates usually sparks a few questions. I've pulled together the ones that pop up most often when developers are getting started with OTA updates for Android using Capacitor and NextNative, so you can get clear answers right away.
Can I Update Native Code with OTA Updates?#
This is the most important distinction to get right from the start. The answer is a hard no.
OTA updates, like the ones you manage through NextNative, are designed exclusively for your web assets. That means the HTML, CSS, and JavaScript that make up your app's interface and logic.
Any changes to the native Android layer will always require a full, traditional app store release. This includes things like:
- Modifying your Java or Kotlin code.
- Adding new native plugins or dependencies.
- Changing core app permissions in the
AndroidManifest.xmlfile.
These kinds of updates need to be compiled into a new application package (an AAB file) and submitted to Google. If you need a refresher on that process, our guide on how to publish an app on Google Play walks you through every step.
What Happens If a User Is Offline?#
The NextNative SDK is built to handle this exact scenario without any drama. If a user is offline when you push out a new update, nothing breaks. The app simply keeps running its current, locally cached version.
The next time that user opens your app with an internet connection, the SDK will automatically check for the pending update, download it quietly in the background, and apply it according to your configuration. It's a seamless experience for them.
How Do I Roll Back a Bad Update?#
Even with the best testing, a bug can sometimes slip through. Rolling it back is thankfully a straightforward process. Inside the NextNative dashboard, you have a complete history of every version you've deployed.
To roll back, you just find a previously deployed, stable version and hit "redeploy." That's it. This tells all your users' devices to download that older, reliable bundle, effectively overwriting the faulty update and fixing the problem almost instantly.
A rollback isn't a sign of failure; it's a feature of a mature and resilient deployment strategy. Having the ability to instantly revert a bad update is a critical safety net that gives you the confidence to ship changes quickly.
Do OTA Updates Affect App Performance?#
When implemented correctly, the performance impact is negligible. The initial check for an update is just a tiny, lightweight network request that happens in the background. The actual download is also handled in the background, so it never blocks the UI or gets in the user's way.
The only moment a user might notice anything is the brief restart when the app applies the new bundle. This is typically very fast, and you can configure it to happen at a convenient time, ensuring the transition is as smooth as possible.
Ready to ship updates instantly and skip the app store review? NextNative gives you the tools to manage your Capacitor app's lifecycle with powerful OTA updates. Get started today and take control of your release cycle. Learn more at https://nextnative.dev.