Boost Your App with Mobile CI CD Automation
Updated: October 1, 2025

Mobile CI/CD is all about automating the repetitive parts of mobile app development—the building, testing, and deployment. Think of Continuous Integration (CI) as the system that constantly merges code changes from your team, and Continuous Deployment (CD) as the part that automatically pushes those updates out. Putting them together is how you speed up the entire development cycle, from an idea to the app store.
Why Mobile CI/CD Changes Everything#

Starting a new React Native app can feel like a mountain of work, but automating the tedious stuff is an absolute game-changer. Imagine a world where your builds, tests, and releases just happen on their own. This frees up your team to focus on what actually matters: building incredible features. That’s the core promise of a mobile CI/CD pipeline.
Moving Beyond the Manual Grind#
Without automation, the process is painfully slow and manual. A developer finishes a feature, then kills hours archiving the app for iOS and building the APK for Android. Then comes the manual upload to TestFlight and Google Play, notifying QA, and waiting for feedback. This cycle isn't just slow; it's a huge drain on resources and wide open for human error.
Now, picture this with a solid pipeline. The moment you push a code change to your repository, it kicks off a chain of events:
- Automated Builds: The CI server immediately gets to work, compiling your React Native code for both iOS and Android. No manual intervention needed.
- Automated Testing: Next, it runs your entire suite of unit and end-to-end tests, catching bugs long before they ever see the light of day.
- Automated Distribution: Once the tests pass, the pipeline automatically sends the new build to your testers through TestFlight or an internal Android track.
This hands-off approach means every single code change gets validated instantly. You get a super-tight feedback loop that keeps your codebase healthy and stable.
The Real-World Impact on Your Team#
This shift from manual labor to automated efficiency brings some serious benefits. It's no surprise that CI/CD adoption in mobile development has exploded as teams chase faster, more reliable releases. By 2023, the global market for this tech hit USD 3.67 billion and is only expected to climb.
For development teams, the true value is in consistency and confidence. No more worrying if someone forgot a step during a manual build or used the wrong signing certificate. The pipeline becomes the single source of truth for creating and deploying your app.
This consistency doesn't just cut down on human error—it boosts morale. When developers can merge their work without the fear of breaking the build, they become more productive and more willing to innovate. For a deeper look at this, check out our guide on how to improve developer productivity.
Ultimately, mobile CI/CD isn't just a technical tool. It’s a strategic shift that lets your team deliver better apps, faster.
Choosing Your Mobile CI/CD Toolkit#
The CI/CD landscape is crowded, but for React Native, only a few platforms really get it right. Picking your tool isn't about finding the "best" one on paper; it's about finding the one that slots into your team's existing workflow, budget, and comfort level. This is a foundational decision that will shape your development rhythm every single day.
Let's cut through the marketing noise and compare the top contenders for mobile CI/CD. The goal here is simple: to give you a clear framework for deciding which platform will actually make your life easier, not more complicated.
Understanding the Key Players#
When you start looking at mobile automation, three names come up again and again: GitHub Actions, Bitrise, and Codemagic. Each one has its own philosophy and is built for a slightly different kind of team. Getting a feel for these differences is the first step toward making a smart choice.
GitHub Actions: If your team already lives in GitHub, this is the path of least resistance. It’s built right into the platform you use for source control, so the setup feels incredibly natural. It’s powerful and flexible, but you'll be writing your workflows from scratch in YAML configuration files.
Bitrise: This platform was built from the ground up specifically for mobile development. It has a slick visual, drag-and-drop workflow editor that can be a huge win for teams that want to avoid YAML hell. Its entire feature set is laser-focused on solving annoying mobile problems like code signing and dependency management.
Codemagic: Originally known for its amazing Flutter support, Codemagic has become a serious contender for React Native as well. It aims for a simple, clean user experience with seriously fast build times, especially on the macOS environments crucial for building iOS apps.
How to Evaluate Your Options#
Picking your toolkit is about more than just a feature checklist; it's about finding the right fit. Your team's size, your current tech stack, and your budget are all major factors. For a bird's-eye view of how these tools fit into the wider development world, check out our guide on cross-platform app development tools.
When you're weighing your options, ask yourself these questions:
Ease of Setup: How fast can you get from zero to a successful build for both iOS and Android? Platforms with visual editors like Bitrise often win this race. GitHub Actions has a steeper learning curve but gives you total control once you get the hang of it.
Pricing Model: Is the free tier actually useful, or just a demo? GitHub Actions offers a very generous number of free build minutes for both public and private repos. Bitrise and Codemagic have solid free tiers too, but their paid plans are typically based on things like build concurrency and team size, which can add up as you scale.
Integration with Your Stack: How well does it play with the other tools you depend on, like Fastlane for managing releases or Jest for running tests? All the big players have strong support for tools like Fastlane, but the quality of pre-built steps and integrations can vary a lot.
The best mobile CI/CD tool is the one your team will actually use. If the configuration is too complex or the pricing is unclear, adoption will fail. Prioritize simplicity and a clear path to your first automated build.
Comparing Top Mobile CI/CD Platforms for React Native#
To make this even clearer, let's put the top platforms side-by-side. This table breaks down the key features of popular CI/CD services to help you choose the best fit for your React Native project.
| Platform | Best For | Ease of Setup | Pricing Model | Key Feature |
|---|---|---|---|---|
| GitHub Actions | Teams already using GitHub, developers comfortable with YAML. | Moderate to High | Generous free tier, usage-based pricing. | Deep integration with the GitHub ecosystem. |
| Bitrise | Teams wanting a visual workflow editor and mobile-first features. | Low | Free tier, scales with concurrency and team size. | Visual, drag-and-drop pipeline builder. |
| Codemagic | Teams prioritizing build speed and a simple, clean UI. | Low | Free tier, pay-as-you-go and annual plans. | Fast macOS build machines for iOS apps. |
Think of this table as a starting point. Your specific needs for things like code signing, testing, or deployment will determine which platform's "key feature" is most valuable to you.
Making a Practical Decision#
Let's ground this in a couple of real-world scenarios. A solo developer or a small startup could get a huge amount of mileage out of the GitHub Actions free tier. Managing your code and your CI/CD pipelines all in one place is a massive productivity boost when you're a small team.
On the flip side, a larger company with developers of varying experience might lean toward Bitrise. Its visual workflow editor lowers the barrier to entry, allowing anyone on the team—not just the DevOps expert—to understand and even tweak the pipeline. This can be a huge win for team collaboration.
Ultimately, your choice comes down to balancing control, convenience, and cost. There's no single right answer, but by focusing on these key evaluation points, you'll be in a great position to pick the toolkit that will serve your NextNative project well today and as you continue to grow.
Theory is great, but let's get our hands dirty and build something real. This section is a practical walkthrough for creating your first mobile CI CD pipeline for a React Native app. We'll use a powerful combination: the native integration of GitHub Actions and the mobile-centric automation of Fastlane.
I'm assuming your React Native project is already sitting in a GitHub repository. We'll build this pipeline from the ground up, starting with initializing Fastlane, configuring its Fastfile to run our builds and tests, and then tying it all together with a GitHub Actions workflow.
This flow chart visualizes the core stages we're about to build. It shows the journey from a simple code commit all the way to automated testing.
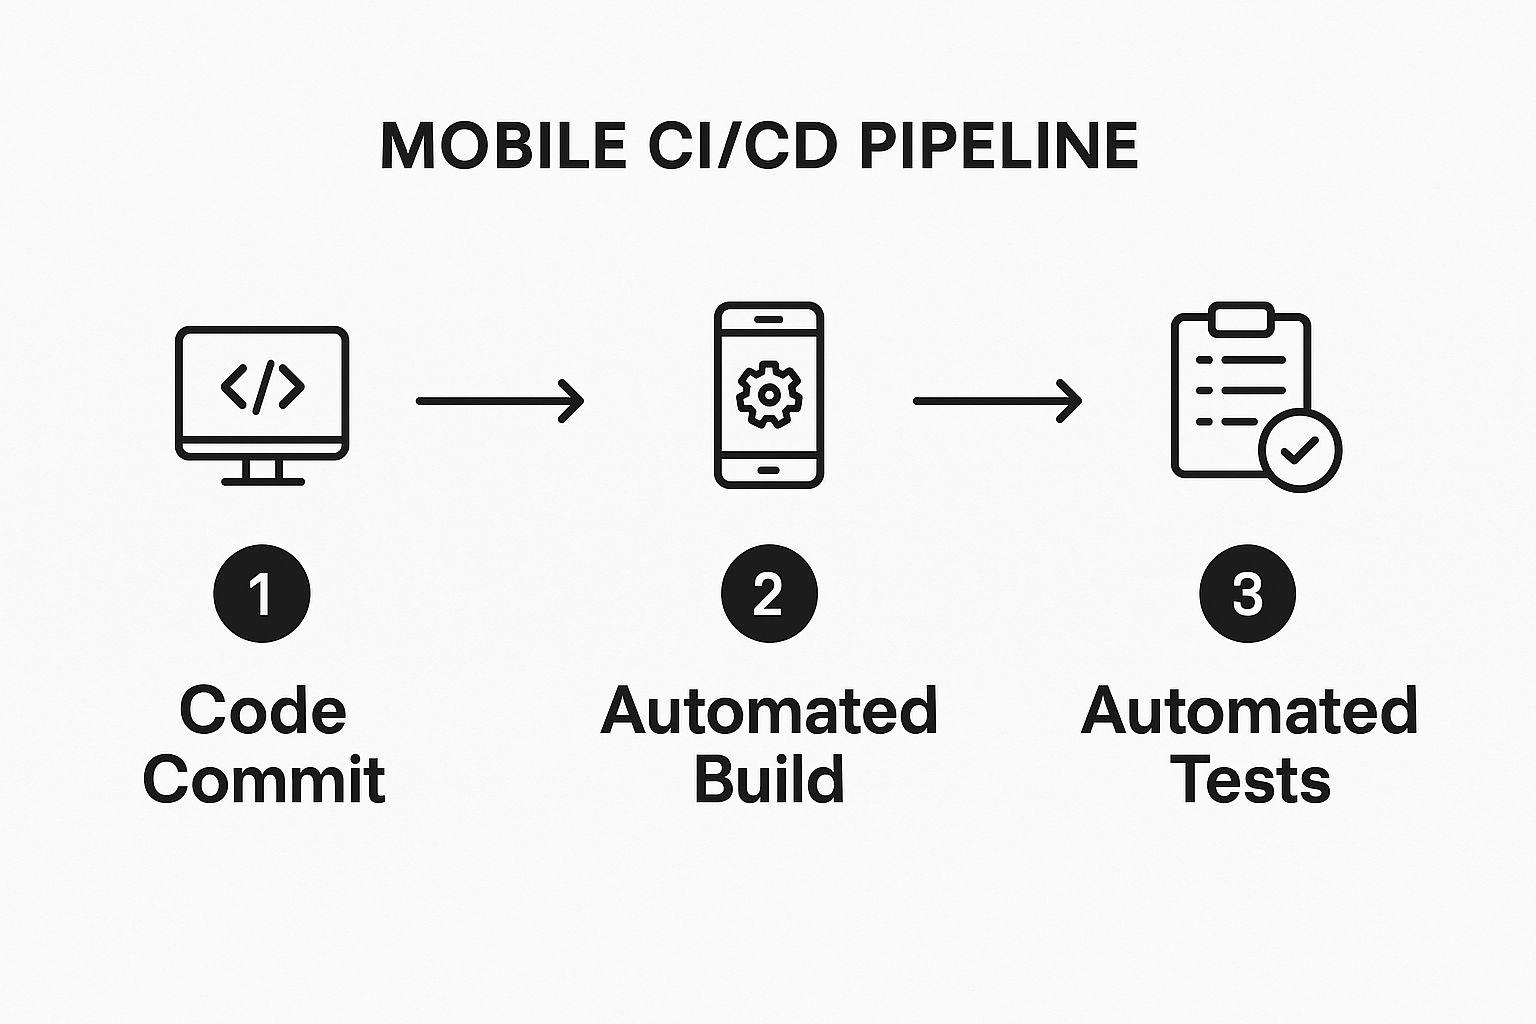
The key takeaway here is the linear, automated progression. Each step triggers the next, creating a reliable and repeatable process that removes human error from the equation.
Setting the Stage with Fastlane#
Before we can tell GitHub Actions what to do, we need a way to script our mobile-specific tasks. This is where Fastlane shines. It's an open-source tool built to automate every tedious aspect of mobile app deployment.
To get started, pop open your terminal and navigate to your project's root directory. If you're working on the iOS side of things, make sure to cd into the ios directory first.
- Install Fastlane: If you haven't already, install it using RubyGems:
sudo gem install fastlane -NV. - Initialize Fastlane: Run
fastlane init. It will ask a few questions about your project and then generate afastlanefolder containing aFastfile.
The Fastfile is the heart of your Fastlane setup. It's a Ruby file where you define "lanes"—sequences of actions. For our first pipeline, let's keep it simple and create a lane that just runs our tests.
fastlane/Fastfile#
default_platform(:ios)
platform :ios do
desc "Runs all the tests"
lane :test do
# This assumes you have a testing scheme set up in Xcode
run_tests(scheme: "YourAppScheme")
end
end
platform :android do
desc "Runs all the tests"
lane :test do
# This runs your Gradle-based unit tests
gradle(task: "test")
end
end
This simple setup gives us two commands we can run from our CI server: fastlane ios test and fastlane android test. These are the hooks our GitHub Actions workflow will call.
Creating the GitHub Actions Workflow#
Now for the main event. In your project's root, create this directory path: .github/workflows. Inside that folder, create a new YAML file—let's call it ci-pipeline.yml. This file will define our entire automation process.
A key principle of a good CI pipeline is to start simple and build complexity over time. Our first goal is just to check out the code, install dependencies, and run tests. We can add building and deploying later.
Our workflow will kick off on every push to the main branch. It will have two separate jobs, one for iOS and one for Android, which lets them run in parallel so they don't block each other.
.github/workflows/ci-pipeline.yml#
name: Mobile CI CD Pipeline
on:
push:
branches: [ main ]
jobs:
test-ios:
name: Run iOS Tests
runs-on: macos-latest
steps:
- name: Check out repository
uses: actions/checkout@v3
  - name: Set up Node.js
    uses: actions/setup-node@v3
    with:
      node-version: '18'
      cache: 'npm'

  - name: Install dependencies
    run: npm install

  - name: Install Bundler dependencies
    run: bundle install
    working-directory: ./ios

  - name: Run iOS tests via Fastlane
    run: bundle exec fastlane test
    working-directory: ./ios
test-android:
name: Run Android Tests
runs-on: ubuntu-latest
steps:
- name: Check out repository
uses: actions/checkout@v3
  - name: Set up Node.js
    uses: actions/setup-node@v3
    with:
      node-version: '18'
      cache: 'npm'

  - name: Install dependencies
    run: npm install

  - name: Run Android tests via Fastlane
    run: bundle exec fastlane test
    working-directory: ./android
Let's break down what's happening. The runs-on directive tells GitHub which virtual machine to use; we need macos-latest for any iOS tasks, while ubuntu-latest is perfect for Android.
Here’s a pro-tip: using cache: 'npm' can dramatically speed up your subsequent runs by up to 50%, as it avoids reinstalling all your dependencies from scratch every single time.
Handling Secrets and Code Signing#
Honestly, the biggest headache in mobile CI CD is securely managing credentials. This includes API keys, environment variables, and especially code signing certificates. Never, ever commit these directly to your repository. It's a huge security risk.
GitHub gives us a secure solution: Encrypted Secrets. You can add these in your repository under Settings > Secrets and variables > Actions.
Here’s a typical scenario for handling an API key:
- Add the Secret: Go to your GitHub repo settings and create a new secret named
API_KEYwith your actual key as the value. - Access in Workflow: You can then reference it in your workflow file using the
secretscontext, like this:env: { API_KEY: ${{ secrets.API_KEY }} }.
For the notoriously complex world of iOS code signing (certificates and provisioning profiles), a common best practice is to encode the files into Base64 strings. You save those strings as GitHub Secrets, and then have a script in your pipeline decode them back into files on the CI runner.
Better yet, tools like Fastlane Match are designed to automate this entire process by storing your certificates in a private, encrypted Git repository for secure access.
Once you have your secrets handled and a basic testing pipeline in place, you're ready to expand it to include building the app itself. For more detailed instructions, you can check out our guide on how to build an app for production, which covers all the necessary configurations.
By following this structure, you've laid the foundation for a robust, secure, and automated pipeline. Every push now triggers a validation sequence, giving you instant feedback and ensuring a new level of quality and consistency in your development process. This is the solid base upon which you can build more advanced deployment automation.
Integrating Automated Testing for Quality Apps#

A pipeline that just builds your code is only doing half the job. Without a solid testing strategy, all you've really built is a high-speed conveyor belt for shipping bugs straight to your users. Let's talk about weaving an automated quality gate into your mobile CI/CD workflow, turning it from a simple builder into a true guardian of your app's quality.
Look, manually testing every feature across a growing list of iOS and Android devices just doesn't scale. It's painfully slow, shockingly expensive, and wide open to human error. Automation is the only way forward if you want to ship with confidence every single time. By baking tests directly into your pipeline, you create a system that validates every single change automatically.
Choosing the Right Tests for the Job#
Not all tests are created equal, and running every possible test on every single commit would bring your pipeline to a grinding halt. The secret is a tiered approach that balances speed with how thorough it is. You have to know which tests to run and, just as importantly, when to run them.
Here are the main players you'll be working with:
- Unit Tests: These are your lightning-fast, isolated tests that check individual functions or components. Using a framework like Jest, you can blaze through hundreds of these in seconds, making them perfect for getting immediate feedback on every push.
- Integration Tests: These check how different parts of your app work together. For instance, does tapping a button actually trigger that API call and update the UI state correctly? They're a bit slower than unit tests but catch a whole different class of bugs.
- End-to-End (E2E) Tests: These simulate real user workflows from start to finish. With a framework like Detox, you can automate entire scenarios like a user logging in, navigating to a product page, and completing a purchase. E2E tests are the slowest but give you the highest level of confidence that your core user journeys are solid.
For a deeper dive into all the testing types, make sure to check out our detailed mobile app testing checklist.
Implementing a Tiered Testing Strategy#
A smart mobile CI/CD pipeline doesn't just run every test all the time. Instead, it uses a strategic, multi-stage approach to give you feedback when it's most useful. That means running the fastest tests first and saving the slower, more resource-heavy tests for key integration points.
Here’s a battle-tested strategy that just works:
- On Every Push to a Feature Branch: Automatically kick off all unit tests. Think of them as your first line of defense. They're quick, so they won't bog down the development cycle, and they catch logic errors right at the source.
- On Opening a Pull Request: Run the full suite of unit tests again, but this time, add your integration tests to the mix. This step ensures that a new feature plays nicely with the existing codebase before it's even considered for merging.
- On Merge to the Main Branch: This is your final quality gate before a release. Here, you run everything: unit tests, integration tests, and your full E2E test suite on both iOS and Android emulators.
By structuring your pipeline this way, you create an intelligent system. You get fast feedback during active development, while the most comprehensive (and time-consuming) validation is reserved for when it matters most—right before a new build goes out to your testers.
Configuring Your Pipeline for Failure#
Running tests is pointless if your pipeline doesn't do anything with the results. A critical piece of the puzzle is configuring your workflow to fail the build if any test suite doesn't pass. This "red build" is a powerful, unambiguous signal to the team that something is broken and needs immediate attention.
In a GitHub Actions workflow, this is actually the default behavior. If a command like fastlane test exits with a non-zero status code (which testing frameworks do when a test fails), the job will stop and be marked as failed.
This simple mechanism automatically blocks a pull request from being merged, preventing broken code from ever reaching your main branch. It's the core of what makes automated testing in CI/CD so effective—it enforces your quality standards programmatically, ensuring a more stable and reliable codebase.
You've nailed the hard part. Your pipeline is now a well-oiled machine that builds and tests your React Native app automatically. It’s time for the final, most satisfying step: getting that app into the hands of testers and, eventually, your users.
This is where your mobile CI CD pipeline really starts to pay dividends. We're about to turn the nerve-wracking, manual upload process into a predictable, automated event.
We'll extend our GitHub Actions workflow to push builds directly to Apple’s TestFlight and the Google Play Console's internal testing track. This means we have to tackle the trickiest parts of mobile deployment head-on—things like managing version numbers and, most critically, handling secure code signing for both platforms.
Securing Your Deployment Credentials#
Before you can upload a single byte, your CI pipeline needs permission to act on your behalf. This involves creating API credentials for both the App Store and Google Play, and these keys need to be handled with extreme care. If they leak, anyone could potentially upload malicious versions of your app.
This is where GitHub Secrets become absolutely non-negotiable. You must store all sensitive information here, never in your code.
- For iOS/TestFlight: You'll need an App Store Connect API key. This means generating a key in App Store Connect, downloading the
.p8file, and then storing the Key ID, Issuer ID, and the.p8file's content as separate secrets. - For Android/Google Play: This requires setting up a Google Cloud service account with the right permissions and downloading its JSON key file. The entire content of that JSON file gets stored as a single GitHub Secret.
By using secrets, you guarantee they're never exposed in your logs or accidentally committed to your repository. Your workflow can access them securely at runtime without their actual values ever seeing the light of day.
Crafting the Deployment Workflow#
To keep things clean and intentional, we'll set up a dedicated deployment workflow. You don't want this running on every single push; that would be chaos. A much smarter strategy is to trigger it only when code is merged into a specific branch, like release or main.
This creates a clear separation of concerns. The ci-pipeline.yml we built earlier handles continuous integration on every commit, while a new deploy.yml file will manage continuous deployment only when a release is truly ready.
This simple rule ensures that only approved, fully tested code gets distributed. It provides a final, human-gated checkpoint before an app is sent out—a critical safety measure.
The goal of automating deployments isn't just about speed; it's about making your release process boringly predictable. When deployments are a non-event, you can release more frequently and with far greater confidence.
This predictability is where the real business value of mobile CI CD shines. In fact, companies that fully implement CI/CD can slash their time-to-market for new features by up to 30% and see a 68% drop in production defects, thanks to consistent, automated testing. You can discover more insights about these mobile CI/CD benefits on moldstud.com.
Extending Fastlane for Distribution#
Just like we did for testing, we'll lean on Fastlane to script our deployment tasks. This keeps our GitHub Actions workflow clean and readable, offloading all the platform-specific complexities to where they belong.
Let's add a couple of new deploy lanes to our Fastfile.
fastlane/Fastfile#
... existing lanes ...#
platform :ios do
lane :deploy do
# Automatically increments the build number in Xcode
increment_build_number(xcodeproj: "YourApp.xcodeproj")
# Builds the app using the "App Store" configuration
build_app(scheme: "YourAppScheme", export_method: "app-store")

# Uploads the build to TestFlight using API Key authentication
upload_to_testflight(
  api_key_path: "path/to/api_key.json" # Reconstructed from secrets
)
end
end
platform :android do
lane :deploy do
# Increments the version code in your build.gradle
increment_version_code(
app_project_dir: "../app"
)
# Assembles the release build (AAB or APK)
gradle(task: "bundle", build_type: "Release")

# Uploads the build to the internal testing track
upload_to_play_store(
  track: 'internal',
  json_key: "path/to/service_account.json" # Reconstructed from secrets
)
end
end
These lanes automate several crucial steps. They bump the build/version number so you never upload a duplicate, create a production-signed build, and finally, push it to the right distribution channel. Simple, repeatable, and error-proof.
If you want a refresher on all the manual steps this automation replaces, check out our detailed guide on how to publish an app on Google Play. Automating this process removes the risk of human error at every stage, from forgetting to increment a version code to uploading the wrong build file.
With these Fastlane lanes ready, calling them from your deploy.yml workflow is a piece of cake. You’ll just add a few steps to reconstruct your secret files on the runner and then execute bundle exec fastlane deploy.
This final step closes the loop on your development cycle, moving code from a developer's machine to testers' devices without anyone needing to lift a finger.
A Few Common Questions About Mobile CI/CD#
Getting into mobile CI/CD can feel a bit like wading into new territory, so it's totally normal to have questions. Let's walk through some of the most common ones that pop up for developers. My goal here is to cut through the noise and give you clear, practical answers.
How Do I Manage Different Environments?#
This one comes up all the time. Handling multiple environments like staging and production without accidentally mixing them up is a huge challenge. The cleanest way to do this is to tie your deployments directly to your Git branches.
For instance, you can set it up so your develop branch automatically triggers builds that deploy to a staging environment for the QA team. Easy.
Meanwhile, your main or release branch should be the only thing that can kick off a production deployment to the app stores. You can use tools like GitHub Environments to keep separate sets of secrets and variables for each. That way, the pipeline just grabs the right API keys depending on the branch it's running on.
The core idea is simple: your Git branching strategy should mirror your deployment strategy. This gives you a crystal-clear, auditable path for your code as it moves from development to production and helps prevent those "oops" releases.
What Are the Biggest Mobile-Specific Challenges?#
Unlike web development, mobile CI/CD has its own unique set of headaches. The biggest one, by a long shot, is code signing. Juggling certificates, provisioning profiles for iOS, and keystores for Android in a secure, automated pipeline is famously tricky and where things often break first.
Build times can also be a real drag. You need a macOS environment to compile an iOS app, and those virtualized macOS runners can be slower and pricier than their Linux counterparts.
Finally, getting your emulators and simulators to behave consistently on every single CI run takes some careful setup. If you don't nail this, you'll end up with flaky tests that fail for all the wrong reasons. For specific questions about getting a platform like Amino into your workflow, you might find some answers in their Amino's Frequently Asked Questions.
Is Setting Up a Mobile Pipeline Expensive?#
It really doesn't have to be. Most modern CI/CD services, like GitHub Actions, come with generous free tiers that are more than enough for solo devs or small projects. You can often run hundreds of builds a month without spending a dime.
Of course, as your team gets bigger and you're building more frequently, the costs will scale. But the time you save by not doing things manually and the bugs you catch with automated testing almost always deliver a massive return on investment. The efficiency boost alone makes a mobile CI/CD pipeline a smart, cost-effective move for any serious project.
At NextNative, we build the tools and boilerplates to get your Next.js mobile app launched in record time. Skip the painful setup and get straight to building features. Check out our toolkit at https://nextnative.dev.