Ionic Framework Push Notifications Guide
Updated: October 6, 2025

Push notifications aren't just a feature; they're a lifeline. For an Ionic app, they're one of the most direct and powerful ways to re-engage users and pull your app back to the front of their minds. The whole idea is to integrate a service like Firebase Cloud Messaging (FCM) into your app with Capacitor plugins, letting you send timely, relevant alerts to users on both iOS and Android.
Why Bother With Push Notifications in Your Ionic App?#
Before we jump into the code, let's get one thing straight: push notifications are a non-negotiable for modern apps. They’re so much more than just little pop-up alerts. They are a direct, personal communication channel to your users, giving you a way to bring them back into your app long after they first hit "download."
When you get them right, push notifications become the backbone of your engagement and retention strategy. It’s what separates an app that gets forgotten from one that becomes a daily habit.
A Direct Line to User Engagement#
Think about it. A single notification can instantly tell a user about new content, a flash sale, or an important update. This kind of proactive communication is what keeps your app feeling alive and valuable. And with Ionic's cross-platform magic, you can build and manage a consistent notification experience across both iOS and Android without doubling your workload.
That unified approach saves a ton of time and helps you dodge the platform-specific headaches that plague native development. The goal is simple: deliver real value directly to your user's lock screen and give them a reason to tap back in. We've seen Progressive Web Apps (PWAs) built with Ionic boost engagement by a staggering 400%, which just goes to show how powerful this is.
A great push notification feels personal, timely, and actionable. It should come across less like an ad and more like a helpful reminder or an exclusive tip meant just for them.
Boost Retention and Drive Real Success#
Good notifications are also your secret weapon for retention. A gentle nudge to an inactive user or a small reward for a loyal one can dramatically cut down on churn. This is especially true in those critical first few days after someone installs your app.
Here are a few ways smart notifications can drive your app's success:
- Nail the Onboarding: Guide new users through your app's key features with a welcome series. We've got a whole guide on this, so check out our post on mobile onboarding best practices.
- Recover Abandoned Carts: If you're running an e-commerce app, a simple reminder about items left in a cart can be a massive sales driver. It’s low-hanging fruit.
- Deliver Personalized Content: Send alerts based on what a user actually does in your app. When a message feels like it was made just for them, it becomes genuinely valuable.
Setting Up Your Firebase and Capacitor Environment#
To get Ionic push notifications working, the first thing we need to do is build a solid foundation. This means connecting your Ionic app to Firebase and installing the right Capacitor plugins. Trust me, getting this part right from the start is non-negotiable—it’ll save you from a world of headaches and weird bugs down the road.
We’ll kick things off by creating a new project in the Firebase console. Think of this as the backend brain for our notification system. We’ll be using Firebase Cloud Messaging (FCM), which is a powerful—and free—tool for sending messages to both Android and iOS devices from one central place.
Installing the Essential Capacitor Plugin#
Before we even touch Firebase, let's add the core dependency to our Ionic project. The official Capacitor Push Notifications plugin is what creates the bridge between our web code and the native notification services on each device.
Installing it is pretty straightforward. Pop open your terminal at the root of your Ionic project and run this command:
npm install @capacitor/push-notifications
Once that’s finished, you need to sync these changes with your native projects. This command is what actually updates your native Android and iOS folders to include the new plugin's code.
npx cap sync
With the plugin installed, your app now has the ability to handle push notifications. But it doesn't know where to listen for them yet. That's where Firebase comes in.
Configuring Your Firebase Project#
Alright, time to head over to the Firebase Console and set up a new project. If you don't already have one, creating it is fast and painless. This project is what will generate the configuration files your Ionic app needs to securely communicate with Google's services.
The whole process is a simple three-step flow: you create the project, register your app's unique identifiers, and then download the config files.
This flow chart gives you a quick visual of the core steps for getting set up.
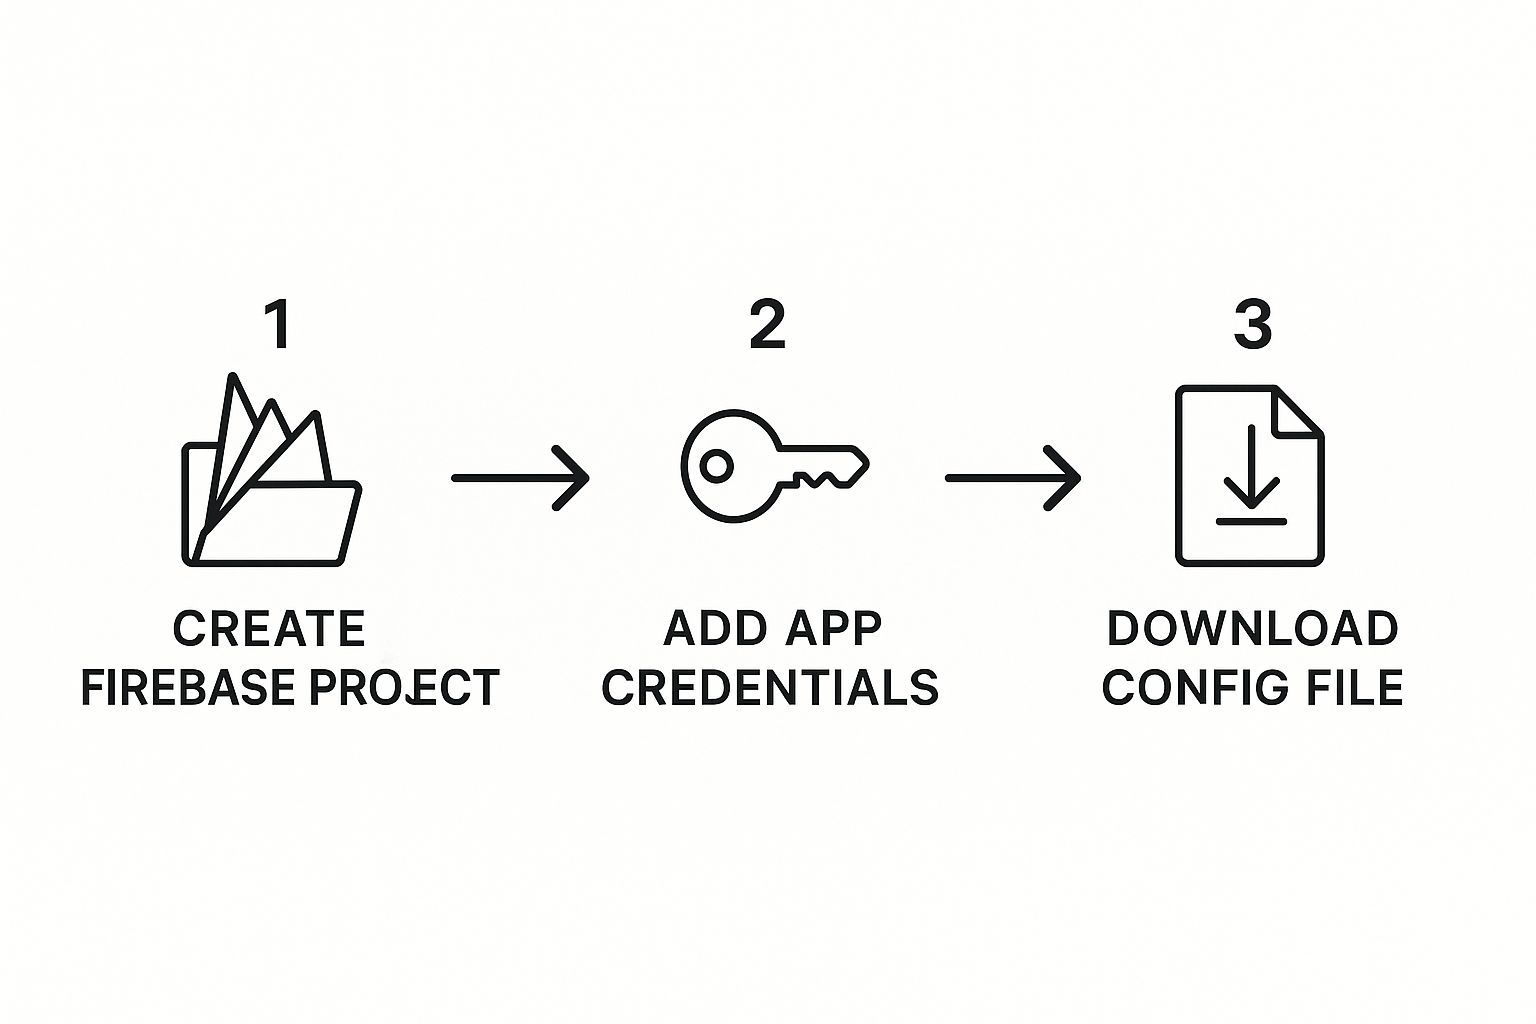
Following this sequence ensures that your app has the correct credentials right from the very beginning.
Inside your new Firebase project, you'll need to register your application for both Android and iOS separately. This is a critical step because each platform uses a unique identifier to know who it's talking to.
- For Android: You'll need the Package Name from your
capacitor.config.tsfile (it looks something likecom.mycompany.appname). - For iOS: You'll need the Bundle ID, which should also match what's in your configuration file.
After you register each platform, Firebase provides a special configuration file. These files contain all the API keys and project information your app needs to connect to the right Firebase project.
Pro Tip: Double-check that the package name and bundle ID you enter in Firebase exactly match what’s in your
capacitor.config.ts. A tiny typo here is one of the most common reasons I've seen for push notifications failing to register.
You'll end up downloading two key files:
google-services.jsonfor your Android app.GoogleService-Info.plistfor your iOS app.
The google-services.json file needs to be placed in the android/app/ directory of your Ionic project. For iOS, you'll need to open your project in Xcode and physically drag the GoogleService-Info.plist file into the App/App folder. If you need a more detailed walkthrough on this, our complete guide on using Firebase in Ionic covers these steps in greater detail.
Once those files are in place, your Ionic application is now officially linked to your Firebase project. You've just laid all the necessary groundwork for sending and receiving your first push notification.
Alright, with the initial setup out of the way, it's time to get our hands dirty and actually wire up push notifications in the app. This is the fun part, where we'll connect the UI to the native device services using the Capacitor plugin we installed earlier.
We'll be writing a bit of TypeScript to handle a few key things: politely asking the user for permission, grabbing the device token once they say yes, and then deciding what to do when a notification shows up.
Requesting Permissions and Registering the Device#
First things first: you can't just blast notifications at people. You have to ask for their permission. This is a non-negotiable step on both iOS and Android, and getting it wrong can lead to users blocking notifications from your app forever. Game over.
I usually handle this logic in a central spot, like app.component.ts or a dedicated notification service. That way, it runs right when the app boots up.
Let's start by setting up the basic listeners for the Capacitor Push Notifications plugin.
// A simplified example for your notification service or app.component.ts
import { Component, OnInit } from '@angular/core';
import { PushNotifications, Token, PushNotificationSchema, ActionPerformed } from '@capacitor/push-notifications';
@Component({ ... })
export class AppComponent implements OnInit {
ngOnInit() {
this.registerForPushNotifications();
}
registerForPushNotifications() {
// First, we have to ask the user for permission
PushNotifications.requestPermissions().then(result => {
if (result.receive === 'granted') {
// If they say yes, we can register for push notifications
PushNotifications.register();
} else {
// Handle the case where the user denies permission
console.warn('User denied push notification permissions.');
}
});
// This listener fires when a registration token is received from FCM/APNS
PushNotifications.addListener('registration', (token: Token) => {
  console.log('Push registration success, token:', token.value);
  // IMPORTANT: You have to send this token to your backend server!
});

// This one fires if something goes wrong during registration
PushNotifications.addListener('registrationError', (error: any) => {
  console.error('Error on registration:', error);
});
}
}
Key Takeaway: That
token.valueis pure gold. You must send this token to your backend and store it, linking it to a specific user. Without it, you have no way to send targeted notifications from your server.
Handling Incoming Notifications#
Once a device is registered, you need to tell your app how to behave when a notification actually arrives. The experience is totally different depending on whether the app is open right now or sitting in the background.
- Foreground: The app is open and on the user's screen. The notification won't pop up in the system tray. Instead, it gets delivered straight to your app's code, giving you the chance to show a custom in-app alert or maybe do something silently.
- Background: The app is closed or just not the active window. In this case, iOS or Android handles displaying the notification in the system tray. If the user taps on it, your app will open up.
We can listen for both of these scenarios by adding two more listeners to our setup.
// Continuing in your notification service or app.component.ts
// Fires when a notification is received while the app is in the foreground
PushNotifications.addListener('pushNotificationReceived', (notification: PushNotificationSchema) => {
console.log('Push received in foreground:', notification);
// Example: You could display a custom in-app toast or alert here
});
// Fires when a user taps on a notification in the system tray
PushNotifications.addListener('pushNotificationActionPerformed', (action: ActionPerformed) => {
console.log('Push action performed:', action);
// Example: Navigate to a specific page based on the notification's data
const data = action.notification.data;
if (data.detailsId) {
// router.navigateByUrl(/details/${data.detailsId});
}
});
That second listener, pushNotificationActionPerformed, is incredibly powerful. The action.notification.data object holds any custom payload you send from your server. This is exactly how you implement deep linking—sending the user to a specific product page, a new message, or an order status screen the moment they tap the notification.
It's what turns a simple alert into a genuinely useful, context-aware part of your app's experience.
If you're looking for an even deeper dive, our comprehensive guide on Capacitor push notifications walks through more advanced setups and provides additional examples. With these listeners now in place, your Ionic app is officially ready to register, receive, and react to push notifications.
Sending Your First Notification from Firebase#
Alright, your Ionic app is wired up and listening for messages. Now for the moment of truth: sending that first notification. The quickest way to see if everything is working is to use the Firebase Console directly. It lets you manually compose and fire off a message without touching any backend code.
This is my go-to method for initial testing. It's the perfect sanity check to confirm your app's connection to Firebase Cloud Messaging (FCM) is solid and your device is actually receiving the payload.
Using the Firebase Cloud Messaging Composer#
Head back over to your project in the Firebase Console. On the left-hand menu, look for the "Engage" section and click on "Messaging." This takes you to the FCM dashboard where you can manage your notification campaigns.
Hit the "Create your first campaign" button and choose "Firebase Notification messages." You'll land on a pretty straightforward composer interface.
- Notification Title: Pop in something short and sweet, like "Welcome!"
- Notification Text: Write the body of your message. Something like, "Your first notification has arrived." is perfect.
- Send Test Message: This is the most important part for our test. You'll see a field where you can add an FCM registration token.
Now, grab that device token we logged in the app's console (from the registration listener) and paste it right into that field. Click "Test," and if all goes well, you should see the notification pop up on your physical device within seconds.
Success? You've just integrated Ionic Framework push notifications.
Seeing that first test notification appear is a huge milestone. It validates your entire client-side setup—from the Capacitor plugin configuration all the way to the placement of your
google-services.jsonfile. If it doesn't show up, that's your cue to double-check that token and your initial setup steps.
Moving Beyond Manual Tests to a Backend Server#
Manually sending messages is great for a quick test, but it's not how a real app operates. In a live environment, notifications get triggered by backend events—a new chat message, an order getting shipped, or a flash sale starting. To make that happen, you'll need to use the Firebase Admin SDK on your own server.
The Admin SDK gives your server the keys to the kingdom, allowing it to programmatically send notifications to specific device tokens, topics, or even segments of your user base. You can install it in a Node.js environment (or other supported languages) and start building out your notification logic.
When you're setting up a backend to fire off notifications, it's really important to follow strong API design best practices. This makes sure your server's communication with FCM is efficient, secure, and easy to maintain as your app grows.
Whether you're building a classic server or going with a more modern approach, the core ideas are the same. A serverless architecture is actually a fantastic fit for this kind of task-based automation. If you're curious, you can check out our guide on creating a serverless backend for mobile apps. This is the path to building a truly dynamic and scalable notification system.
Advanced Strategies for Better Engagement#
Sending a basic alert is a start, but a truly great notification does more than just inform—it drives action and feels personal. Let's get past the basics and look at the techniques that make a real difference in how users see and interact with your messages. This is how you turn your ionic framework push notifications from simple pop-ups into a powerful engagement engine.
Take Users Exactly Where They Need to Go#
The first big leap is deep linking. It’s the difference between a notification that just opens your app and one that takes the user directly to a specific piece of content, bypassing the home screen completely.
Imagine a flash sale notification. If it just opens the app's main page, you're forcing the user to hunt for the deal. That friction kills conversions. A deep link, on the other hand, drops them right onto the product page for the item on sale. The experience is seamless, and your conversion rates climb because of it.
You can pull this off by adding custom data to your notification payload, just like we did with the pushNotificationActionPerformed listener. A payload might carry a product ID, a conversation key, or a specific app route, telling your app exactly where to navigate the moment it opens.
Give Users More Control with Channels#
On Android, you can take user experience a step further with Notification Channels. These let you categorize your notifications, giving users fine-grained control over what kind of alerts they get from you. For example, an e-commerce app could have separate channels for "Order Updates," "Promotions," and "Account Alerts."
This is a massive win for your relationship with the user. Instead of someone getting annoyed by promotional messages and turning off all notifications, they can simply mute the "Promotions" channel while keeping critical "Order Updates" active. You can create these channels natively, and it’s a clear signal to users that you respect their preferences.
By giving users control, you build trust. An app that respects a user's notification preferences is an app they're far more likely to keep installed and engaged with.
Make it Personal and Visually Interesting#
The most effective notifications always feel like they were written for one person. Using data you already have—like a user's name, their purchase history, or recent in-app behavior—is the key to crafting messages that connect. A generic "Check out our new items!" is easy to ignore. "Hey Sarah, we think you'll love this new item based on your recent activity" is far more compelling.
And don't forget about rich content. You can include images in your push notifications to make them visually striking and more informative. A notification about a new message is good, but one that includes the sender's profile picture is so much better.
These strategies aren't just minor tweaks; they have a measurable impact on how users respond to your messages.
Push Notification Engagement Strategies#
Here's a quick look at how different techniques stack up and the kind of results you can expect when you implement them well.
| Strategy | Description | Potential Engagement Uplift |
|---|---|---|
| Deep Linking | Takes users to specific in-app content. | Up to 2x higher conversion |
| Segmentation | Targets users based on behavior or demographics. | 30-50% higher open rates |
| Rich Media | Includes images or action buttons. | Up to 56% more opens |
| Android Channels | Allows users to customize notification types. | Reduces total opt-outs |
As you can see, moving beyond basic alerts pays off significantly. Each strategy helps make your notifications more relevant, useful, and harder to ignore.
The future of mobile is all about creating smarter, more integrated experiences. By 2025, it's expected that over 70% of businesses will lean on cross-platform frameworks like Ionic that can support these kinds of advanced features with a single codebase. Getting a handle on these engagement strategies now is what will set your app up for long-term success. You can explore more insights about the future of mobile evolution on moldstud.com.
Troubleshooting Common Ionic Notification Issues#

Even with a perfect setup, you're going to hit a wall with your ionic framework push notifications eventually. It's a rite of passage, really. The classic head-scratcher is when notifications work flawlessly on Android but seem to vanish into a black hole on iOS, or vice versa.
When you see that kind of platform-specific weirdness, it almost always points back to a configuration problem. For iOS, the usual suspects are incorrect APNs (Apple Push Notification service) keys uploaded to Firebase or a simple mistake in your Xcode project's capabilities. A missing Push Notifications capability is a surprisingly common culprit.
On the Android side, make sure your google-services.json file is sitting in the right android/app/ directory. Then, triple-check that the package name in your capacitor.config.ts matches the one in Firebase exactly. A single typo here will stop everything cold.
Diagnosing Token and Permission Problems#
Another bugbear is when a device just won't register and give you a token. If your registration event listener never fires, you know something is broken right at the start of the chain. This usually comes down to permissions.
Remember, if a user denies permission the first time, your app can't just ask again. You have to guide them into their device's system settings to enable notifications manually. This is a critical piece of the user experience you can't afford to get wrong.
When you're debugging, always, always test on a physical device. Emulators are notoriously unreliable for push notifications, and you'll save yourself hours of frustration by sticking to real hardware for your tests.
If you're seeing persistent issues, it might also be worth looking for ways to improve mobile app performance. Sometimes, underlying performance bottlenecks can mess with background processes like notification handling.
Here’s a quick mental checklist I run through for common problems:
- iOS Certificate Mismatch: Is my APNs certificate in Firebase expired? Does it match my app's Bundle ID perfectly?
- Android Package Name: Did I make a typo in the package name anywhere? Check again.
- Plugin Syncing: After changing any native config, did I run
npx cap syncto make sure those changes were actually applied?
Ready to build production-grade mobile apps without the native-development headache? With NextNative, you can transform your web skills into powerful iOS and Android applications. Skip the setup and start building today.