Develop App for iOS and Android | Build Cross-Platform Apps
Updated: October 3, 2025
Ever dream of launching your own mobile app but feel blocked by the steep learning curve of Swift or Kotlin? Good news. You can develop an app for both iOS and Android using the web development skills you already have. Frameworks like NextNative make it possible to build, test, and deploy on both platforms from a single codebase.
Build for Both Platforms With Your Existing Web Skills#
If you're a web developer, the idea of creating a mobile app can feel like starting from scratch. Traditionally, it meant learning entirely new programming languages—Swift for iOS and Kotlin for Android.
This "native" approach requires two separate projects, two development teams (or double the work for a solo dev), and a much bigger budget. It's a major barrier for small teams and independent creators.
But what if you could skip that entire learning curve? That's where cross-platform development completely changes the game. It allows you to write your code once and deploy it as a true native app on both the Apple App Store and Google Play Store.
The Power of a Single Codebase#
The core advantage is simple: efficiency. Instead of juggling two separate codebases, you maintain just one. A change to a feature, a quick bug fix, or a UI update gets done once and shows up on both iOS and Android at the same time.
This dramatically cuts down development time and ongoing maintenance costs. For a startup or a solo project, this isn't just a nice-to-have—it's often the deciding factor that makes a project possible in the first place.
This infographic breaks down the practical differences in time, cost, and code reuse between native and cross-platform approaches.
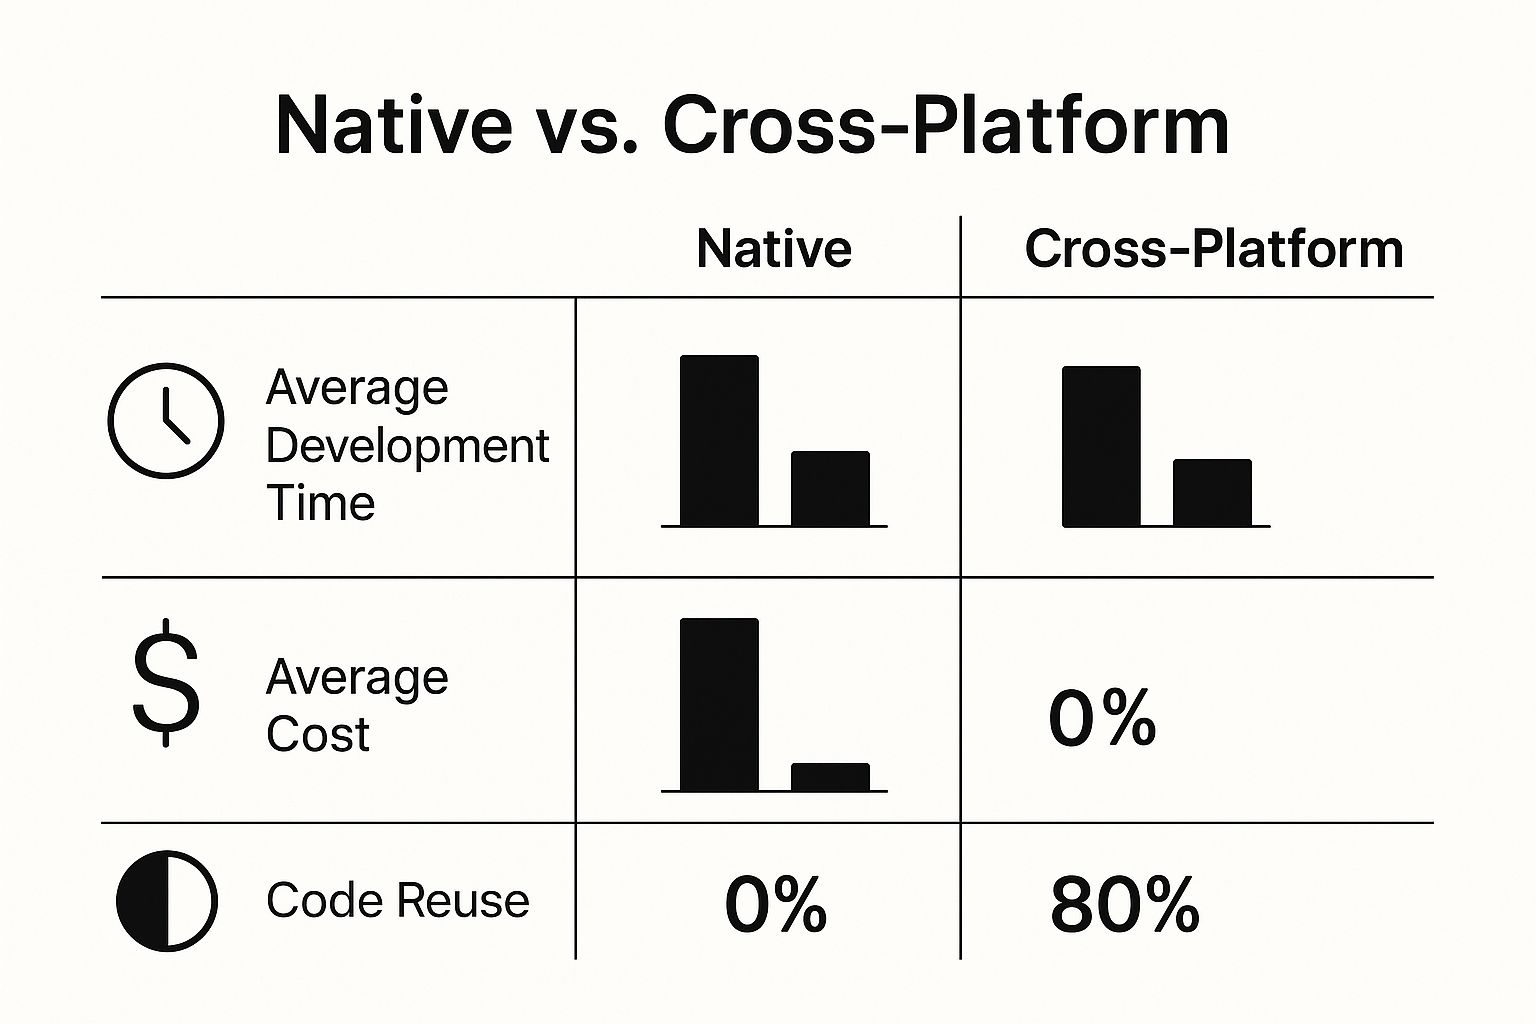
The data makes it pretty clear how a cross-platform strategy can deliver huge savings and efficiency, making it an attractive option for most projects.
To give you a quick reference, here’s a simple table that sums up the key differences between the two development paths.
Cross-Platform vs Native Development at a Glance#
| Aspect | Cross-Platform (NextNative) | Native (Swift/Kotlin) |
|---|---|---|
| Codebase | Single codebase for iOS & Android | Separate codebase for each platform |
| Team Skills | Web technologies (React, Next.js) | Specialized mobile languages (Swift, Kotlin) |
| Development Speed | Faster, launch on both platforms at once | Slower, sequential or parallel development |
| Cost | Lower, requires one team and less time | Higher, often needs two specialized teams |
| Maintenance | Simpler, update one set of code | More complex, requires updates to two codebases |
| Consistency | High, consistent UI/UX across devices | Can be inconsistent without careful management |
This table really highlights how NextNative streamlines the entire process, letting you get to market faster and with fewer resources.
Why Your React and Next.js Skills Are Your Superpower#
This is where NextNative really shines. It's built specifically for web developers who are already comfortable with React and Next.js. You can use the same components, hooks, and logic you'd use for a web application to build a mobile experience. We dive deeper into this in our guide on how to leverage React.js for mobile development.
This approach brings a few key benefits to the table:
- Faster Time-to-Market: Launch your MVP on both platforms at the same time, gathering user feedback from a wider audience from day one.
- Reduced Costs: You only need one development team (or just yourself!) familiar with web technologies, cutting labor costs significantly.
- Consistent User Experience: Ensure your app's look, feel, and functionality are consistent across all devices, strengthening your brand identity.
Cross-platform development has become a vital industry trend for a reason. Modern frameworks allow for massive code sharing while maintaining near-native performance, and businesses can cut development costs by up to 30-50%. This strategy lets companies reach a massive global audience—covering both Android's market dominance and the high-value iOS user base—from a single effort.
Key Takeaway: You don't need to be a Swift or Kotlin expert to build a high-quality mobile app. Your existing web development knowledge is your most valuable asset, enabling you to build for both iOS and Android efficiently.
Setting Realistic Expectations#
While this approach is powerful, it's best suited for most content-driven apps, e-commerce stores, social platforms, and business utility tools.
However, for apps requiring intensive 3D graphics, heavy processing like video editing, or deep integration with specific, low-level OS features, a fully native build might still be the better choice. For those exploring other popular cross-platform solutions that leverage JavaScript, you might find resources on getting started with React Native helpful.
For the vast majority of app ideas out there, a solution like NextNative provides the perfect balance of performance, development speed, and cost-effectiveness. It's all about working smarter, not harder, by using the skills you've already mastered.
Setting Up Your NextNative Development Environment#
Alright, let's get our hands dirty and set up the tools. This is the first real step to develop an app for iOS and Android, and I'll walk you through it so you can skip the confusing documentation. By the end, you'll have a clean, functional workspace ready for code.
We’ll install the essentials, spin up your first project, and configure everything so you can see your app come to life on both virtual iPhones and Android devices. A solid foundation is everything.
Installing Core Dependencies#
Before you can touch NextNative, you need a few foundational tools on your machine. The most critical piece is Node.js, which gives you the JavaScript runtime environment that powers the entire workflow.
You'll want a recent version. I strongly recommend using a version manager like nvm (Node Version Manager). Trust me, it saves a ton of compatibility headaches down the road when you’re juggling different projects that need different Node versions.
Once Node.js is ready, you can install the NextNative command-line interface (CLI) globally on your system. This little tool is your control panel for creating and managing projects. Just pop open your terminal and run this simple command: npm install -g nextnative-cli.
This command makes the nextnative keyword available everywhere in your terminal, which is what we'll use to create new apps and fire up the development servers.
Initializing Your First Project#
With the CLI installed, creating a new project is a breeze. Just navigate to wherever you keep your code and run one command to scaffold a new NextNative application.
nextnative create my-first-app
This command is doing all the heavy lifting. It creates a new folder called my-first-app, pulls down the latest NextNative template, and installs all the packages and dependencies you need. It’s like having an expert developer set up the entire project structure for you in seconds.
For a deeper dive into what the CLI can do, the official docs have a great tutorial that shows you how to ship a mobile app in just 5 minutes.
When it’s done, you’ll have a production-ready boilerplate with everything you need to start building.
Configuring Native SDKs#
NextNative handles most of the cross-platform complexity, but you still need the official software from Apple and Google to actually build and run your app on their platforms.
For iOS Development: You'll need a Mac and Xcode. You can grab it for free from the Mac App Store. Xcode bundles the iOS SDK, simulators, and all the command-line tools required to build an iOS app.
For Android Development: You'll need Android Studio, which is available for Windows, macOS, and Linux. It comes with the Android SDK (letting you install different Android versions) and the Android Virtual Device (AVD) Manager for creating emulators.
Pro Tip: When you're setting up Android Studio, pay close attention to the environment variables. Make sure
ANDROID_HOMEis set correctly in your system's path. This is how the NextNative CLI finds your Android SDK and talks to it.
Running Your App on Emulators#
With everything installed, it's time for the fun part: seeing your app run. Emulators are just virtual devices that run on your computer, so you can test your app without needing a pile of physical phones.
To run your app on an iOS simulator, cd into your project directory and run:
npm run ios
This command automatically talks to Xcode, finds an available iOS simulator, and launches your blank application on it.
For Android, the process is just as simple. First, open the AVD Manager in Android Studio and create a new virtual device. Once you have it running, execute this command in your terminal:
npm run android
This will build your app and install it on the running Android emulator. Seeing that boilerplate app pop up on both a virtual iPhone and an Android device, built from the exact same codebase, is a pretty great feeling. Your environment is now fully configured and ready for you to start building.
And as you get deeper into development, especially if you're using specific frameworks, exploring a tool like a Flutter Code Generator can seriously speed things up for both platforms.
Building Your First Screen and Navigating Between Pages#
Alright, enough with the setup. Let's get to the fun part—actually building something that looks and feels like a real app. This is where your web development skills translate directly into a native experience, and you'll see your code come to life on both iOS and Android at the same time.

We’ll build a simple two-screen app: a home screen and a details page. Then, we'll wire them up so you can tap a button on the first screen to get to the second. You'll see just how quickly a single React component can render perfectly across both platforms.
Crafting Reusable UI Components#
If you're coming from a Next.js background, the way you build UIs in NextNative will feel like home. It’s all about creating small, reusable React components. This isn't just good practice; it's the key to keeping your codebase clean and scalable as your app gets more complex.
Let's start by creating a HomePage.tsx file inside a pages directory. This component will be the main entry point for our app.
Inside, you can pull in Ionic's pre-styled components like <IonPage>, <IonHeader>, and <IonContent> to quickly scaffold a native-looking layout. These components are smart—they automatically adapt their appearance to match the platform they're on. That means you get an authentic iOS or Android look without writing a single line of platform-specific code.
Here’s a quick example of what your HomePage might look like:
import { IonContent, IonHeader, IonPage, IonTitle, IonToolbar } from '@ionic/react';
const HomePage = () => {
return (
This is the main screen of our app!
);
};
export default HomePage;
It's just a clean, simple React component. No magic, just familiar code that instantly creates a native screen with a header and some content.
Implementing Simple Navigation#
An app with just one screen isn't much of an app. People need to move around, and that's where navigation comes in. NextNative uses a powerful routing system that handles everything from page transitions and the back button to URL management, making your app feel snappy and intuitive.
To get started, we'll need a second screen. Let's call it DetailsPage.tsx. Next, we'll drop a button on our HomePage that takes the user to this new page when they tap it.
Making the button work is incredibly straightforward. We'll use a router link component. Here's how you'd tweak the HomePage to add that link:
- Import the Button: Add
<IonButton>to your import statement from@ionic/react. - Add it to the Layout: Place the
<IonButton>somewhere inside your<IonContent>. - Define the Destination: Use the
routerLinkprop to tell it where to go, likerouterLink="/details".
That one little addition connects your screens and breathes life into the app. The routing system takes care of the animated transitions, making the whole experience feel polished and professional. You can dive deeper into the full routing system by checking out the official docs on the Ionic Router for mobile apps.
This declarative approach to navigation is a game-changer. You're not manually managing screen states or transitions; you just tell the app where to go. The framework handles all the messy implementation details for both iOS and Android behind the scenes.
Passing Data Between Screens#
Static navigation is a good start, but real apps need to pass information between screens. Think about a product list on your home screen—when a user taps an item, you need to show a details page for that specific product.
This is handled with dynamic route parameters. You define a route like /products/:id and then navigate to a specific path like /products/123. The details page can then grab the id from the URL to fetch and display the right information.
Here’s a quick peek at how that works:
- On the Home Page: Your button's
routerLinkwould be dynamic, pulling in a product ID.<IonButton routerLink={/products/${product.id}}>View Details</IonButton> - On the Details Page: You'd use a hook to grab the
idfrom the route's parameters.const { id } = useParams<{ id: string }>();
If you've ever built a modern web app with a framework like Next.js, this pattern should look identical. It’s another perfect example of how your existing web development skills transfer directly, letting you develop an app for iOS and Android with speed and confidence. By sticking to familiar components and routing logic, you can build out complex, multi-screen applications without a steep learning curve.
Tapping into Native Device Features Like the Camera#
This is where the magic really happens. An app that just lives inside its own UI is fine, but one that can reach out and interact with the phone’s hardware? That feels truly native. When you develop an app for iOS and Android, getting access to things like the camera, GPS, or the user's files is what turns your project from a simple web wrapper into a powerful mobile tool. With NextNative, this isn’t some complicated, low-level headache; it's just a natural extension of the JavaScript you already know.
Let's walk through a super common, real-world scenario: building a feature that lets someone snap a photo with their device's camera and see it pop up right inside the app. This one example is all you need to see how easy it is to close the gap between your web code and the native APIs that make these devices so cool.
How JavaScript Talks to Native Code#
Under the hood, NextNative uses Capacitor to build a secure bridge between the JavaScript running in your web view and the native SDKs on iOS and Android. Think of it like a translator. Your JavaScript says, "Hey, I need to open the camera," and Capacitor translates that command into the specific Swift (for iOS) or Kotlin (for Android) code required to make it happen.
The best part? You don't have to write a single line of native code yourself. Instead, you get a clean, consistent JavaScript API for every native feature. This API smooths over all the platform-specific quirks behind the scenes, so your function call works exactly the same way everywhere.
Asking for Permission the Right Way#
Before you can touch sensitive hardware like the camera, you absolutely have to ask the user for permission. This is non-negotiable in modern mobile development and a huge part of building trust. Both iOS and Android are really strict about this, and if you get it wrong, you’re looking at a terrible user experience or even getting your app rejected from the app stores.
Thankfully, the Capacitor Camera API handles this whole dance for you. The first time you call the function to take a picture, it automatically checks if your app has the permissions it needs.
- If permission has already been granted, the camera just opens. Simple.
- If permission hasn't been granted yet, a native system prompt will pop up asking the user to allow access.
- If the user has already said "no" in the past, the function throws an error. You can catch this and show a helpful message, like guiding them to their device settings to change it.
This built-in logic takes care of one of the trickiest parts of native integration, letting you focus on what your app actually does instead of writing a ton of boilerplate permission code.
Key Takeaway: The permission request is a critical moment in your user's journey. By handling both "yes" and "no" gracefully, you create a more professional and trustworthy app. A good experience here builds confidence.
Understanding the mobile landscape is key here. The global market is a duopoly, with Android holding about 70-72% of the worldwide share, while iOS has around 28-29%. But here's the kicker: iOS users are responsible for a massive 67% of all global app spending. This makes it absolutely critical that core features like camera access work flawlessly on both platforms to maximize your reach and potential revenue. You can read more about these market share dynamics on tekrevol.com.
A Practical Camera Implementation#
Alright, let's get our hands dirty. We'll add a button that, when tapped, opens the camera, lets the user take a photo, and then slaps that image right onto the screen.
First, you'll need to install the Camera plugin:npm install @capacitor/camera
Next, you need to sync your project so the native platforms know about this new plugin:npx cap sync
Now, you can put together a simple React component to handle the logic. You'll import the Camera object from the plugin and use a state variable to hold the image path once it's taken. The main function might look something like this:
import { Camera, CameraResultType } from '@capacitor/camera';
import { useState } from 'react';
const PhotoTaker = () => {
const [imageUrl, setImageUrl] = useState('');
const takePicture = async () => {
try {
const image = await Camera.getPhoto({
quality: 90,
allowEditing: false,
resultType: CameraResultType.Uri
});
// The webPath is a temporary URL to the image
setImageUrl(image.webPath);
} catch (error) {
console.error("User cancelled or camera failed", error);
}
};
return (
{imageUrl &&
);
};
And that's it. This small snippet is all it takes to build out a complete camera feature. The
getPhoto method handles everything for you: asking for permissions, launching the native camera UI, and handing the image data back to your app. For more advanced tricks, like controlling the camera flash, check out our guide on the Capacitor camera and flash functionality.
This example proves you're not just building a website inside a box. You're creating a real, feature-rich mobile application that can tap into the core hardware of a device, opening up a world of possibilities for your project.
Preparing Your App for the App Store and Google Play#
You’ve built your app, tested it, and polished the user interface. Awesome. Now for the final boss: getting it into the hands of real users. This is where you shift from developer to publisher, learning the ropes of Apple’s App Store and the Google Play Store.

This last stretch isn't just about uploading a file. It's a game of careful preparation. You’ll need to generate the right credentials, write a store listing that actually converts, and get a handle on the review guidelines. Let's break it all down and turn this intimidating hurdle into a clear, actionable checklist.
Mastering the Apple App Store Submission#
Apple is famous for its meticulous review process, so getting your ducks in a row is non-negotiable. Everything happens inside App Store Connect, and it all starts with giving your app an official identity.
Before you can even think about submitting, you have to sort out a few technical pieces in your Apple Developer account:
- Certificates: First, you'll generate a distribution certificate. This is a cryptographic key that proves the app build is genuinely from you and not a bad actor.
- App ID: This is a unique identifier for your app, like
com.yourcompany.yourappname. It officially registers your app within Apple's ecosystem. - Provisioning Profile: This is the glue that holds it all together. This file ties your certificate and App ID to your app, giving it the green light for installation and store submission.
Once those technical bits are sorted, you can create your app listing in App Store Connect. Think of this as your digital storefront. You'll need high-quality screenshots for various iPhone and iPad sizes, a compelling app description, smart keywords for search, and a URL for your privacy policy.
Pro Tip: Don't treat your screenshots as an afterthought. They are your single most important marketing asset. Create visually appealing mockups that showcase your app's key features and benefits in action. A great first impression can dramatically increase downloads.
Navigating the Google Play Console#
Submitting to the Google Play Store is generally a more straightforward and faster process. Your mission control for this is the Google Play Console. While the review process is often quicker, a polished setup is still crucial for long-term success.
The first step is getting your application ready for release. Unlike iOS, Android requires you to digitally sign your app package yourself. You'll generate a signing key and use it to create a signed Android App Bundle (.aab)—this is the modern format Google recommends over the old APK files.
With your signed bundle ready, you’ll set up your store listing. This includes:
- Title and Descriptions: A short and a long description for your app.
- Graphics: Your app icon, a feature graphic, and phone screenshots.
- Categorization: Picking the right category and setting the content rating.
One of the biggest differences is the review time. Google's automated system often approves and publishes apps within a few hours, though it can sometimes stretch to a few days. For a complete walkthrough of all the pre-launch steps, our comprehensive mobile app release checklist covers every single detail you'll need.
Avoiding Common Rejection Reasons#
Getting that rejection email after all your hard work is a real gut punch, but most rejections are completely avoidable. Both platforms have detailed guidelines, but a few common mistakes trip up developers all the time.
Here are the top reasons apps get rejected and how to steer clear of them:
- Crashes and Bugs: This is the big one. Thoroughly test your app on multiple devices and OS versions. A stable, polished app is table stakes.
- Incomplete Information: Make sure your store listing is accurate and every required field is filled out. Don't forget a working link to your privacy policy and contact info.
- User Privacy Violations: If your app collects user data, you absolutely must be transparent about what you collect and why. This includes getting explicit consent for things like camera or location access.
- Misleading Users: Your app has to deliver on what your description and screenshots promise. Any "bait and switch" tactics will earn you a swift rejection.
The mobile app industry's growth is staggering. In 2024 alone, users downloaded approximately 218 billion mobile apps, and app-generated revenue hit over $935 billion. User engagement is incredibly high, with 70% of all digital media time in the US spent on mobile apps. These numbers show that while the submission process has its hurdles, the reward for getting it right is access to a massive and engaged audience. By preparing meticulously, you position your app to capture a piece of this thriving market.
Common Questions About Cross-Platform Development#
When you're thinking about building an app for both iOS and Android with a new approach, questions are a good sign. It means you’re thinking about the long-term health of your project. Let's dig into some of the most common things web developers ask when they start looking at a tool like NextNative.
Is This Actually Going to Perform Well?#
This is always the first question, and it's the right one to ask. Will my app feel as smooth and responsive as one built with Swift or Kotlin? The good news is that modern frameworks have come a long way.
For the vast majority of apps out there—think e-commerce stores, social feeds, or productivity tools—the performance is so good that your users will never know the difference. The UI renders using real native components, not just a clunky web view, which gives you fluid animations and snappy scrolling right out of the box.
Unless you're building a high-intensity 3D game or a complex video editor, you're not going to hit any performance walls.
How Do We Handle OS Updates?#
What happens when Apple drops a new version of iOS, or Google pushes a major Android update? This is a huge concern because breaking changes can be a total nightmare for development teams.
This is where the power of the community really shines. Because NextNative is built on well-supported, open-source foundations like Capacitor, the core teams and contributors are incredibly quick to adapt.
When a new OS version comes out, updates are typically released fast. You just update your dependencies, run a quick command to sync your native projects, and you’re back in business. It shields you from having to dive into the low-level specifics of every single OS change yourself.
Key Takeaway: You get the benefit of a massive open-source community that shoulders the burden of OS compatibility. Instead of having two separate native teams scrambling to keep up, you rely on a single, focused effort from the framework maintainers.
What About Platform-Specific Code?#
Even though NextNative lets you share almost all of your code, you'll eventually run into a situation where you need something to look or act differently on iOS versus Android. How do you handle that without turning your codebase into a tangled mess of if/else statements?
The framework gives you clean, simple ways to write platform-specific logic when you need it. You can easily check which OS the app is running on and then render a component or execute a function just for that platform.
For instance, you might want to use different icons or adjust some padding to better match the native design guidelines. It's really straightforward:
- Check the platform: Use a simple
isPlatform('ios')orisPlatform('android')check. - Apply styles conditionally: Show or hide elements or apply different CSS classes based on that check.
- Use separate component files: For more complex logic, you can even create files like
component.ios.tsxandcomponent.android.tsx.
This approach keeps your main codebase clean while giving you precise control exactly where you need it. You end up with one shared set of logic for 95% of your app and only branch off for the handful of platform-specific tweaks. It’s the perfect balance of efficiency and control.
Ready to stop worrying and start building? With NextNative, you can take the web skills you already have and ship beautiful, performant mobile apps faster than ever. Get started today and turn your idea into a reality on both app stores.