A Guide to Using a Web to App Converter for Next.js
Updated: June 27, 2025
So, what exactly is a web to app converter? Think of it as a bridge that takes your existing website and masterfully reframes it into a native mobile application. This lets you connect with users directly on their iOS and Android devices.
If you're a Next.js developer, this is a game-changer. You can use the codebase you already know and love to launch in the app stores quickly, without having to dive into brand-new mobile frameworks from scratch.
Why Turn Your Next.js Site into an App?#
Have you ever looked at your Next.js site and wondered if it could be doing more? A responsive website is non-negotiable these days, but converting it into a native app is a strategic play that can seriously boost user engagement and business growth. It’s all about moving beyond the browser and giving your brand a permanent spot on your audience's most personal device.
Let's be real about the user experience. A native app delivers a much stickier, more integrated feel than a mobile website can usually manage. When your app icon is right there on their home screen, you're always just a single tap away. That constant presence helps build a deeper, more lasting connection with your users, which almost always translates to better retention and a higher customer lifetime value.
Creating a Direct Line to Your Audience#
One of the biggest wins of going native is unlocking device features, especially push notifications. A browser tab is easily closed and forgotten, but a push notification is a direct, personal message. Imagine sending out alerts for new content, special offers, or gentle reminders to re-engage users who have been away for a bit. It’s a powerful tool for keeping your brand top-of-mind in a way that email or social media just can't replicate.
The real advantage here is presence. An app doesn't just live on the internet; it lives on your user's device. This creates a persistent and direct link that a mobile website simply can't match.
Before we go further, it's helpful to see a direct comparison of how these two approaches stack up.
Mobile Web vs Native App Key Differences#
Here’s a quick breakdown of the core differences between a mobile website and a native app, especially when it comes to user engagement and growing your business.
| Feature | Mobile Website | Native App |
|---|---|---|
| Accessibility | Accessible via browser, requires URL | One-tap access from home screen |
| Push Notifications | Limited or no support | Fully supported, direct engagement |
| Offline Access | Generally requires an internet connection | Can be designed for offline functionality |
| Performance | Dependent on browser speed and network | Faster, optimized for the device hardware |
| User Engagement | Lower; users are more likely to bounce | Higher; users spend more time in-app |
| Monetization | Primarily ads and direct sales | In-app purchases, subscriptions, ads |
As you can see, while a mobile site is great for initial discovery, a native app excels at building long-term relationships and driving repeat engagement.
Unlocking Higher Engagement and Conversions#
The numbers don't lie. People are far more engaged and spend significantly more time inside apps compared to mobile browsers. With over 6.3 billion smartphone users worldwide, a staggering 90% of their mobile internet time is now spent within apps.
This preference has a huge impact on business goals. On average, apps boast a conversion rate that's 157% higher than mobile websites. By using a web to app converter, you’re effectively plugging into this highly engaged audience. If you want to dig deeper into the strategy, you can find a lot more information in our detailed comparison of a mobile website vs a mobile app.
For anyone running on Next.js, this is a massive opportunity. You get to build on your fast, powerful web foundation to take advantage of these app-centric behaviors. Making the jump from web to mobile app isn't just a technical change; it's about fundamentally upgrading your relationship with your users and opening the door to new growth.
Getting Your Next.js Project Ready for Mobile#
So, you’re thinking about turning your Next.js site into an app. Before you even touch a web to app converter, let's talk about prep work. Think of it like a pre-flight check for your project. Just wrapping a clunky website in a native shell isn't going to cut it—users will see right through it. To get this right, your web project needs to be primed for a smooth transition.
The secret to a great mobile app experience starts with a truly mobile-first design. And I don't just mean responsive layouts. I'm talking about deeply considering how your site feels on a small touchscreen. If the user experience is even slightly awkward on a mobile browser, it’ll feel ten times worse inside an actual app.
Put on your "mobile user" hat and start auditing your project. Can you easily tap buttons with your thumb without hitting something else by mistake? Is the navigation simple and intuitive? These details aren't just nice-to-haves; they're essential for an app that people will actually enjoy using.
Fine-Tuning for Mobile Performance#
In the mobile world, speed is king. App users are notoriously impatient and expect everything to be instant and fluid. Your Next.js site might fly on a desktop with a great Wi-Fi connection, but you can't count on that for mobile users. They're often dealing with slower networks and less powerful devices.
This is where you need to get ruthless with your optimizations. Your goal is to make the application feel incredibly snappy, even when conditions are far from perfect.
A great place to begin is by implementing some aggressive performance-boosting tactics.
- Lazy-Load Everything: Don't just stop with images. Get into the habit of lazy-loading components, videos, and any asset that isn't absolutely critical for that first screen paint. This makes a huge difference in how fast your app initially loads.
- Compress Your Assets: Squeeze every last kilobyte out of your images and other files. Use modern formats like WebP and run everything through compression tools. Trust me, every single byte you save counts on a mobile data plan.
- Embrace Code-Splitting: Next.js makes this easy with dynamic imports. By splitting your code into smaller chunks, you ensure users only download the JavaScript they need for the specific page they’re on.
Nailing these optimizations creates a lightweight, speedy foundation that will directly translate into a much better in-app experience. Remember, your web code is the core of your app, so this work is non-negotiable. For a deeper look at this, our guide on how to build cross platform mobile apps has some more advanced strategies you can check out.
Auditing Your Dependencies and Logic#
The last piece of the puzzle is taking a hard look at your project’s dependencies and server-side logic. When you use a web to app converter like NextNative, your site runs inside what's called a webview. It's a powerful little browser environment, but it has its own quirks compared to Chrome or Safari on a desktop.
You need to pinpoint any part of your Next.js app that leans heavily on server-side rendering (SSR) or browser-specific APIs, as these might not behave quite the same inside a mobile app's webview.
For instance, while Next.js API routes work perfectly fine in the NextNative environment, it’s always a good idea to review them. Make sure they’re lean, efficient, and secure enough for mobile access.
Now, pop open your package.json file. Do you see any libraries that are purely for browser-based tricks, like directly messing with the browser's history API? Those might need to be rethought or replaced with a more app-friendly approach. This audit is your best defense against weird, unexpected bugs and is the key to making sure every feature transitions perfectly from your website into its new life as a mobile app.
Alright, let's get into the good stuff. Now that your Next.js project is all prepped and ready for its mobile close-up, it’s time to roll up our sleeves and see how a web to app converter like NextNative actually works. This is where we take all your hard work and transform it from a website into a real, native app for both iOS and Android. My goal here is to pull back the curtain and show you just how smoothly this tool connects your web code to the mobile world.
The whole idea is pretty clever. NextNative is essentially a powerful command-line interface (CLI) bundled with a bunch of pre-configured tools that do all the heavy lifting for you. So instead of you having to wrestle with the complexities of Xcode and Android Studio from the ground up, NextNative just automates it all. It creates those native projects and wraps your Next.js application inside a high-performance webview.
If you’re already comfortable in the JavaScript world, you’ll feel right at home. It all starts with installing the NextNative CLI on your machine, which gives you all the commands you need to get your mobile app initialized, configured, and built.
This infographic paints a great picture of the overall journey.
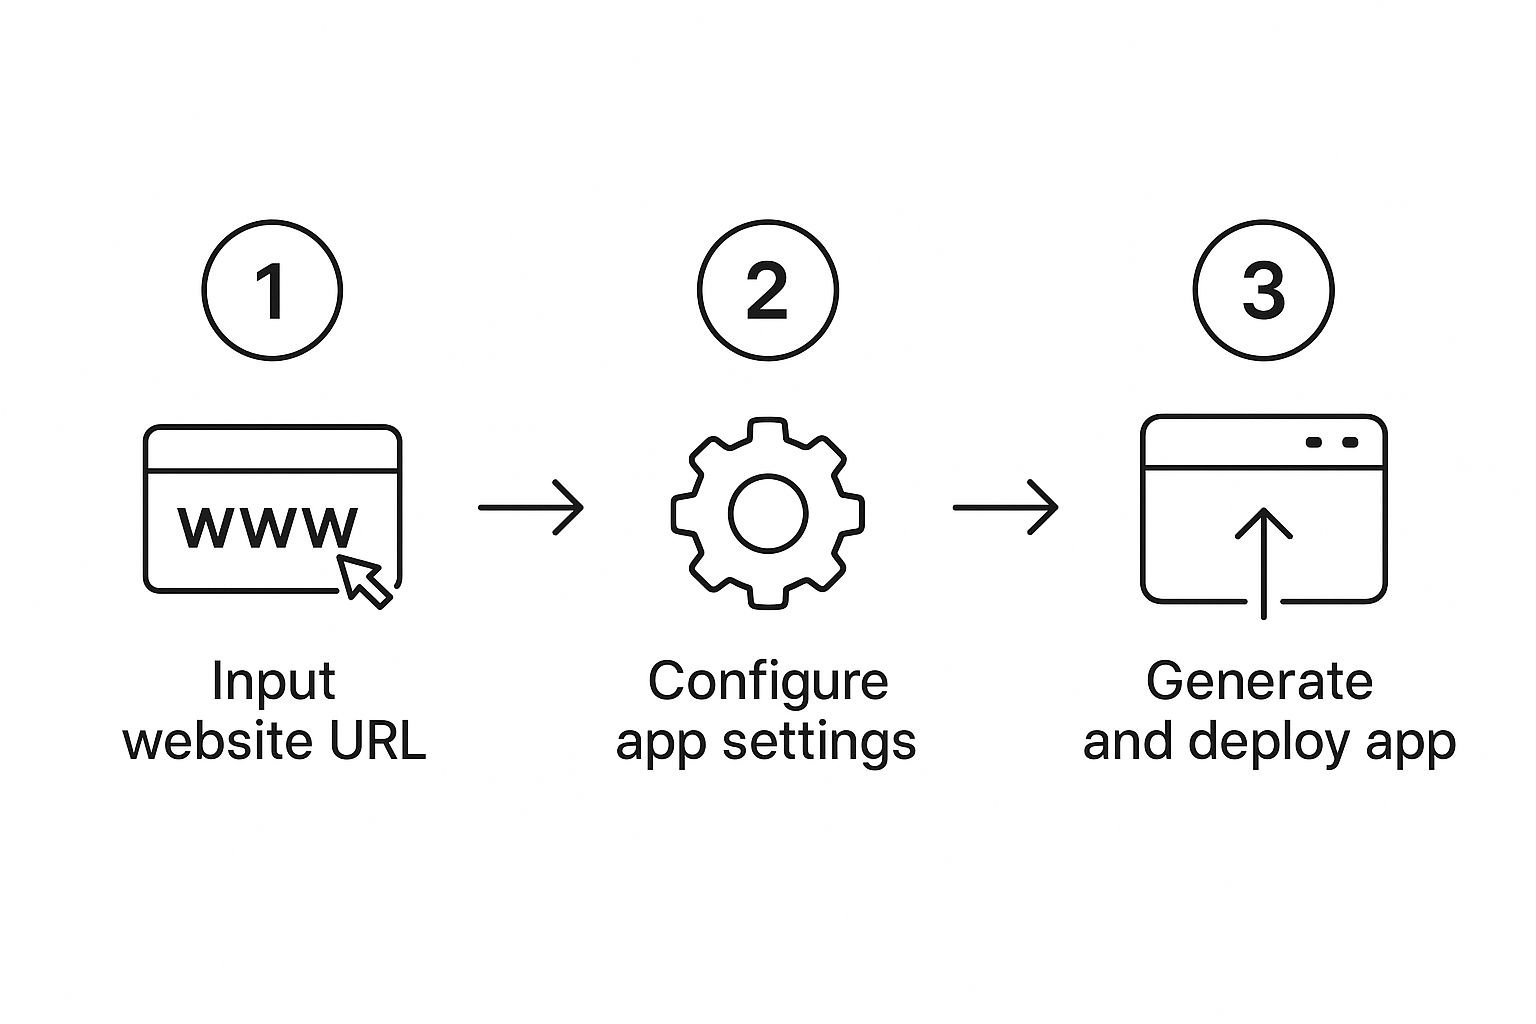
As you can see, it’s a pretty logical path: you feed it your web assets, tweak some settings, and out pops a deployable app. The configuration is really the secret sauce that makes it all come together.
Kicking Off Your Native Project#
First things first, you'll need to grab the NextNative CLI tool using npm. Just pop open your terminal and run this command:
npm install -g nextnative
Once that's finished, navigate your terminal into the root directory of your Next.js project. This is your home base for the entire process. From here, you’ll run the command that gets the ball rolling.
nextnative init
This kicks off an interactive setup process that walks you through the essentials. The CLI will ask for a few key pieces of information to define your new app:
- App Name: This is what users will see on the App Store and Google Play.
- Bundle ID: A unique ID for your app, usually in a reverse-domain style (like
com.mycompany.myapp). - Target URL: The live URL of your Next.js site. This is what the native app will load. For testing, you can just point this to your
localhostaddress.
This interactive setup is a massive time-saver. It automatically generates the ios and android directories right inside your project, filled with all the boilerplate configurations you'd otherwise spend hours setting up by hand.
The real magic here is the automation. NextNative creates fully configured Xcode and Android Studio projects for you, linking them to your web code without you ever having to touch a line of Swift or Kotlin.
Nailing Your App's Look and Feel#
With the basic project structure in place, it’s time to add your brand’s personality. This is all about customizing the visual elements users see right when they open the app—before your Next.js site even has a chance to load. Getting this right is crucial for a polished, professional first impression.
Inside the new native directories, you'll find placeholder files for these assets. Your job is to simply replace them with your own.
- App Icons: You’ll need to provide icons in a few different sizes for various devices. NextNative makes this easy; you provide a single source image, and the build process handles all the resizing for you automatically.
- Splash Screens: This is the image that appears for a moment while your app launches. A sharp-looking splash screen not only looks great but also makes the app feel like it's loading faster.
Next, you'll want to open up the main configuration file, which is usually a capacitor.config.ts file in your project's root. Here, you can fine-tune your app’s behavior. For example, you can set the app shell's background color to match your brand, which prevents that jarring white flash while the webview loads. This is also where you can configure more advanced things, like server-specific rules or permissions.
Handling Platform-Specific Permissions#
Any mobile app that needs to access device hardware—like the camera, GPS, or push notifications—has to ask the user for permission first. This is a core security feature on both iOS and Android. A web to app converter like NextNative makes managing these permissions much less of a headache.
For Android, you'll mostly be working in the AndroidManifest.xml file. On iOS, you'll handle permissions in the Info.plist file.
Let's imagine your Next.js app has a feature where users can upload a profile picture. To make that work, you'd need to request access to the camera and photo library.
- For iOS (
Info.plist): You’d add keys likeNSCameraUsageDescriptionandNSPhotoLibraryUsageDescription. With these, you also provide a short, user-friendly string explaining why you need access (e.g., "We need access to your camera so you can take a new profile picture."). - For Android (
AndroidManifest.xml): You’d add<uses-permission>tags forandroid.permission.CAMERAandandroid.permission.READ_EXTERNAL_STORAGE.
Getting permissions right isn't just a technical detail; it's a make-or-break requirement for getting approved by the app stores. Both Apple and Google are incredibly strict about apps that request permissions without a clear reason.
NextNative’s structure keeps these platform-specific files neatly organized, so you can easily manage these critical settings without getting lost. This streamlined approach is what makes turning your web project into a mobile app not just possible, but genuinely practical.
Integrating Must-Have Native Mobile Features#
Alright, getting your Next.js site packaged into an app is a huge win. But where the magic really happens is when you start weaving your web code together with the device's own native powers. A simple wrapper is one thing, but an app that feels like it belongs on the phone? That’s the goal. This is what separates a truly great app from just a website in a container.
Using a web to app converter like NextNative does more than just give your site a home screen icon; it opens up a powerful bridge to the device itself. This is your chance to build experiences that are flat-out impossible in a web browser, making your app far more valuable to your users.
Let's move beyond the webview and start tapping into the hardware and software that make these devices so personal and useful.
Unlocking Push Notifications for Engagement#
Let's kick things off with the heavy hitter: push notifications. For many, this is the entire reason to turn a website into an app in the first place. Push notifications are your direct line to your users, letting you pull them back in with timely, relevant updates long after they've navigated away.
Just imagine what this means for a Next.js-powered e-commerce store. You could send out notifications for:
- Abandoned Carts: A gentle nudge about the items they left behind.
- Price Drops: An exciting alert when a product on their wishlist goes on sale.
- New Arrivals: A heads-up about fresh products you know they'll love.
NextNative makes this surprisingly straightforward with a clean JavaScript API. Right from your Next.js code, you can trigger the native permission prompt. Once a user opts in, you can use a service like Firebase Cloud Messaging (FCM) to send targeted messages straight to their device, boosting retention and driving them back to your app.
Accessing the Camera and Photo Library#
Another game-changer is getting access to the device's camera and photo library. If your Next.js app involves any kind of user-generated content, this is an absolute must-have. Think about a social platform where users need to upload a profile picture or share photos in a post.
Without this, your users are stuck with a clunky, generic file-picker. With the NextNative API, however, you can call the native camera UI or photo gallery directly from a button in your web code. This creates a smooth, intuitive flow that people expect from a polished mobile app. It's often just a few lines of code, but the leap in user experience is massive.
The whole idea is to swap clunky web interactions for fluid, native ones. When someone taps "Upload Photo," they should see the familiar iOS or Android camera, not some generic file browser. That's the difference a good web to app converter makes.
This integration also builds a ton of trust. Users are inherently more comfortable using their device's built-in, secure interfaces to handle personal photos and files.
Enhancing Security with Biometrics#
How do people log into your app? Punching in passwords on a tiny keyboard is a drag and a common point of failure. This is where biometric authentication—like Face ID or a fingerprint scan—can be a lifesaver. Adding this gives you a secure, almost invisible login experience that users genuinely appreciate.
With NextNative, you just call a simple API function that triggers the device's biometric prompt. If the scan is successful, your app gets the green light, and you can log the user in. Not only does this make your app feel more modern and secure, but it also slashes login friction, which has a direct impact on how often people use your app.
Leveraging Geolocation for Context#
For tons of apps, knowing a user's location unlocks a world of personalization. A retail app can point out nearby stores. A travel app can suggest local hotspots. A news app can surface stories relevant to where the user is right now.
NextNative gives your Next.js code a way to request location permissions and tap into the device's GPS data. You can grab the user's current coordinates and use them to serve up incredibly relevant, contextual content. This makes for a much smarter and more helpful experience that adapts to the user's real-world environment.
These native tie-ins are more critical than ever. The web-to-app conversion channel saw a staggering 77% year-over-year growth, driven largely by tools that create these seamless journeys. As more users make the jump from web to app, delivering these superior, native-feeling experiences is what will keep them around. For a deeper dive into this trend, check out these mobile conversion insights.
And these features are just the beginning. The world of native integration is huge, and many cross-platform app development tools are working to make this bridge between web and native even stronger. By thoughtfully integrating these capabilities, you can ensure your Next.js app delivers an experience that truly stands out from the crowd.
Alright, you’ve built your app. That's a huge milestone, but we're not quite at the finish line yet. Now comes the part that really separates the great apps from the ones that get uninstalled in minutes: testing.
This is your chance to catch every bug, smooth out every rough edge, and make sure the user experience is rock-solid before it goes live.
Putting Your App Through Its Paces#
Before you even think about submitting to the stores, you need to see how your creation holds up in the wild. The best way to do this without a drawer full of phones is by using the simulators and emulators that come with Xcode (for iOS) and Android Studio.
These tools are fantastic for mimicking a whole range of devices. You can test how your app looks and feels on everything from a brand new iPhone 15 Pro Max to an older, smaller Android phone.
Hunting for Real-World Glitches#
Fire up the iOS simulator and the Android emulator and start poking around. Your mission is to find and squash issues that only pop up under certain conditions.
Here’s what I always look for:
- Weird Layouts: Does your beautiful Next.js design suddenly look all wrong on a small iPhone SE screen? Or maybe it feels too stretched out on a big Android tablet? Check every single page.
- Performance Hiccups: See how the app runs on a simulated older device. Is there a noticeable lag in animations? Do pages take too long to load? Users have very little patience for slowness.
- Native Feature Flakiness: This is a big one. You need to test every single native feature you've integrated. Do push notifications pop up when they should? Does the camera open instantly? Is Face ID or fingerprint login working every time?
Remember, people download an app expecting it to feel like an app, not a website crammed into a container. Every little bit of friction can lead to a quick uninstall. For a deeper dive into why this matters, our guide on the best cross-platform frameworks offers some great perspective on what users expect.
Creating Your Store-Ready Files#
Once you're confident your app is stable, fast, and bug-free, it's time to package it up for the stores. This involves creating the final build files that Apple and Google require for submission.
The process is a bit different for each platform:
- For iOS: You'll use Xcode's "Archive" function. This compiles everything and spits out an
.ipafile. This is the package you'll upload to App Store Connect. - For Android: Over in Android Studio, you'll generate a signed
.aab(Android App Bundle). This is the modern format that lets Google Play deliver a smaller, optimized app to each specific user device.
The submission process itself can feel like a maze, but it really just boils down to being thorough. Spend time on your app's metadata—the screenshots, description, and privacy policy. This is your storefront, your first and best chance to convince someone to hit that "Download" button.
Getting Through the App Store Review#
With your build files in hand, the last hurdle is the review process. Both Apple and Google have notoriously strict guidelines, and getting a rejection is practically a rite of passage for new developers. I've been there, and it's usually for a few common reasons.
Be ready to explain why your app needs certain permissions. If you're asking for camera access, your app store listing needs to make it clear what for. Also, make sure your app doesn't crash and actually provides a real benefit over just visiting your website on a mobile browser. This is where a quality web to app converter truly shines, by helping you build that rich, native experience reviewers are looking for.
A key metric here is the web-to-app conversion rate—basically, how many of your website visitors end up installing the app. A healthy rate shows that people see real value in the app version. You can discover more insights about this important metric to get a better handle on what drives user adoption. Once you clear this final review, your Next.js app will officially be live for the world to download.
Got Questions About Turning Your Next.js Site Into an App?#

It’s completely normal to have a few questions before diving in. The idea of taking your existing web project and turning it into a real mobile app is exciting, but you want to make sure you're making the right call. I get it.
Let’s walk through some of the most common questions developers ask when they're considering this path.
But Will It Feel Like a Real Native App?#
This is probably the number one question I hear. Honestly, it can get incredibly close, but it’s important to know it won't be a 1:1 match for an app built from scratch in Swift or Kotlin. Your app essentially runs in a super-optimized webview, which is like a lightweight, powerful browser without the extra chrome.
Modern webviews are impressively fast. So, if your Next.js site is already speedy—think lazy-loaded images, smart code-splitting, and optimized assets—that performance will translate directly to the app. Most users won't know the difference. Your web performance is your app performance.
What’s the Catch With Maintenance?#
This is where you'll really start to love this approach. One of the biggest wins is having a single codebase. When you push an update to your Next.js website, your iOS and Android apps get that same update the next time a user opens them. It's that simple.
You get to sidestep the massive headache of juggling three separate development cycles. The only "native" maintenance you'll typically face is updating the underlying framework (like Capacitor) every so often or making small tweaks for new OS requirements from Apple and Google. It's a world away from managing three distinct projects.
The mantra here is "write once, deploy everywhere." You get to pour all your energy into making your Next.js app better, and your mobile presence just comes along for the ride. It's a game-changer for long-term development.
Can I Still Use My Favorite Next.js Features?#
Mostly, yes! All the good stuff—API Routes, dynamic imports, the next/image component—works just as you'd expect inside the NextNative wrapper. At its heart, it's still your Next.js site.
The only things you'll want to watch out for are niche JavaScript libraries that were built exclusively for a traditional desktop browser environment. In some rare cases, you might need to find a mobile-friendly alternative. But for the vast majority of projects, your existing skills and code will transfer over seamlessly.
If you're weighing different hybrid options, it helps to know the landscape. We put together a Capacitor vs React Native comparison that digs into the technical nuances and might give you some extra clarity.
Is This a Good Long-Term Strategy?#
Absolutely. This isn't just some quick-and-dirty trick to sneak into the app stores. Building hybrid apps with web tech is a mature, battle-tested strategy used by some seriously big companies.
It lets you and your team move fast, use the web development skills you already have, and deliver a great experience on every platform. And as web technology keeps getting better, the line between what you can do on the web versus in a native app gets blurrier every year. This makes it a solid, future-proof bet.
We've gathered some of the most frequent questions developers have into a quick-reference table. This should help clear up any lingering doubts you might have about the process.
| Frequently Asked Questions |
| :--- | :--- |
| Question | Answer |
| Can I use native device features like the camera or GPS? | Yes! Using Capacitor plugins, you can easily access native hardware features directly from your JavaScript code, giving you the best of both worlds. |
| How does app store submission work? | You'll use Xcode for iOS and Android Studio for Android to build the final app package (.ipa or .aab) and submit it to the App Store and Google Play, just like any other native app. |
| Will my app work offline? | You can implement offline support using service workers and caching strategies, just like you would for a Progressive Web App (PWA). This allows your app to function even without an internet connection. |
| Is this approach secure? | Yes. The app runs in a sandboxed webview, and you can implement standard web security practices (HTTPS, secure authentication) to protect your users and data. Native-level security is also handled by the underlying platform. |
Hopefully, this FAQ gives you the confidence to move forward. The hybrid approach really does offer a fantastic balance of speed, cost-effectiveness, and a great user experience.
Ready to stop juggling multiple codebases and finally launch your mobile app? NextNative gives you the production-ready boilerplate and tools to convert your Next.js project into a store-ready iOS and Android app in a fraction of the time. Check out NextNative and start building today!