Build React JS Mobile Apps Like a Pro | Ultimate Guide
Updated: September 16, 2025
For any React developer, the idea of building react js mobile apps can feel like stepping into a whole different world. But what if you could just… not? What if you could use the exact skills you already have? That’s the entire idea behind NextNative, a toolkit designed to bridge the gap between your web expertise and native iOS and Android development.
Why Use NextNative for React JS Mobile Apps#
Jumping from web to mobile development usually means a steep learning curve, forcing you to pick up languages like Swift or Kotlin. NextNative flips that script. It lets you build genuinely native, high-performance apps using the React and Next.js foundation you already know and love.
This isn't just about reusing a few snippets of code. It's about creating a single, unified workflow where your web and mobile projects share one codebase. This leads to dramatically faster development cycles, way easier maintenance, and a consistent user experience across every platform. You get direct access to a rich ecosystem of native device features without ever leaving your familiar JavaScript environment.
The Power of a Unified Codebase#
The core benefit here is simple: efficiency. Instead of juggling separate teams or codebases for web, iOS, and Android, you can consolidate everything. A single feature update can be deployed everywhere at once.
This is a game-changer, especially for startups and small teams where every minute counts. If you're curious how specialized teams handle this, you can explore dedicated React development services that are built around these kinds of unified workflows.
The chart below really puts the framework's impact on development speed and community adoption into perspective.
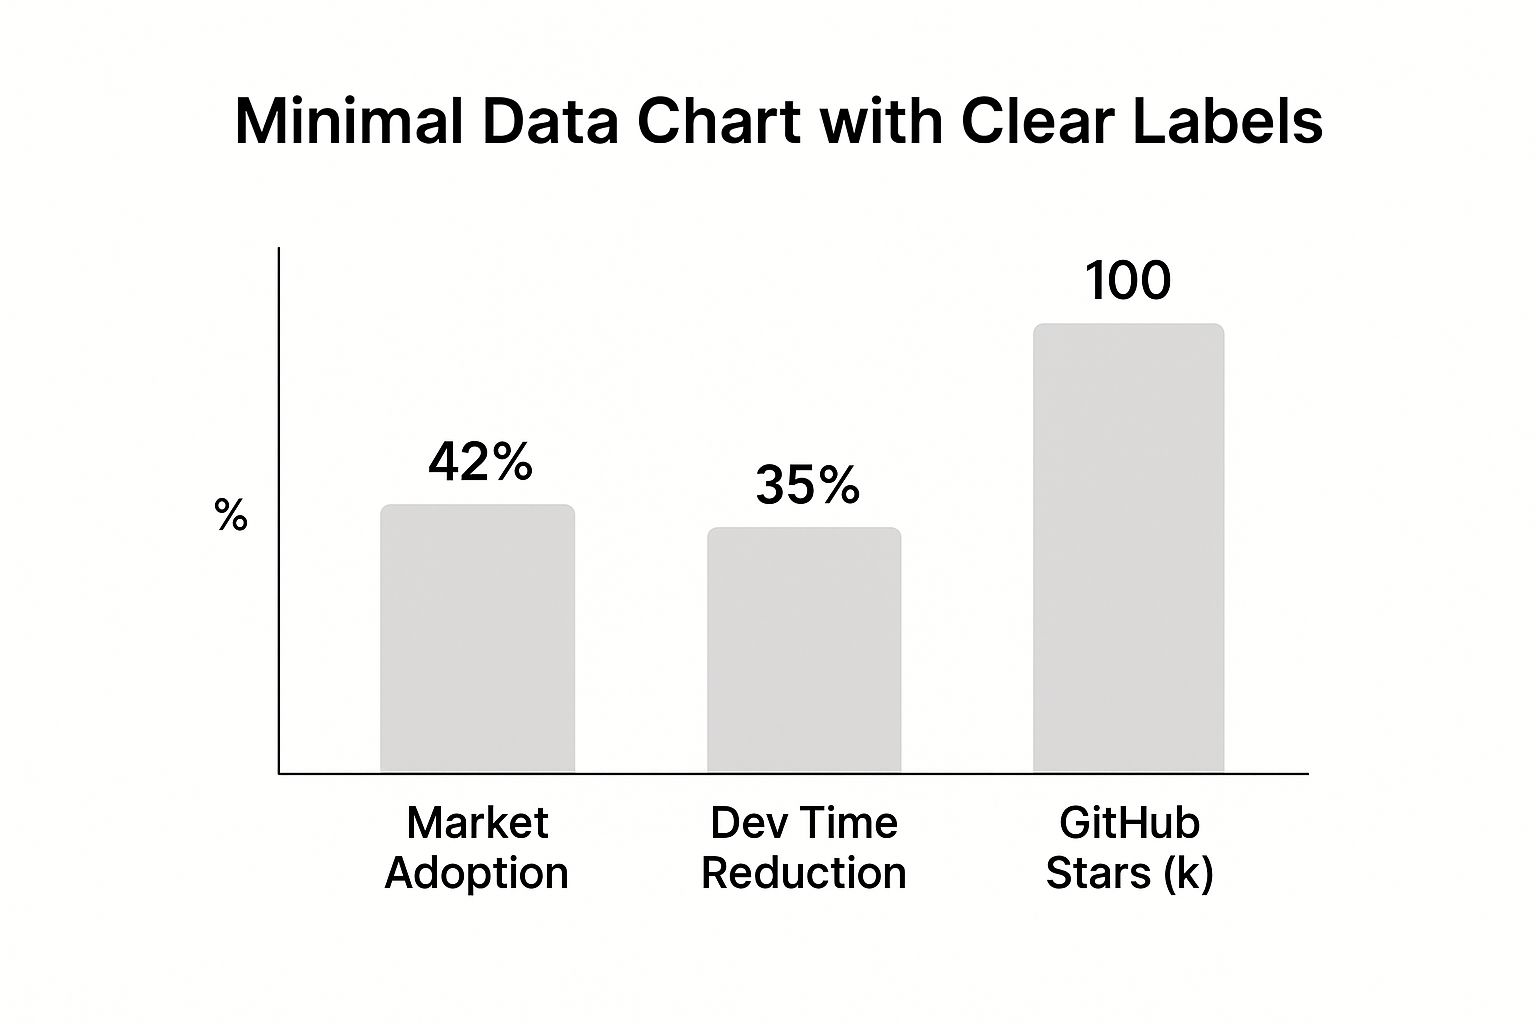
The data speaks for itself—a strong developer community and major cuts in development time really underscore the value here. To see what this looks like in the wild, check out some real-world examples in the project showcase.
Growing Market Adoption#
The momentum behind this approach is impossible to ignore. The share of new apps using React Native climbed from 4.73% in 2022 to 6.75% in 2024, making it the top non-native framework on the Apple App Store. This isn't just a trend; it's a clear signal of strong industry confidence and a robust future for React-based mobile development.
To give you a better idea of how NextNative changes the game, here’s a quick comparison with the traditional way of doing things.
NextNative vs Traditional React Native Development#
This table breaks down the key differences and shows where the NextNative approach really streamlines the process for React JS mobile apps.
| Feature | Traditional React Native | NextNative Approach |
|---|---|---|
| Project Setup | Manual setup of separate native projects (iOS/Android) | One command scaffolds a single project for web, iOS, and Android |
| Codebase | Primarily for mobile; web is a separate project | Truly unified; share components, logic, and pages seamlessly |
| Workflow | Juggling different build tools and environments | A single, consistent workflow across all platforms |
| Development Speed | Slower due to context switching and duplicated effort | Significantly faster; build once, deploy everywhere |
| Web Integration | Requires a separate web app and complex state management | Web and mobile are two outputs of the same codebase |
As you can see, the NextNative model is all about removing friction and letting you focus on building features, not fighting with configuration.
By embracing a unified framework like NextNative, you’re not just saving time; you're future-proofing your application. It allows you to focus on building compelling features that work everywhere, ensuring your mobile app feels perfectly at home on any device.
Configuring Your Development Environment#
Before you write a single line of code for your react js mobile app, you need to get your workshop in order. Setting up your development environment correctly is the single most important first step you can take. A clean, properly configured setup will save you from countless headaches down the road. Let's walk through exactly what you need.
The bedrock of any modern JavaScript project is Node.js. It’s not just a runtime environment; it gives you access to npm (Node Package Manager), which is your command center for installing all the tools and libraries your project will rely on. Stick with the latest Long-Term Support (LTS) version—it's the best way to ensure stability and compatibility across the board.
Installing Platform-Specific SDKs#
With Node.js in place, it's time to tackle the platform-specific tools. This is where many developers, especially those coming from a pure web background, hit their first snag.
If you plan on building for iOS, you'll need a Mac and Xcode, which you can grab right from the App Store. Xcode is a massive Integrated Development Environment (IDE), but it’s non-negotiable because it bundles everything you need:
- The iOS SDK: All the core libraries and frameworks required to build iOS apps.
- The iOS Simulator: An essential tool for running and testing your app on virtual iPhones and iPads.
- Command-line tools: These are critical for the NextNative CLI to build and interact with the native iOS project files.
For Android development, you’ll need Android Studio. This is Google's official IDE, and it's available for Windows, macOS, and Linux. It comes packed with the Android SDK, virtual device managers for emulators, and other essential build tools. A common pitfall here is forgetting to set up your environment variables, like ANDROID_HOME, which tells your system where to find the SDK.
Getting your environment right from the start is non-negotiable. A misconfigured path or a missing dependency can lead to cryptic build errors that are an absolute nightmare to debug. Take your time here; a few extra minutes now will save you hours of frustration later.
Getting the NextNative CLI#
Once the core dependencies are ready, the final piece of the puzzle is the NextNative Command Line Interface (CLI). This handy tool will orchestrate your entire development workflow, from scaffolding a new project to firing it up on your devices.
You can install it globally with npm, making it accessible from any directory on your machine. Just pop open your terminal and run:
npm install -g nextnative-cli
This one command makes the nextnative keyword available in your terminal, ready to create and manage your projects. If you're curious about what happens under the hood during project creation, our guide on how to create a Next.js app offers some great background.
The NextNative homepage, pictured below, perfectly captures the goal: unifying web and mobile development into a single, cohesive workflow.

This is exactly what our properly configured environment enables. By the end of this process, you'll have a professional-grade setup ready to build, run, and test your first mobile project without a hitch.
Alright, with your development environment all set up, it's time for the fun part: actually building your first react js mobile app. We'll kick things off with the NextNative CLI, which will feel right at home if you've ever used tools like create-react-app. This is where we move from theory to a real, working application.
Getting a new project off the ground is as simple as a single command in your terminal. That one line scaffolds a complete, cross-platform app structure, saving you from the headache of manual setup. Think of it as laying down a professional-grade foundation for your app in a matter of seconds.
Taking a Look Around the Project Structure#
Once the CLI does its thing, you’ll see a neatly organized project directory. Let's take a quick tour of the key folders you'll be spending most of your time in. Getting a good feel for this layout now will make development much smoother down the road.
- The
app/Directory: This is the heart and soul of your application. Just like in a standard Next.js project, this is where your pages, layouts, and API routes live. The real magic is that these same files will power your mobile app's screens and navigation. - The
components/Directory: This is a dedicated spot for all your reusable UI components. It's where you'll build out buttons, cards, and other elements that you want to share across both your web and mobile apps, keeping the look and feel consistent everywhere. - The
next-native.config.jsFile: Think of this as the control panel for your mobile build. You'll manage app-specific settings here, like the app's name, its bundle identifier, and permissions for native features.
If you're eager to get a quick win, the official docs have a fantastic guide that shows you how to https://docs.nextnative.dev/tutorials/ship-in-5-minutes.
Firing Up the Emulators#
Now for the moment of truth. Let's get the app up and running on both an iOS simulator and an Android emulator. From your project's root directory, you'll just need to run a couple of simple commands to launch the development servers for each platform. The very first build might take a minute while it compiles all the native code, but don't worry—every launch after that will be much faster.
Once the builds finish, you'll see your new app's default home screen pop up on both virtual devices. This is a huge milestone! You're now looking at a genuine native application built entirely from your React and JavaScript codebase.
The most satisfying part of this whole process is seeing live reloading in action. This isn't some watered-down web feature; it's fully baked into the native development workflow. Every change you save in your code instantly reflects on your emulators without needing a full rebuild.
Let's try it out. Open the main page file in your editor and change the welcome text. As soon as you hit save, watch both the iOS and Android screens update in real time. This immediate feedback loop is what makes building react js mobile apps with NextNative so productive and, honestly, so much fun. It completely changes the game, letting you iterate and experiment at an incredible speed.
A great mobile app shouldn't just look like it belongs on a phone—it should feel like a natural part of the device itself. This means going beyond displaying content and tapping directly into the hardware. This is where your React JS mobile apps can really come alive, bridging the gap between your web code and the powerful, native capabilities of the phone.
It's a huge reason why frameworks built on React Native are exploding in popularity. The ability to write your logic once and have it work across both iOS and Android is a game-changer for development overhead. The numbers back it up: React Native's global market was valued at $325 million in 2024 and is expected to hit around $499 million by 2031. You can get the full scoop on this growth over at IntelMarketResearch.com.
Integrating the Device Camera#
Let's start with a classic and incredibly useful feature: the camera. Say you're building a social app and want users to update their profile picture. Instead of making them hunt through their photo library, why not just let them snap a new one on the spot?
NextNative makes this surprisingly simple. We can pull in a pre-built Capacitor plugin that gives our JavaScript a direct line to the native camera UI. A single function call from our React code is all it takes to open the camera.
Here's the basic play-by-play of how it works in a real app:
- First, you'd install the Capacitor camera plugin into your project.
- The first time a user tries this feature, the app has to ask for permission. This is non-negotiable for privacy and functionality, and the plugin handles showing the proper native permission prompts for you.
- A function call like
Camera.getPhoto()opens the device’s camera interface. - Once they take the picture, that function returns the image data right back to your code. From there, you can display it in the UI or upload it to your server.
The best part? This entire flow is managed with the familiar async/await syntax you already use in React. All the messy native code is completely abstracted away. For a deeper look at the actual code and setup, we've put together a detailed guide on integrating native device features.
Setting Up Push Notifications#
Push notifications are another must-have for keeping users in the loop. They're a direct line to your audience, perfect for alerts, updates, or personalized messages. While setting them up can seem intimidating, the process is broken down into a few manageable pieces.
You'll need to configure your app to talk to platform-specific services like Apple Push Notification service (APNs) for iOS and Firebase Cloud Messaging (FCM) for Android.
The real magic of a toolkit like NextNative is that it gives you a single, unified API for both platforms. You write the logic to handle an incoming notification just once, and it works perfectly whether your user is on an iPhone or an Android.
The general workflow looks something like this:
- Configuration: You'll start by adding your FCM and APNs credentials into your project's configuration files.
- Token Registration: When a user opens the app, it requests a unique push token from the native platform and sends that token to your server. This token is like a mailing address for the device.
- Sending a Notification: Your backend server uses that token to send a message through FCM or APNs, which then delivers it to the user's device.
- Handling the Notification: Your React code listens for these incoming notifications, allowing you to react in real-time—maybe by showing an in-app alert or navigating the user to a specific screen.
By implementing features like camera access and push notifications, your app evolves from a simple web view into a powerful, truly native tool. These two examples provide a solid blueprint for integrating all sorts of other native APIs, from accessing the file system to using geolocation.
You've built something incredible, and now it’s time to get your react js mobile app into the hands of users. This is the final, crucial step: prepping your application for both the Apple App Store and Google Play Store. The whole deployment process can feel like a maze, but when you break it down, it's completely manageable.
Your app's first impression happens before it even fully loads. That's where polished assets like app icons and splash screens come into play. They aren't just for looks; they establish your brand and make the user experience feel professional from the very first tap.
Essential Pre-Launch Assets#
Before you even think about building the final release, you need to get your visual assets sorted. Both app stores have very specific requirements for icons and promotional images, and getting this wrong can lead to an instant rejection.
- App Icons: You'll need a whole set of different sizes for your app icon. These are used everywhere from the home screen and notification panels to the App Store listing itself. An app icon generator can be a massive time-saver here.
- Splash Screens: This is the screen that pops up for a moment while your app loads. A well-designed splash screen makes the transition into the app feel seamless and reinforces your branding.
- Version Management: Pop open your
next-native.config.jsfile. This is where you'll manage your app's version (versionCodefor Android,buildNumberfor iOS). Incrementing this with every single release is mandatory for pushing updates.
Trust me, these small details have a huge impact on how people perceive your app's quality.
Generating Your Production Builds#
With your assets and configurations ready, it's time to create the actual files you'll upload. The process is a bit different for Android and iOS.
For Android, you'll generate a signed APK or an Android App Bundle (AAB). The AAB is the modern standard and is what Google Play prefers, as it helps optimize the app size for different devices. This involves creating a signing key, which is basically a digital signature that proves you're the authentic developer.
For iOS, the journey takes you through Xcode, where you'll create an "Archive" build. This packages up your app and all its assets into a format that App Store Connect can accept. You'll need an active Apple Developer account and will have to navigate the world of provisioning profiles and certificates to get it done. This is often where developers hit their first major roadblock.
One of the most common snags I see is a code signing error. This almost always means there's a mismatch between your developer certificate and the provisioning profile. Your first move should be to double-check that everything is correctly configured in Xcode.
Navigating the App Store Review#
Once your build is uploaded, it officially enters the review process. This is where following the rules is absolutely critical. Each store has its own set of guidelines covering everything from user privacy to UI design.
To save yourself a headache, check out our detailed breakdown of the app store review guidelines to steer clear of common rejection reasons.
This ecosystem is thriving because of its cross-platform efficiency. In 2025, over 25,000 companies have adopted React Native, with projects sharing 70–85% of their code between iOS and Android, which drastically cuts down on development work. Successfully navigating this final deployment stage is your ticket into this massive, growing market.
Common Questions About NextNative Development#
When you're first getting your hands dirty with a framework like NextNative, a few questions always seem to pop up. Let's tackle them head-on, so you can spend less time wondering and more time building.
How Much Code Can I Actually Share?#
This is probably the first thing everyone asks. From my experience, you can realistically share somewhere between 70-90% of your codebase between your web and mobile apps. It’s a huge win for productivity.
This shared code typically includes your core business logic, state management (whether you’re using Redux, Zustand, or something else), API calls, and any helper functions. The parts that stay platform-specific are usually the UI components that need that distinct native look and feel, top-level navigation, and certain device integrations like push notifications or camera access.
Is Performance a Real Concern?#
Another big one. We've all seen slow, clunky cross-platform apps from years ago. The good news is that modern frameworks built on React Native have come a long way. They render your UI components directly to native platform views, which completely sidesteps the performance traps of older, web-based tools.
For most apps, the performance is so good it feels indistinguishable from a fully native one. If you're building something with seriously intense animations or heavy data processing, you can always optimize those specific parts or even offload them to native modules.
What's the Biggest Hurdle for New Developers?#
Honestly? The initial environment setup is almost always the toughest part for newcomers. It's a one-time pain, but it can be a real headache.
Once you get past that first setup, the actual development workflow is incredibly smooth. Things like live reloading make building React JS mobile apps a breeze, letting you see your changes instantly without a full recompile. Here are the usual suspects that trip people up:
- Configuring Xcode and Android Studio: Getting the SDKs, command-line tools, and emulators all playing nicely can feel like a chore.
- Environment Variables: One wrong path for something like
ANDROID_HOMEcan lead to some seriously cryptic build failures. - Dependency Management: Making sure all your native dependencies are linked up correctly takes a bit of care.
But once you're over that hump, you're off to the races.
Ready to build your first native app without that steep learning curve? NextNative gives you production-ready templates and a unified workflow to get you started in minutes. Start building your app today!